User Guide DVD Recorder/VCR NS-DRVCR
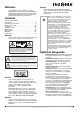
Welcome Caution: Congratulations on your purchase of this high-quality Insignia product. Your NS-DRVCR DVD Recorder/VCR represents the state of the art in DVD/VCR recorders and is designed for reliable and trouble-free performance. Contents Class 2M visible and invisible laser radiation when open and interlocks defeated. Do not stare into the beam or view directly with optical instruments. Caution Important Safeguards . . . . . . . . . . . . . . . . . . . . . . . .1 Introduction. . . . . . . . . . . .
NS-DRVCR DVD Recorder/VCR • • • • • • 2 Accessories–Do not place your recorder on an unstable cart, stand, tripod, bracket, or table. Your recorder may fall, causing serious injury to someone and serious damage to your recorder. Use only with a cart, stand, tripod, bracket, or table recommended by the manufacturer, or sold with your recorder. If you mount your recorder, follow the manufacturer's instructions and use a mounting accessory recommended by the manufacturer.
NS-DRVCR DVD Recorder/VCR • • • • If your recorder does not operate normally by following the operating instructions. Adjust only those controls that are covered by the operating instructions, because incorrect adjustment of other controls may result in damage and often requires extensive work by a qualified technician to restore your recorder to its normal operation. • If your recorder has been dropped or damaged in any way.
NS-DRVCR DVD Recorder/VCR Disc Characteristics Note • Depending on the conditions of the recording equipment or the CD-R/RW (or DVD±R/RW) disc itself, some CD-R/RW (or DVD±R/RW) discs cannot be played on the recorder. • Do not attach any seal or label to either side (the labeled side or the recorded side) of a disc. • Do not use irregularly shaped CDs (for example, heart-shaped or octagonal). Doing so may result in malfunctions.
NS-DRVCR DVD Recorder/VCR CPRM copy protection CPRM is a copy protection system (with scramble system) only allowing the recording of ‘copy once’ broadcast programs. CPRM stands for Content Protection for Recordable Media. Your recorder is CPRM compatible, which means that you can record copy-once broadcast programs, but you cannot then make a copy of those recordings.
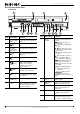
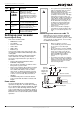
NS-DRVCR DVD Recorder/VCR Controls and connections Front panel 1 8 6 5 7 4 3 2 13 9 10 12 11 14 15 16 17 Item Description Function 11 Display window Shows the current status of the recorder. Item Description Function 1 Disc tray (DVD deck) Place a disc on the tray when it opens. 2 DVD button Press to open or close the disc tray. 3 Cassette compartment (VCR deck) Insert the video cassette here. lights when the recorder is in play mode or flashes when in search mode.
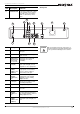
NS-DRVCR DVD Recorder/VCR Back panel Item Description Function 17 VIDEO/AUDIO Connect the audio/video output of an external source (such as an audio system, TV, monitor, VCR, or camcorder) to these jacks. 3 1 2 9 4 5 10 11 Caution Item Description Function 1 ANT. IN Connect the antenna cable to this jack. 2 S-VIDEO OUT Connect to the S-Video input jack on a TV. 3 COMPONENT/ PROGRESSIVE SCAN VIDEO OUT (Y Pb Pr) Connect to the component input jacks on a TV (if available).
NS-DRVCR DVD Recorder/VCR Remote control Item 2 12 3 1 35 Button RETURN Function Press to close the on-screen display and return to normal viewing. 13 CHP. ADD Press to insert a chapter marker when playing or recording a DVD. 14 ZOOM Press to enlarge the DVD image to 2, 3, or 4 times the original size. 15 THUMBNAIL Press to select a thumbnail picture for the current title in the Title List menu. 16 TITLE Press to display the title menu of the DVD, if available.
NS-DRVCR DVD Recorder/VCR Item Button 32 BACKWARD and FORWARD Function Warning DVD - Press to search backward or forward. VCR - Press to search a tape on fast backward or forward. In STOP mode, press to rewind or advance the tape (picture not visible). 33 I.SKIP (instant skip) Press to skip ahead 30 seconds during DVD playback. 34 0 - 9 number buttons Press to select numbered options in a menu or to enter a channel number directly. 35 DVD Press to change the recorder’s function mode to DVD.
NS-DRVCR DVD Recorder/VCR To connect the recorder to an antenna: • Disconnect the antenna from the back of the TV and identify the antenna cable. If your antenna cable is a round 75 ohm coaxial cable, connect it directly to the jack marked ANT. IN on your recorder. - OR If your antenna cable is flat, connect it to a 300-ohm to 75-ohm antenna adapter (not supplied) and slip the adapter over the ANT. IN jack. Do not try to screw it into to the recorder.
NS-DRVCR DVD Recorder/VCR Connecting to an amplifier Note Digital coaxial cable Audio cable • Due to the DTS Licensing agreement, the digital output will be in DTS digital out when DTS audio stream is selected. • If the audio format of the digital output does not match the capabilities of your receiver, the receiver will produce a strong, distorted sound or no sound at all. • To play six-channel digital surround sound though a digital connection, your receiver must have a Digital Multi-channel decoder.
NS-DRVCR DVD Recorder/VCR Connecting a digital camcorder 3 Close the battery holder. DV digital camcorder Caution Front of recorder • Use only the size and type of batteries specified. • Make sure that you follow the correct polarity as indicated in the battery compartment. Reversed batteries may damage the device. • Do not mix different types of batteries together (for example, Alkaline and Carbon-Zinc) or old batteries with new ones.
NS-DRVCR DVD Recorder/VCR 4 Select Auto or Manual to set the clock, then press ENTER. Auto • Press / to choose your Time Zone. • Press to choose the Daylight Savings option. Press / to choose Auto, ON, or OFF. • Press ENTER to confirm your setting. Manual • Enter the necessary information for year, date, and time. / (left/right): Moves the cursor to the previous or next column. / (up/down): Changes the setting at the current cursor position. • Press ENTER to confirm your setting.
NS-DRVCR DVD Recorder/VCR Buttons PAUSE ( ) Operations Discs Buttons Operations Discs Press to pause playback. All PLAY MODE Press during playback to select the play mode you want. A-—Repeats a sequence between A (start point) and B (end point) during playback. Press ENTER at the selected end point, then the repeat sequence begins. DVD ALL Press repeatedly to play frame-by-frame. Note: You can also use the / buttons to step backward or forward while in PAUSE mode.
NS-DRVCR DVD Recorder/VCR Buttons Operations AUDIO Press AUDIO then press the / buttons repeatedly repeatedly to hear a different audio language or audio track. Note: Some discs feature both Dolby Digital and DTS soundtracks. There is no analog audio output when DTS is selected. To listen to the DTS soundtrack, connect your recorder to a DTS decoder through one of the digital outputs.
NS-DRVCR DVD Recorder/VCR Menu Available settings Menu Available settings Language Settings Display Menu–You can select a language for the setup menu and information display. Disc Menu–You can select a language for the DVD menu. Disc Audio–You can select a language for the DVD audio. Disc Subtitle–You can select a language for the DVD subtitle.
NS-DRVCR DVD Recorder/VCR Displaying disc information on screen You can display various information about the disc or tape loaded on screen. Some items can be changed using the menu. To display disc information on screen: 1 Press DISPLAY once to show current status. Example: DVD-RW in VR mode 2 Press DISPLAY again to show playback information. The items displayed differ depending on the disc type or playing status. 3 Select an item by pressing / and change or select the setting by pressing / .
NS-DRVCR DVD Recorder/VCR Last scene memory DVD Your recorder memorizes last scene from the last disc that is viewed. The last scene remains in memory even if you remove the disc from the recorder or switch off the recorder. If you load a disc that has the scene memorized, the scene is automatically recalled. Note • Settings are stored in memory for use at any time. • Your recorder does not memorize settings of a disc if you switch off the recorder before you play it.
NS-DRVCR DVD Recorder/VCR To play an audio CD or MP3/WMA files: 1 Press HOME. The Home menu opens. 2 Select Music, DISC, then press ENTER. The Audio CD or Music menu opens. 3 Press / to select a track or file, then press PLAY ( ). Playback starts. You can use variable playback functions as described in “Special playback options” on page 17. 4 To stop playback at any time, press STOP ( ). Tip • You can view the TV channel or video input source by pressing RETURN ( ).
NS-DRVCR DVD Recorder/VCR Photo menu options To select the photo menu options: 1 Press / / to select a file, then press ENTER. The menu options appear. 2 Press / to select an option, then press ENTER to confirm your selection. • Open—Opens the folder, and a list of files in the folder appears. • Full Screen—Shows the selected file as full screen. • Slide Show—Opens the Slide Show menu. Still picture Press PAUSE/STEP ( ) while showing a picture to pause the slideshow.
NS-DRVCR DVD Recorder/VCR Recording from a TV Follow these instructions to record a TV program. Recording starts immediately and continues until the disc or tape is full or you stop the recording. To record from a TV: 1 Turn on the recorder, select the recording device (VCR or DVD) for recording, then load a recordable disc or tape. Also make sure that the TV signal input is set to your recorder. 2 Set the recording mode, as necessary, by pressing REC MODE repeatedly.
NS-DRVCR DVD Recorder/VCR 3 Select NEW, then press ENTER. The Timer Record menu opens. To check timer recording details: 1 Press HOME. The Home menu opens. 2 Select TV, Timer Record, then press ENTER. 3 Press / to select a program. 4 Press ENTER to edit the selected program. The Timer Record menu opens. Canceling a timer recording You can clear a timer setting anytime before the recording actually starts. 4 Enter the necessary information for your timer recording(s).
NS-DRVCR DVD Recorder/VCR To dub from DVD to VCR: 1 Insert a blank VHS videotape into the VCR deck. 2 Insert the disc you want to copy in the DVD deck and close the disc tray. 3 Find the place on the DVD (or disc) from which you want to start dubbing using PLAY, FF, REW, and PAUSE. For best results, pause playback at the point from which you want to start recording. 4 Press the DUBBING button. The Dubbing menu opens. 5 Press / / to select the record mode you want: SP or SLP (3 times SP).
NS-DRVCR DVD Recorder/VCR Recording from DV Input Before DV dubbing You can connect a DV-equipped camcorder to your recorder using a single DV cable for input and output of audio, video, data, and control signals. • Your recorder is only compatible with DV-format (DVC-SD, DV25) camcorders. Digital satellite tuners and Digital VHS video recorders are not compatible. • You cannot connect more than one DV camcorder at a time to your recorder.
NS-DRVCR DVD Recorder/VCR To use the Title List menu: 1 If the DVD is playing, press STOP ( ). 2 Press DISC MENU/LIST to open the TITLE LIST menu. Playback should be stopped when you do this. • When selecting titles, press the / buttons to display the previous/next page if there are more than six titles. • If you are editing a VR mode disc, press DISC MENU/LIST to switch between Original and Playlist menus. • On the left side of the screen are the menu options.
NS-DRVCR DVD Recorder/VCR Changing title thumbnails VR Mode: Original and playlist editing Titles, chapters, and parts Titles in the disc’s original content contain one or more chapters. When you insert a disc’s title into the playlist, all the chapters within that title also appear. In other words, chapters in the playlist behave exactly as chapters on a DVD-Video disc do. Parts are sections of original or playlist titles. From the Original and Playlist menu you can add or delete parts.
NS-DRVCR DVD Recorder/VCR Deleting an original or playlist title or chapter When you erase a title or chapter from the Playlist menu, you only remove it from the playlist. The title or chapter remains in the original menu. If you choose to delete a title or chapter from the original (title or chapter) menu, the title or chapter is actually deleted from the disc and the remaining time available for recording increases. Titles or chapters deleted from the original are also removed from the playlist.
NS-DRVCR DVD Recorder/VCR Time searching You can select the start point of the title. 3 Press ENTER to confirm. The chapter’s or title’s thumbnail will dim. To select the starting point of the title: 1 Press / / to choose a title on the TITLE LIST menu, then press ENTER. The options appear on the left side of the menu. 2 Select Search, Time, then press ENTER. The Time menu opens.
NS-DRVCR DVD Recorder/VCR Viewing the Title List menu displayed on other DVD Note You cannot select a dividing point less than 3 seconds from the end of the program. +RW +R Use this function to combine two adjacent chapters into one. To combine two chapters into one: 1 On the Chapter List menu, select the second chapter of the two chapters you want to combine, then press ENTER. The menu options appear on the left side of the screen. 2 Press / to select Combine from the options.
NS-DRVCR DVD Recorder/VCR Reference Controlling your TV with the supplied universal remote control You can control the sound level, input source, and power switch of your LG TV with the supplied universal remote control. You can control your TV using the following buttons. Press To... POWER Turn the TV on or off INPUT Switch the TV’s input source between the TV and other input sources.
NS-DRVCR DVD Recorder/VCR Language code list Use this list to input your desired language for the following initial settings: Disc Audio, Disc Subtitle, Disc Menu.
NS-DRVCR DVD Recorder/VCR Area Code Area Code Islands HM Sri Lanka LK Hong Kong HK Sweden SE Hungary HU Switzerland CH India IN Taiwan TW Indonesia ID Thailand TH Israel IL Turkey TR Italy IT Uganda UG Jamaica JM Ukraine UA Japan JP United States US Kenya KE Uruguay UY Kuwait KW Uzbekistan UZ Libya LY Vietnam VN Luxembourg LU Zimbabwe ZW Troubleshooting Use the following check list for troubleshooting when you have problems with your recorder.
NS-DRVCR DVD Recorder/VCR The recorder clock is not set to the correct time Set the clock to the correct time The timer has been programmed incorrectly Reprogram the Timer The TIMER Record indicator light does not appear after programming the timer Reprogram the Timer and turn off the recorder to enable the timer Picture or sound of a channel is weak or missing Antenna or cables are loose Tighten connections or replace the cable Wrong tuning band is selected in the Recorder Setup menu.
NS-DRVCR DVD Recorder/VCR Specifications DVD specifications Laser system General Power requirements Power consumption Dimensions (approx.) (w × h × d) Mass (approx.) Operating temperature Operating humidity Signal system AC 120V, 60 Hz 27W 16.9 × 3.1 × 13.9 in. (430 × 78.5 × 354 mm) 14.96 lbs (6.8 kg) 41°F to 95°F (5°C to 35°C) 5% to 90% NTSC Recording Recording format Recordable discs Recordable time DVD (Approx.
NS-DRVCR DVD Recorder/VCR Limited warranty Legal notices Insignia Products warrants to you, the original purchaser of this Product, that this product shall be free of defects in material or workmanship for a period of three hundred sixty five (365) days from the date of purchase as follows: 1 LABOR: During the Warranty Period if this Product is determined to be defective, Insignia will repair or replace the Product, at its option at no charge, or pay the labor charges to any Insignia authorized service f
NS-DRVCR DVD Recorder/VCR 36 www.insignia-products.
Distributed by Insignia™ Products 7601 Penn Avenue South, Richfield, MN USA 55423-3645 www.Insignia-Products.com © 2006 Insignia™ Products All rights reserved. All other products and brand names aretrademarks of their respective owners.