
User Instructions


15
The end-of-warranty signal can be silenced for 48 hours by pressing the "ENTER/TEST" button or by temporarily dropping power to the
unit. The end-of-warranty signal provides the user an opportunity to test and/or calibrate the sensor assuring that it is still performing
within acceptable parameters though the sensor is nearing the end of its 2-3 year expected life. The silence function will continue to be
available for 29 days after the TX-6-AM initiates the initial end-of-warranty signal. After this 29 day period the TX-6-AM can no longer be
silenced and the sensor must be replaced or the sensor life reset.
Sensor Replacement
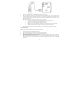
1. Remove power to the unit
2. Remove the Philips screw on the front of the TX-6-AM. Pull the front cover of the unit off.
3. Remove the sensor by pulling it gently from the three pronged socket.
4. Remove the Shorting Spring from the new sensor if installed and insert the new sensor into the socket.
5. Power up the unit. The TX-6-AM steps through an internal self-test cycle for the first 1 minute that it is powered. During the self-test
cycle the unit will display the Firmware Version number, then count down from 60 to 0 and finally go into normal operation. The
indicator light (LED) will flash green during the self-test cycle. At the end of the 1 minute cycle, the unit will take its first sample of
the air and the indicator light will turn solid green.
6. Let the new sensor stabilize for at least 5 minutes then refer to the FIELD CALIBRATION PROCEDURE section to zero and
calibrate the unit.
7. After the successful calibration is complete, reset the sensor life.
Sensor Life Reset
1. Remove the Philips screw on the front of the TX-6-AM. Pull the front cover of the unit off.
2. To reset the sensor life (rSt), from normal or warm-up mode, press the Next button four times to get to SEn or Sensor Mode.
3. Then press the Enter button to get to “rSt” - Reset Sensor Mode.
4. Press the Enter button again to see the sensor reset status. If the sensor life has already been reset, done “don” will be displayed.
If it has not already been reset, “no” will be displayed. Push Next to change it to “yES” (flashing) then push Enter to confirm the
change (solid) and push Enter again to return to “rSt” in the SEn menu. Push Next until “End” is displayed then push Enter to get
back to normal operation.
NOTE: If the sensor is reset and not replaced it is necessary to test and/or calibrate the sensor to assure that it is still performing within
acceptable specifications though the sensor is nearing the end of its 2-3 year expected life. There will be no other indication of sensor
performance.
! WARNING