Smart Wireless Access Point 802.11b User’s Guide Version: 2.
Federal Communication Commission Interference Statement This equipment has been tested and found to comply with the limits for a Class B digital device, pursuant to Part 15 of the FCC Rules. These limits are designed to provide reasonable protection against harmful interference in a residential installation. This equipment generates, uses and can radiated radio frequency energy and, if not installed and used in accordance with the instructions, may cause harmful interference to radio communications.
Safety This equipment is designed with the utmost care for the safety of those who install and use it. However, special attention must be paid to the dangers of electric shock and static electricity when working with electrical equipment. All guidelines of this and of the computer manufacture must therefore be allowed at all times to ensure the safe use of the equipment.
Mounting instruction 1. Stick the accessorial sticker for wall-mounting on the wall. 2. Use a φ6.5mm driller to drill a 25mm-deep hole at each of the cross marks. 3. Plug in an accessorial plastic conical anchor in each hole. 4. Screw an accessorial screw in each plastic conical anchor for a proper depth so that the wireless AP can be hung on the screws. 5. Hang the wireless AP on the screws. 6.5mm 55mm iii ST 3.
Power Selection. The AP can be powered by the supplied power adapter or POE (Power over Ethernet). The AP automatically selects the suitable one depending on the user's decision. To power the AP by the supplied power adapter: 1. Plug the power adapter to an AC socket. 2. Plug the connector of the power adapter to the power jack of the AP.
Table of Contents 1. Introduction....................................................................................................................... 1 1.1. Overview................................................................................................................. 1 1.2. Features ................................................................................................................. 1 2. First-Time Installation and Configuration......................................................
1. Introduction 1.1. Overview The wireless access point (AP) enables IEEE 802.11b client computers to access the resources on the Ethernet network. The Pro and Advanced models are bundled with the Windows-based management software— Wireless Network Manager— for multiple AP management. The Advanced model supports IEEE 802.
protocol is HTTP (HeperText Transfer Protocol)-based. n UPnP. The AP responds to UPnP discovery messages so that a Windows XP user can locate the AP in the Network Neighborhood and use a Web browser to configure it. n SNMP. SNMP (Simple Network Management Protocol) MIB I, MIB II, IEEE 802.1d, IEEE 802.1x (Advanced model), and InterEpoch Enterprise MIB are supported. l Power over Ethernet (optional). Supplying power to an AP over an Ethernet cable (IEEE 802.3af compliant).
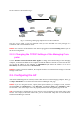
has two choices as illustrated in Fig. 1. Cross-over Ethernet cable Normal Ethernet cable Managing Computer Normal Ethernet cable Ethernet Hub/Switch Managed AP Fig. 1. Connecting a managing computer and an AP via Ethernet. The user can use either a cross-over Ethernet cable (we have included one in the package) or a switch/hub with 2 normal Ethernet cables. NOTE: One connector of the Ethernet cable must be plugged into the LAN/Config Ethernet jack of the AP for configuration. 2.2.2.
2.3.1. Entering the User Name and Password Before the start page is shown, you will be prompted to enter the user name and password to gain the right to access the Web-based Network Manager. For first-time configuration, use the default user name “root” and default password “root”, respectively. Fig. 2. Entering the user name and password. NOTE: It is strongly recommended that the password be changed to other value for security reasons. On the start page, click the General\Password link to change the value
Fig. 3. The Start page. 2.3.2. Step 1: Configure TCP/IP Settings Fig. 4. TCP/IP settings. Go to the TCP/IP, Addressing section to configure IP address settings. The IP address can be manually set or automatically assigned by a DHCP server on the LAN. If you are manually setting the IP Address, Subnet Mask, and Default Gateway settings, set them appropriately, so that they comply with your LAN environment. In addition, you can specify the Host Name and Domain (DNS suffix) of the AP.
2.3.3. Step 2: Configure IEEE 802.11 Settings Fig. 5. IEEE 802.11b communication settings. Go to the IEEE 802.11, Communication section to configure IEEE 802.11b-related communication settings, including Regulatory Domain, Channel Number, and Network Name (SSID). The number of available RF channels depends on local regulations; therefore you have to choose an appropriate regulatory domain to comply with local regulations.
On the start page, you can review all the settings you have made. Changes are highlighted in red. If they are OK, click Restart to restart the AP for the new settings to take effect. NOTE: About 7 seconds are needed for the AP to complete its restart process. 2.4. Deploying the AP After the settings have been configured, deploy the AP to the field application environment. Connect Ethernet client computers to the Ethernet switch ports of the AP. 2.5. Setting up Client Computers The TCP/IP and IEEE 802.
2.6. Confirming the Settings of the AP and Client Computers After you have completed deploying the AP and setting up client computers, you have to make sure the settings you have made are correct. 2.6.1. Checking if the IEEE 802.11b-Related Settings Work To check if a wireless client computer can link to the AP: 1. Launch the configuration/monitoring utility provided by the vendor of the installed WLAN NIC. 2. Check if the client computer is associated to an access point, and the access point is the AP.
3.1. Overview Fig. 7. The Start page. The left side of the start page contains a menu for the user to carry out commands. Here is a brief description of the hyperlinks in the menu: l Home. For going back to the start page. l General. Global operations. l n Password. For gaining right to change the settings of the AP. n Firmware Upgrade. For upgrading the firmware of the AP. TCP/IP. TCP/IP-related settings. n l Addressing. IP addressing settings for the AP to work in the TCP/IP networking world.
n l IEEE 802.1x/RADIUS (Advanced model). IEEE 802.1x Port-Based Network Access Control and RADIUS (Remote Authentication Dial-In User Service) settings for better wireless security. Advanced. Advanced settings of the AP. n Management. UPnP and SNMP settings. Fig. 8. Save, Save & Restart, and Cancel. At the bottom of each page, there are up to three buttons— Save, Save & Restart, and Cancel. Clicking Save stores the settings changes to the memory of the AP and brings the user back to the start page.
3.2. General Operations 3.2.1. Changing Password Fig. 10. Password. On this page, the user could change the password for the right to modify the configuration of the AP. The new password must be typed twice for confirmation. 3.2.2. Upgrading Firmware Fig. 11. Firmware Upgrade. The AP can be triggered to download updated firmware from a specified TFTP server. On this page, the user specifies the IP address of the intended TFTP server, and then triggers the AP to begin downloading.
Fig. 12. TFTP Server. TIP: It's more convenient to use the Firmware Upgrade Wizard of Wireless Network Manager to upgrade the firmware of an AP. NOTE: After the dialog box of the TFTP server program appears, be sure to specify the working folder within which the downloaded firmware files reside. NOTE: The LAN IP address of the AP and the IP address of the TFTP server must be in the same IP subnet for TFTP to work.
3.3. Configuring TCP/IP Related Settings 3.3.1. Addressing Fig. 13. TCP/IP settings. The IP address of the AP can be manually set or automatically assigned by a DHCP server on the LAN. If you are manually setting the IP Address, Subnet Mask, and Default Gateway settings, set them appropriately, so that they comply with your LAN environment. In addition, you can specify the Host Name and Domain (DNS suffix) of the AP. 3.4. Configuring IEEE 802.11b-Related Settings 3.4.1. Communication IEEE 802.
3.4.2. Security Fig. 15. IEEE 802.11b communication settings. IEEE 802.11b security settings include SSID Broadcasts, Security Mode, WEP Keys, MAC-AddressBased Access Control. For security reasons, it’s highly recommended that the security mode be set to options other than Open System. When the security mode is set to Open System, no authentication and data encryption will be performed.
l 802.1x EAP-TLS; no encryption. The IEEE 802.1x functionality is enabled and the digital certificate-based EAP-TLS user authentication. No data encryption is used. l 802.1x EAP-TLS + 64-bit key. The IEEE 802.1x functionality is enabled and the digital certificate-based EAP-TLS (Transport Layer Security) user authentication and data encryption is used. Session keys are 64-bit. l 802.1x EAP-TLS + 128-bit key. The IEEE 802.
puter hard disk or a smart card for authentication. And after a successful EAP-TLS authentication, a session key is automatically generated for wireless packets encryption between the wireless client computer and its associated wireless access point. To sum up, EAP-MD5 supports only user authentication, while EAP-TLS supports user authentication as well as dynamic encryption key distribution. Fig. 16. IEEE 802.1x and RADIUS. An advanced wireless access point supporting IEEE 802.
3.5. Configuring Advanced Settings 3.5.1. Management 3.5.1.1. SNMP Fig. 18. SNMP settings. The SNMP (Simple Network Management Protocol) functionality can be disabled, and the user can specify the name (used as a password) of the read-only and read-write community. In addition, up to 5 SNMP trap targets can be set in the SNMP Trap table. 3.5.1.2. UPnP Fig. 19. UPnP settings. UPnP (Universal Plug and Play) enables a Windows XP user to automatically discover peripheral devices by HTTP.
Appendix A A-1: Default Settings TIP: Press the Default (SF-Reset, or Soft-Reset) switch on the housing of a powered-on AP to reset the configuration settings to factory-set values. Setting Name Global User Name Password IEEE 802.11b Regulatory Domain Channel Number SSID SSID Broadcasts Transmission Rate Transmission Power MAC Address Default Value root root FCC (U.S.) 11 wireless Enabled 11Mbps High See the label on the accompanying PCMCIA card or the label on the housing of the AP.
Appendix B: Troubleshooting Check the following first: l Make sure that the power of the AP is on and the Ethernet cables are connected firmly to the RJ45 jacks of the AP. l Make sure that the LED ALV of the AP is blinking to indicate the AP is working. l Make sure the types of the Ethernet cables are correct. Recall that there are two types— normal and crossover. B-1: Wireless Settings Problems l The wireless client computer cannot link to an access point.
B-2: TCP/IP Settings Problems Correspondent Host IEEE 802.11b Internet Ethernet LAN Stage A Client Computer Stage D State B AP Default Gateway of Client Computer DNS Server of Client Computer Fig. 20. Communication stages for a client to reach its correspondent host. For a wireless client computer to communicate with a correspondent host on the Internet by the host’s domain name (e.g. http://www.wi-fi.com), it first sends a DNS request to a DNS server on the Internet.
n l l u Make sure the Ethernet link is OK. u Make sure the wireless settings of the wireless client computer and of the AP match. Are the IP address of the client computer and the IP address of the AP in the same IP subnet? u Use WinIPCfg.exe or IPConfig.exe to see the current IP address of the client computer. Make sure the IP address of the client computer and the IP address of the AP are in the same IP subnet.
Fig. 21. Wireless Router/AP Browser. l The AP stops working and does not respond to Web management requests. n n The firmware of the AP may be stuck in an incorrect state. u Unplug the power connector from the power jack, and then re-plug the connector to restart the AP. u Contact our technical support representatives to report this problem, so that the bugs can be static in future firmware versions. If the AP still does not work after restarting, there may be hardware component failures in the AP.