
User's Manual


3
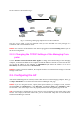
has two choices as illustrated in Fig. 1.
Managing
Computer
Normal
Ethernet
cable
Managed
AP
Normal
Ethernet
cable
Ethernet
Hub/Switch
Cross-over
Ethernet
cable
Fig. 1. Connecting a managing computer and an AP via Ethernet.
The user can use either a cross-over Ethernet cable (we have included one in the package) or a
switch/hub with 2 normal Ethernet cables.
NOTE: One connector of the Ethernet cable must be plugged into the LAN/Config Ethernet jack of
the AP for configuration.
2.2.2. Changing the TCP/IP Settings of the Managing Com-
puter
Use the Windows Network Control Panel Applet to change the TCP/IP settings of the managing
computer, so that the IP address of the computer and the IP address of the AP are in the same IP sub-
net. Set the IP address of the computer to 192.168.0.xxx (the default IP address of an AP is
192.168.0.1) and the subnet mask to 255.255.255.0.
NOTE: For some versions of Windows, the computer needs to be restarted for the changes of TCP/IP
settings to take effect.
2.3. Configuring the AP
After the IP addressing issue is resolved, launch a Web browser on the managing computer. Then, go
to “http://192.168.0.1” to access the Web-based Network Manager start page.
NOTE: If you are using the browser, Opera (from Opera Software), to configure an AP, click the
menu item File, click Preferences..., click File types, and edit the MIME type, text/html, to add a
file extension ".sht" so that Opera can work properly with the Web management pages of the AP.
TIP: For maintenance configuration of an AP, the AP can be reached by its host name using a Web
browser. For example, if the AP is named “AP”, you can use the URL “http://AP” to access the Web-
based Network Manager of the AP.