Vehicle Navigation System Installation & Reference Addendum Vehicle Navigation Made Portable
TABLE OF C ONTENTS The Magellan 750M ™ Vehicle Navigation Made Portable™ Precautions . . . . . . . . . . . . . . . . . . . . . . . . . . . . . . . . . . . . . 2 Important Information: Please Read This First! DO . . . . . . . . . . . . . . . . . . . . . . . . . . . . . . . . . . . . . . . . . . . DO NOT . . . . . . . . . . . . . . . . . . . . . . . . . . . . . . . . . . . . . . . Battery Precautions . . . . . . . . . . . . . . . . . . . . . . . . . . . . . . . Components . . . . . . . . . . . . . . . .
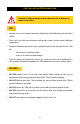
PREC AUTIONS This symbol is intended to alert the user to the presence of important operating instructions. Failure to heed the instructions can result in injury or material damage. ! This symbol indicates information which can be helpful in the use of the 750 M Navigation System. TIP Important Information: Please Read This First! To reduce the risk of personal injury, please follow these important Dos and Do Nots.… DO… ! • Secure the Display to ashtray, glove box or other suitable location.
BATTERY PRECAUTIONS DO… ! • Only charge the Battery using the Battery Charger supplied to avoid damage. ! • The Battery contains diluted sulfuric acid, a very toxic substance. If sulfuric acid contacts skin or clothing, immediately wash with plenty of clean water. If the acid splashes into eyes, immediately flush with plenty of clean water and consult a physician. Sulfuric acid in the eyes may cause a loss of eyesight and acid on the skin will cause burns.
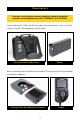
C OMPONENTS If any part is missing, please contact a Magellan retailer or Magellan’s customer service department at 1-877-4-CARNAV (1-877-422-7628). Upon purchasing the 750M verify that the product box contains both a Carry Case (which contains all of the 750M components) and the Battery.
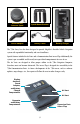
Antenna and Antenna Spool Quick Mount Bracket Power Adapter Battery Cable Battery Charger The 750M Carry Case has been designed to provide Magellan’s Portable Vehicle Navigation system with expandable functionality and user friendliness. Special features include the Air Vents and a Communication Port Access Flap. Additionally, the system is pre-assembled and fits neatly into specialized compartments for ease of use.
I NSTALLATION P REPARATION To optimize 750M operation and to reduce the risk of damage to vehicle or the 750M … ! DO… • Position Carry Case to eliminate movement while driving with handle facing toward front of vehicle. • Place Carry Case in the same orientation each time the system is used to reduce calibration requirements. • Complete calibration steps when system is powered up for the first time and after the 750M has: - been moved to a different vehicle; - or has its in-vehicle location changed.
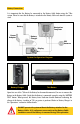
Component Placement The 750M vehicle navigation system components are pre-assembled in the Carry Case as shown in the picture below with the exception of the Battery.
Battery Connection It is important that the Battery be connected to the Battery Cable before using the 750M system. Please be sure that the Battery is attached to the Battery Cable each time the system is used. Battery Navigation Computer Power Adapter Battery Charger GPS Antenna Display System Configuration Diagram Test Button Battery Charger Upon first use of the 750M or if the Battery has become disconnected, be sure to connect the Battery to the Battery Cable.
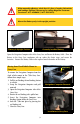
! ! When unpacking Battery, check that it is free of cracks, deformities and leakage. Replace if necessary by calling Magellan Customer Service at 1-877-4CARNAV (1-877-422-7628). Mount the Battery only in the upright position. Battery in Upright Position Correctly Installed Battery Open the Navigation Computer side of the Carry Case and locate the Battery Cable . Place the Battery in the Carry Case, conductor side up, under the elastic strap, and secure the fasteners.
I NSTALLATION Step 1: Place Carry Case in Vehicle While the preferred placement of the Carry Case depends on the vehicle being driven, ALWAYS place case: • On a vehicle floor or seat that allows easy driver accessibility and optimal passenger comfort; • With its Air Vent side up and with its handle facing the front of the vehicle; • In the SAME orientation each time the system is used; • In a location where movement will be eliminated while driving; • In a location that minimizes stress on cables.
TIP When the Power Adapter is connected to the vehicle accessory power port, and the Battery Charger switch is in the ‘AUTO’ position, the 750M will automatically power up when vehicle is started and will automatically shutdown when vehicle is turned off. Step 3: Antenna Setup The GPS Antenna is located inside the Display compartment of the Carry Case. a) Unwind GPS Antenna Wire from the Antenna Storage Spool. b) Place the GPS Antenna on the vehicle roof.
! When mounting the Display take care to ensure that it is clear of vehicle operation, airbags and function controls. ! Avoid excessive force in operation! Damage may result if excessive force or leverage is applied. ! Take care when removing or replacing the Quick Mount Bracket and be aware that heavy accidental impacts may result in damage. ! ! ! Do not mount display in a place or manner where driver or passengers are likely to have an impact with the display in a collision or during heavy braking.
I NITIALIZATION Initialization must be conducted prior to the first use of the 750M or when the Navigation Computer has been moved from a fixed vehicle installation in order to achieve maximum performance. Before using the 750M for the first time conduct Steps 1 through 15. Step 1: Move the vehicle to an open area away from buildings, trees, and other obstructions. The vehicle must remain in an open area throughout the entire GPS initialization process. Step 2: Ensure the 750M is powered on.
Step 8: Scroll to ‘Vehicle-Select’, press ENTER. Step 9: Scroll to ‘System’ and choose ‘750M’ by pressing ENTER. Step 10: Scroll to ‘Save’, press ENTER. Then press CANCEL. Step 11: Scroll to the ‘Diagnostics’ icon, press ENTER. Step 12: Scroll to ‘GPS Status’, press ENTER. Step 13: When information is displayed showing at least four (4) GPS satellites being used (indicated by a U in the U/N column), press ENTER to verify a position calculation.
Step 14: Check the latitude and longitude information and ensure that the data reads anything other than zeroes. If the system does not show GPS satellite data or a vehicle position is not generated in several minutes, go to the ‘Troubleshooting’ section, otherwise, GPS initialization is complete. Step 15: Press the CANCEL key three (3) times to return to ‘Select Destination’ (Main Menu) screen.
Step 2: If the 750M is not on, verify that the slide switch on the Battery Charger is in the ‘AUTO’ position then press POWER and allow the system to power up. Step 3: Select desired user and press ENTER to arrive at ‘Select Destination’ screen (Main Menu). Step 4: Press OPTION to arrive at ‘User Options’ screen. Step 5: Select the ‘Diagnostics’ icon, press ENTER. Step 6: Scroll to ‘Sensor Status’, press ENTER.
Step 13: Press CANCEL three (3) times to get to ‘Select Destination’ screen and then press VIEW to get to the ‘Map’ screen. Verify that the Direction and Signal Strength Indicator located at the bottom left corner of the Display, is green, indicating that the system has located GPS satellites. If this is not true, refer to the ‘Troubleshooting’ section. Ensure vehicle icon is correctly displayed on the Map or press LOCATE to check current location.
O PERATIONS Battery Charger The Battery Charger provides power to the 750M and charges the Battery only during 750M operation. It also incorporates a Battery Test Circuit that allows the user to check the charge on the Battery. Using the ‘BATTERY TEST’ Button and reading the five (5) multi-colored Battery Status Indicators, a user can determine the state of the Battery, from ‘LOW’ to ‘100%’.
TIP Battery capacity degrades at low temperatures and over the life of the system. In the event that the vehicle power port is unusable, such as a blown fuse, or if required for an airport security check, the 750M can be used solely from a new, fully charged Battery for periods up to 1 hour. To do so, simply slide the Battery Charger switch to ‘BATTERY’. Be certain to slide the Battery Charger switch back to ‘OFF’ or ‘AUTO’ when finished to avoid depleting the Battery.
S TORAGE The 750M will automatically shutdown when the vehicle ignition is turned to off. If the 750M needs to be removed while the vehicle is still running, simply press the POWER button to shutdown the system manually. Return the Display, Power Adapter, and GPS Antenna to the Carry Case. Store the GPS Antenna on the Antenna Storage Spool by winding the Antenna Wire around the Antenna Storage Spool and placing the GPS Antenna on the Antenna Storage Spool top where it is magnetically retained.
T ROUBLESHOOTING Problem Possible Cause(s) Solution(s) GPS will not initialize within several minutes or GPS Signal Indicator did not turn green. 1. Insufficient GPS signal strength due to nearby obstructions. 1. a) Move to open area away from trees or tall buildings. b) Ensure GPS Antenna is on exterior of vehicle and not obstructed by roof racks or antennas. 2. GPS Antenna not connected to Docking Station. 2. Connect GPS Antenna to Docking Station. 3. GPS Antenna wire is damaged. 3.
Problem Possible Cause(s) Solution(s) Display does not turn on. 1. No power to the system. 1. a) Verify all connections to the Docking Station, Battery Charger, and Battery. b) Ensure fuse for the vehicle’s Accessory Power Port is good. c) Turn switch on Battery Charger to ‘AUTO’ position. d) Ensure fuse for 750M Power Adapter is good by unscrewing endcap on Power Adapter and removing fuse. Replace with 3 amp miniature barrel fuse. 2. Power to the 750M is turned off. 2.
Problem Possible Cause(s) Solution(s) Will not save last position. 1. Battery or Battery Charger is not properly connected. 1. Verify all connections to Battery and Battery Charger 2. Back-up Battery has no power 2. Check Battery voltage by pressing button on side of the Battery Charger. If indicator reads low after charging, replace battery. No roads are displayed. 1. a) Refer to Map Area 1.
Problem Possible Cause(s) Solution(s) Poor vehicle positioning performance. 1. GPS Antenna is not connected. 1. Connect GPS Antenna to Docking Station. 2. GPS Antenna is incorrectly located. 2. GPS Antenna needs an unobstructed view of the sky from the exterior of the vehicle. Ensure luggage racks or accessories are not blocking the satellite signal to the GPS Antenna. 3. Carry Case is not placed in same orientation. 3. Place the bag in its original orientation. 4.
750 M C ARE & M AINTENANCE Designed to provide years of trouble-free use, the Magellan 750M system requires little or no maintenance. As with all electronic equipment, care should be taken to avoid system damage. Following the suggestions below will ensure maximum functionality and enjoyment of the 750M. • Most common multi-purpose cleaners will not harm the Display or Navigation Computer unit.
B AT TERY R EPLACEMENT & D ISPOSAL Replacement Replace the Battery when: 1. Charge or discharge characteristics of the Battery change. 2. The Battery no longer holds a charge as indicated by the Battery Status Indicator consistently showing ‘LOW’ after charging. 3. Any time there is an indication of Battery leakage. 4. The Battery case is deformed or cracked. When the original Battery included with the 750M system needs to be replaced, be sure to contact Magellan to purchase a replacement.
Magellan 750M Map Areas 27
W elcome to the Magellan 750M portable vehicle navigation and information system. The 750M provides 750NAV functionality without the need for permanent installation. Pre-assembled in a convenient Carry Case, the 750M offers on-the-go vehicle navigation and information. The included Power Adapter, Battery and Battery Charger provide system power.
2950 Waterview Rochester Hills, MI 48309 Toll Free Number: 1-877-4 CAR NAV www.magellangps.