MAGELLAN and eXplorist are registered trademarks of MiTAC International Corp. All other brands are the property of their respective owner. References eXplorist TRX7 ® The Ultimate Off-Road GPS Navigator User Manual The Official GPS of Jeep Jamboree USA MAGELLANGPS.
Safety. IMPORTANT SAFETY WARNINGS The Magellan eXplorist TRX7 and TRX7 CS are off-road vehicle navigation aids designed to assist you in driving on offroad routes as well as across municipal streets. Please check with your state or local law enforcement for applicable regulations regarding mounting to the windshield. The driver should enter data or program the Magellan device only when the vehicle is stopped. Only a vehicle passenger should enter data or program the device while the vehicle is moving.
Table of Contents. Get To Know TRX7.................................................................................. 5 TRX7 Hardware........................................................................................................................... 6 TRX7 Software............................................................................................................................ 7 Get Started.............................................................................................
Table of Contents. Use TRX Trailhead.................................................................................. 34 Use TRX Trailhead....................................................................................................................... 34 Sign In to TRX Trailhead.............................................................................................................. 35 Wish List and Log...............................................................................................
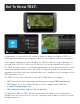
Get To Know TRX7. Designed specifically with the off-roader in mind, the Magellan eXplorist TRX7 is a GPS map and navigation system purpose-built for off-road use and street navigation. Powered by a ruggedly constructed tablet, the TRX7 includes the largest database of off-road Trails in the U.S., with over 100,000 official Trails preloaded into the device.
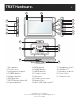
TRX7 Hardware. 1 6 2 17 8 18 9 19 10 20 11 3 4 5 6 7 21 12 13 14 13 16 15 1. Microphone 2. Touchscreen 3. Lanyard attach point 4. POWER button 5. Volume buttons 6. MUTE button 7. RESET button (unused) 8. Camera button* 9. BACK button 10. HOME button 11. MENU button 12. Cradle screws 13. Speakers 14. Cradle connections 15. Mount Plate 16. Mini-USB Power port** *available on select models. **use caution when opening to avoid damaging covers. ***inactive on TRX7. 17. Headphone jack** 18.
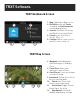
TRX7 Software. TRX7 Dashboard Screen 1 3 1. Map: Tap to open Map screen. 2. Dirt Miles traveled, Tracks recorded, and Achievements earned displayed here. 3. Journal: Contains Track Log and Wish List of saved Trails. 4. Search: Search for Trails, Tracks, POIs, etc. 5. Settings: Edit account, vehicle profiles, connectivity, etc. 2 4 5 TRX7 Map Screen 10 12 11 6 7 8 9 10 6. Waypoint: Mark Waypoints while driving or recording a Track. 7. Social Post: Share your adventures with a Tweet. 8.
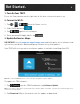
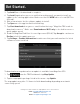
Get Started. 8 1. Turn On Your TRX7. Press the Power button on the right side of the device to turn the device on. 2. Connect to Wi-Fi. 1. Tap > > from the Home screen. 2. Slide On/Off button to 3. Tap . again to see networks. 4. Enter password (if applicable) > tap . 3. Update Software + Maps. IMPORTANT: Go to trxsupport.magellangps.com and look up the latest software and system versions before downloading any software or system updates.
Get Started. 3. Tap Install once the download is complete. 4. Tap Install again when you see a notification asking you if you want to install an update to the existing application. Make sure that the NEW tab is selected (NOT the ALL tab). 5. Wait a few minutes for the software update to install. 6. Tap Open once the app has finished installing. 7. Tap Start download when you see a notification that says “Magellan TRX needs to download resources”.
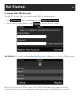
Get Started. 10 4. Create Your TRX Account. You MUST create a TRX account for your TRX7 to work properly. 1. Tap from the Dashboard > tap 2. Enter your account details > tap to create your account. IMPORTANT: Use your existing MagellanGPS.com credentials to create a TRX account. When you create your TRX account, your TRX7 is automatically registered to the account. You’ll receive a confirmation email once your account has been created.
Get Started. Whenever you need to log in, tap password > tap . > enter TRX email address and Note: A MagellanGPS.com account will also be created if you’re new to Magellan and you’re registering an email address for the first time. You can also create your TRX account or log in with your account on TRX Trailhead, the TRX online site optimized to search for Trails and organize/publish your Track data: 1. Go to www.TRXTrailhead.com > click 2. Click 3. Click your email. . > enter your account details.
Get Started. 12 5. Get a GPS Signal. 1. Slide your finger downward from the top left corner of the screen. 2. Tap on . A display screen appears with: • Access to my location: lets device apps use your location information. Tap use this function. to • Location Sources: indicates the sources that provide your device position (see GPS satellites below). • GPS satellites: lets apps use GPS on your TRX7 to pinpoint your location. This option automatically activates when Location Access is .
Get Started. 6. Mount the TRX7 in Your Vehicle. 1. Clean the area on the windshield where you want to mount the device. Allow the surface to dry. 2. Attach the mount baseplate to the cradle with the included screws. 3. Attach the mount to the vehicle.* 4. Plug the device into your Vehicle Power Outlet using the Vehicle Power Adapter (VPA) supplied with your TRX7. Please use ONLY the supplied VPA. 1 2 3 4 *RAM suction and U-Bolt mounts both require additional assembly. Note: Go to trxsupport.
Get Started. 14 Power On Press and release the Power button. The Boot screen (with Magellan logo) appears, then the Home screen appears. Turn Off Display and Power Off. Press the Power button to lock the TRX7. To power the device off completely, press and hold Power button for 3 seconds > select Power off from the menu. From this menu, you can also: • Turn on Airplane Mode to deactivate Wi-Fi and Bluetooth connections. • Restart the device. • Turn on Silent mode to mute sound.
Get Started. Adjust Volume. Use the two volume buttons on the right side of the TRX7 to adjust volume. You’ll see a volume indicator appear on the screen. Adjust the volume by sliding the circle left (for volume down) or right (for volume up). Tap to open a Notification volume indicator. Slide this indicator left and right to adjust notification volume. Adjust Brightness. 1. Slide your finger downward from the top right corner of the screen > tap . 2.
Get Started. 16 TRX7 Home Screen. The Home Screen displays the TRX7 software icon, current time and date, local weather, and other basic functions for your TRX7 unit. Magellan icon: tap the icon to enter the TRX7 software at the TRX Dashboard. Internet browser Android Tools Contacts List The Android Tools function allows you to configure the Android apps, widgets and settings on the device.
Get Started. Now that you’re familiar with TRX7 basics, customize your TRX user profile before you hit the Trail. Create Your Vehicle Profile. Create a customized Vehicle Profile so that the TRX community knows your vehicle by name (and to show it off). 1. Tap from the Dashboard > tap . 2. Tap > tap > . 3. Enter vehicle information: Nickname, Year, Make, Model, and City and State. 4. Tap 5. Tap if this will be your primary vehicle.
Get Started. 18 Link to Social Media. Link your Twitter and Instagram accounts to your TRX Account to Tweet your Dirt Miles and share off-roading photos while Tracking using the Social Post ( ) button. Link Your Twitter Account To link your TRX7 to your Twitter account: 1. Tap 2. Tap from the Dashboard > tap next to the Twitter option > tap 3. Enter account details > tap . . > tap to finish linking to Twitter.
Go Riding. Use Street Navigation. You can route to any location on the map (Trails, Tracks, POIs, Addresses, and more) on your TRX7 without having to use another navigation device. To use street navigation on your TRX7: 1. 2. 3. 4. 5. 6. 7. Tap Search from the TRX Dashboard. Search for an Address, Trail, or other location that you want to get to. Tap on the desired location from the search results. Tap GO to begin routing to an Address, or tap Save to add a Trail to your Wish List.
Go Riding. 20 Tracking. To track your progress from any location: 1. Tap 2. Tap from the Dashboard to get to the Map screen. to start tracking > tap to pause tracking at any time. On the Active Map screen, you can: Mark a Quick Waypoint. Customize map view. Note: Go to Settings > Map Display to configure your default Map View and Orientation as well as to toggle the North Up and Zoom buttons on and off. Tip: Tap to snap the map view back to your current location after you’ve panned around the map.
Go Riding. Change Map Options Tap to customize your map view: • Tap Basemap for the default topo map view, and tap Satellite for satellite map imagery from DigitalGlobe.* • Tap 2D for a 2D map view, and tap 3D for a 3D map view. • Tap Trails to view authorized Trail data on the map view. • Tap Tracks to view user-generated Tracks on the map view. • Tap Hide All to hide map content from the map view.
Go Riding. 22 Pausing the Track displays more options. Detail Waypoint: Record an Audio Waypoint, select Waypoint type at Current Location, mark Point on Map, or Enter Waypoint using Coordinates. Social Post: Tweet Dirt Miles from your current Track. Backtrack: Follow your Track back to starting point. Finish: Save customized Track. Mark Waypoints.
Go Riding. To save a Detail Waypoint: 1. Tap to pause your Track > tap . 2. Tap Detail Waypoint option. : Record custom audio message. 1. Tap > record your message. 2. Tap to save Audio Waypoint. : Select Waypoint for your location. 1. Tap Waypoint type > choose applicable Waypoint sub-type > tap Next. 2. Enter Waypoint name and comment. 3. Tap to save the Waypoint to your Track, or Waypoint options.
Go Riding. 24 To add a photo to a Detail Waypoint: 1. Press Camera button* while tracking or paused. *available on select models. 2. Use the Camera to take a photo. The photo is added to your photo gallery. 3. Pause your Track > tap > > tap Waypoint type. 4. Tap > select a photo. 5. Tap to add photos from the gallery to a Waypoint. Tip: You can also add photos to Waypoints on TRX Trailhead after saving your Track to your Log. : Tap on the map to save a Waypoint in a specific location.
Go Riding. Backtrack. Follow a Track back to the starting point: 1. Tap 2. Tap . You’ll see this notification: to begin Backtracking, or to return to the Pause screen. While Backtracking, you’ll see a line with arrows moving to the start of your Track. WARNING: Use Backtracking with caution. Direction of travel can affect Route difficulty. Finish (Save) Your Track. When you’ve finished Tracking, save your Track to your Log.
Go Riding. 26 5. Tap a Terrain type. 6. Tap Terrain information. 7. Tap Pitch, Tilt, and 1-5 Star Rating. 8. Tap Comment to write Track details. 9. Tap to save your Track, or to stop saving your Track. Tip: Your selections assign one of four Difficulty levels to your Track: Easy Intermediate Advanced Expert only When you’ve saved a Track to your account, you can view and edit the Track’s route, Waypoints, and attributes in your Log.
Go Riding. Use The Journal. The (accessible from TRX Dashboard) contains your saved items in two lists: : Contains your completed Tracks in chronological order, with the most recent saved Track at the top. : Contains Trails, Trips, and Waypoints that you’ve saved. Create A New Trip 1. Tap > . 2. Type a name for the Trip > tap . 3. Check each Track or Trail you want to add to the Trip > tap .
Go Riding. 28 Delete A Trip 1. Tap 2. Tap > tap the check box next to each Trip you want to delete > tap to delete the Trip, or . to return to your Log or Wish List. To go to a Trail or POI that you’ve saved to your Wish List, tap an item on your Wish List > Tap . To follow a Trail from your Wish List: 1. Tap an item on your Wish List. 2. Tap , then tap or to ride a Track or Trail. 3. Follow the arrows to ride along the Track or Trail.
Go Exploring. Search For Map Content. Tap to search through the TRX7 Basemap of over 100,000 preloaded Trails in addition to user Tracks, POIs, OHV Attractions, and more. Search by keyword or from the menu: Search by category: : search for official TRX7 Trails. : search for TRX user-recorded Tracks. : search for TRX user-recorded Trips. : search for OHV parks.
Go Exploring. Tap 30 to populate the map with results related to your search. Tap to refine results > choose a sorting option. Tap again to refine your search results on the map. Tip: Searching by cities or regions (e.g. Moab, Rubicon) in the keyword search can help expedite your search for specific Trails.
Go Exploring. View and Save Searched Items You can save items from your search results to your Wish List. 1. Tap on a Marker Label on the Map to see an item’s attributes. 2. Tap 3. Tap to save the item to your Wish List. to confirm. Use Satellite Imagery. You have several options for saving satellite imagery to your TRX7 so that you can access the satellite imagery associated with that map area even when you’re outside of network coverage.
Go Exploring. 32 Purchase a DigitalGlobe Subscription. IMPORTANT: You do NOT need to download VantagePoint or any other additional software to use DigitalGlobe on your TRX7. To purchase the subscription from your web browser: 1. Tap Settings from the TRX Dashboard > tap In-App Purchases. 2. Tap the 1 Year of DigitalGlobe Satellite Maps option > tap $29.99 on the right side of the screen. When prompted, tap OK to be redirected to the URL in the next step. 3.
Go Exploring. Save Satellite Imagery from the Map Screen. 1. Tap Map from the TRX Dashboard > tap Map Options in the top right of the screen. 2. Toggle to the Satellite option > tap Save Map on the bottom left of the screen. 3. Zoom out on the map view on the left side of the screen until you see the entire map area that you want to save OR until the Size exceeds the Max limit. 4. Tap Next > Enter a name for the map area > tap Save. 5. Go to Settings > Map Save > Saved Maps to view all saved map areas.
Use TRX Trailhead. 34 Use TRX Trailhead TRX Trailhead allows you to instantly see all 100,000+ Trails in the TRX Basemap to quickly search for Trails for your Wish List. You can also edit/review Tracks in your Log, edit Waypoints, search for user Tracks, and publicly share your Tracks. 1 7 2 3 4 5 8 9 11 10 13 12 14 1 Minimize Log/Wish List. 2 Enter Search Terms. 3 Enter Location Criteria. 4 Search Button. 5 View Profile. 6 View Page Settings. 7 Access Personal Log.
Use TRX Trailhead. Sign In to TRX Trailhead 1. Go to www.TRXTrailhead.com. 2. Click . 3. Enter your account details. 4. Click . Note: Refer to Create Your Account on TRX Trailhead for information about registering on TRX Trailhead. If you forget your TRX account password, use TRX Trailhead to reset it: 1. Click Forgot your password? > enter your TRX email address > click Send. 2. Go to the email inbox associated with your TRX account > click the link in the email you receive from noreply@mytrxjournal.
Use TRX Trailhead. 36 Once you’ve logged in, you’ll see two tabs for your Wish List and Log. Find Trails, Trips, ORV Areas, Landmarks... Magellan eXploristTRX 39 Trails 49 OHV 03 Tracks 12 POIs Wish List Near City, State or Zip or Forest... Sign In 09 Trips Log Add new trip Sort by Name Search Harrison Camp Site 123 Main St. Grand Rapids, Michigan 10001 Spokee Trail Trail: 1.82mi Drive time: 4.
Use TRX Trailhead. Wish List and Log Access your Wish List and Log by clicking on the tabs on the left side of the screen. Click Tracks, Trails, or Waypoints in your Log or Wish List to view details on the Map. | To delete items from your Journal: 1. Click 2. Click next to the item. to delete the item, or to stop the deletion. Select any saved Tracks or Trips in your Log to view details, including Start and End Elevation and Terrain Specs. You can modify Terrain Specs from a saved Track or Trip.
Use TRX Trailhead. Spokee Track Difficulty: Rating: 38 (12) Terrain Spec Spokee Track Latitude: 42.655025 | Longitude: -86.201982 Rating: Dirt Miles: 12.82 Difficulty: Elevation gain: 12.82 Publish Date: 10/24/15 Shared Track This is a publicly shared track that has not been verified for safety.
Use TRX Trailhead. Search for Trails, Tracks, Trips, OHV Attractions, and POIs. To search for an item in TRX Trailhead: 1. Click an items from Search options at the top of the page. 2. 3. 4. Tip: Click on the user Tracks or Trips icons to filter your search results. Tracks Filter Trips Filter Tip: Click the blue sphere next to a city name to highlight Trails within a roughly 50-mile radius of that city. 5. Type a search term in the Find text box (e.g. Beaver, Creek). 6.
Use TRX Trailhead. 40 Click on a Trail or POI for information. Note: Multiple Trails within a single route appear in a list form. Click any of the items in the list to view Trail information. WARNING: Some Trails warn that This is a publicly shared trail that has not been verified for safety. Drive at your own risk! Review all Trail safety details before riding the Trail.
Use TRX Trailhead.
Use TRX Trailhead. 42 Save To Your Wish List Click next to the item Marker Label to save an item from your search results to your Wish List: Tip: Any items you add to your Wish List on TRX Trailhead automatically sync with your TRX7 Wish List next time you sign in or if you choose Settings > Manual Sync from your TRX7. Report Issues To report issues with an item on the map: 1. Click on item details > check applicable boxes. 2. Enter detailed issues in the text box. 3.
Use TRX Trailhead. Create a Route. The TRX Routing tool on www.TRXTrailhead.com is designed to help you plan day trips, weekend trips, and even long overland voyages that you can follow using your TRX7. With the TRX Routing tool, you can create a custom route, save it to your Wish List, and sync the route with your TRX7 Wish List. First, create a custom route on TRX Trailhead: 1. Sign in to TRX Trailhead using your TRX account. 2.
Use TRX Trailhead. 44 Connect To Social Media Connect your Twitter and Instagram accounts to your TRX Trailhead account (if you haven’t already on your TRX7 device). To connect to Twitter and Instagram: 1. Click at the top right corner of the screen. 2. Click or to go to the Twitter or Instagram login page. 3. Enter your Twitter or Instagram login information, or create a new account for use with your TRX account.
Use TRX Trailhead. Add a New Trip Add a new Trip to your Log from TRX Trailhead by clicking on To add items to your Trip: 1. Search for an item in the Basemap. 2. Click and hold on the Marker Label > drag the Marker Label to the Trip folder and release your click. The item is added to the Trip. Repeat for each item you want in your Trip. You can see the Trip in your TRX7 Log and once you’ve synced your account.
TRX Glossary. 46 TRX GLOSSARY OF KEY TERMS Your TRX7 account syncs seamlessly with TRX Trailhead and all TRX companion mobile apps. This glossary will familiarize you with all functions associated with your TRX7 and all applications accessible with your TRX user account. Unless otherwise noted, all interface terms are applicable to the TRX7 device and all TRX mobile apps.
TRX Glossary Orientation: button that allows a user to toggle between North Up and Track Up views. This button turns blue and can be tapped to restore North Up orientation when a user has panned around the map (TRX7 and TRX Apps). Place: another name for a Point of Interest (POI). Private Files: accessible only to their owner(s). Public Files: accessible by any search by visitors to TRX Trailhead. Quick Waypoint: created by a user by selecting the Quick Waypoint icon during an Active Track.
Warranty. 48 Magellan Limited Warranty All Magellan global positioning system (GPS) receivers are navigation aids, and are not intended to replace other methods of navigation. The purchaser is advised to perform careful position charting and use good judgment. READ THE USER GUIDE CAREFULLY BEFORE USING THE PRODUCT. 1. MAGELLAN WARRANTY (a) MiTAC Digital Corp.
Warranty.
Need Technical Support? To get technical support for your Magellan TRX product, go to trxsupport.magellangps.com for troubleshooting, tutorials, and more. If you can’t find a solution there, contact Magellan Technical Support directly by e-mail at trxsupport@magellangps.com or call 800-707-9971. Connect with us @MagellanTRX MiTAC Digital Corporation 279 E. Arrow Hwy, San Dimas, CA 91773 USA www.magellanGPS.com 112-0089-002 © 2017 MiTAC International Corporation.