Magellan® Maestro™ 4245 User Manual Magellan Navigation, Inc.
IMPORTANT SAFETY WARNINGS The Magellan Maestro is a vehicle-navigation aid designed to assist you in arriving at your selected destinations. When using the Magellan Maestro, these safety rules must be followed to prevent accidents that can result in injury or death to yourself or others: • • • • • • • • Some countries may prohibit mounting any item to your windshield. Please check the applicable regulations in your country as regards windscreen mounting. Go to www.magellanGPS.
IMPORTANT SAFETY WARNINGS Federal Communication Commission Interference Statement This equipment has been tested and found to comply with the limits for class B digital devices, in accordance with part 15 of the FCC Rules. These limits are designed to provide reasonable protection against harmful interference in a residential installation.
IMPORTANT SAFETY WARNINGS IC statement Operation is subject to the following two conditions: 1. 2. This device may not cause interference and This device must accept any interference, including interference that may cause undesired operation of the device. IMPORTANT NOTE: IC Radiation Exposure Statement: This equipment complies with IC radiation exposure limits established for an uncontrolled environment. End users must follow the specific operating instructions for satisfying RF exposure compliance.
Table of Contents Magellan Maestro 4245 .......................................................................................................... 1 Front View ............................................................................................................. 2 Side Views ............................................................................................................. 2 Back View ...........................................................................................................
Voice Control ........................................................................................................................ 13 Activating Voice Control ........................................................................................ 13 Sample Nearest Restaurant .............................................................................. 13 Quitting Voice Command ....................................................................................... 14 Tips on Speaking Voice Commands ...
Deleting a Previous Destination ......................................................................... 26 Address Book ...............................................................................................................27 Accessing an Address in Your Address Book ....................................................... 27 Routing to an Address in Your Address Book ...................................................... 27 Editing an Address in Your Address Book. .................................
Changing the Route Method ............................................................................. 40 Trip Planner.......................................................................................................................... 41 Creating a Trip ................................................................................................ 41 Optimising a Trip ............................................................................................. 42 Starting a Trip ....................
Setting Time Zone ........................................................................................... 52 Selecting Units of Measure ............................................................................... 53 Displaying Contact Us Information .................................................................... 53 Displaying Product Information ......................................................................... 53 Performing Diagnostics ....................................................
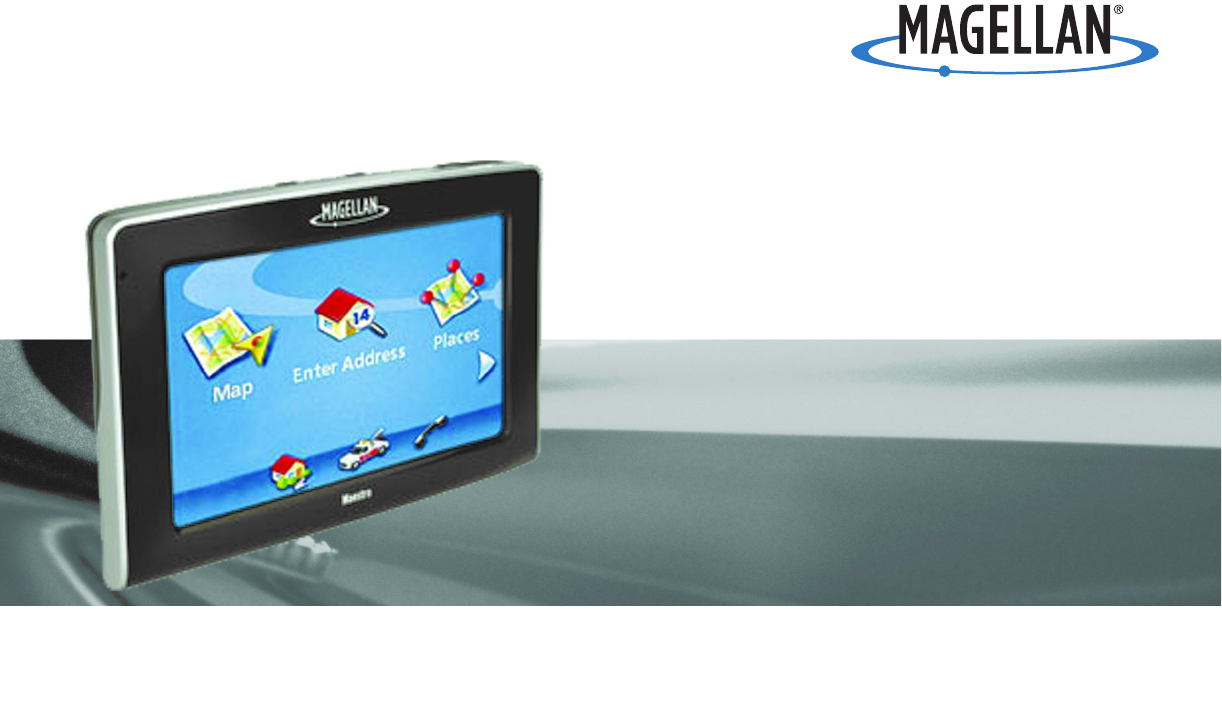
Magellan Maestro 4245 The Magellan Maestro 4245 is a vehicle navigation product that uses GPS signals from satellites to calculate your precise location and compute detailed routes. As it knows its position and movement, it can then overlay this information on detailed maps provided by NAVTEQ® to provide a visual representation of your location. With the Magellan Maestro 4245 you can: • Store your home address and quickly obtain routing details to your home.
Front View A B A Power (Top) Reset (Bottom) B Side Views C FM Antenna input. D USB connector. Power input from cigarette lighter adapter or AC power adapter (+5 VDC / 2A).
Installation Instructions Installation of the Magellan Maestro is simple and easy. The hardest part will be picking the best location. Selecting the Location A few tips on selecting the proper location. • Mount the Magellan Maestro in a place where it can be easily seen and will not interfere with your view of the road. • The Magellan Maestro should be mounted in such a way that the antenna, (located in the top of the receiver), has an unobstructed view of the sky through the windshield.
Make sure that the lever at the base of the adjustable mount is in the up position. Place the base of the swivel mount firmly over the area to be used. Push the lever at the base of the swivel mount all the way down until it snaps in place. Carefully let go of the assembly, making sure that it is securely mounted. Attaching the Magellan Maestro to the Cradle Align the tabs on the cradle to the indents on the bottom of the Magellan Maestro.
Connecting Traffic Antenna These instructions apply to those versions of the Magellan Maestro that are “traffic-ready”. Magellan Maestro’s with an external antenna input (shown) are considered “traffic-ready”. Traffic FM Connector Plug the FM antenna connector from the Vehicle Power Cable to the FM antenna jack on the Magellan Maestro. See the section on Traffic for additional set up information.
Check Connection and Final Adjustments If the power indicator light on the vehicle power cable connector is on, power is being supplied to the Magellan Maestro. If it is not on, check the cable connection to the vehicle power receptacle. If the light is still not on, turn the vehicle’s ignition on. Press the power button (located at the bottom right side of the Maestro) and hold down for a few seconds. The Magellan Maestro will power on.
Fundamentals Powering on the Magellan Maestro The On/Off button is the silver button located on the left-hand side of the Magellan Maestro as shown in the Overview chapter. Turning the Magellan Maestro On 1. Press and hold the On/Off button for 1-2 seconds. 2. Read the Warnings and tap OK. Turning the Magellan Maestro Off 1. Press and hold the On/Off button for 1-2 seconds. Selecting Auto Power Off Time The Magellan Maestro can be set to shut down automatically after a time selected by you.
Changing the Volume via User Options 1. Access the Main Menu. 2. Tap the Next arrow to access the Main Menu Page 2. 3. Tap User Options. 4. Tap System Settings. 5. Tap Volume. 6. Tap on the Mute button to mute the volume, or tap inside the volume adjust bar below the Mute button to change the volume levels. 7. Tap Save. Brightness Accessing the Brightness Control 1. Access the Main Menu. 2. Tap the Next arrow to access the Main Menu Page 2. 3. Tap User Options. 4. Tap System Settings.
Main Menu - Page 1 Show Map: Displays the map with your current position (if computing a position from the GPS signals) indicated by the blue triangle. See the Map Screen chapter for details. Enter Address: Displays Enter Address menu. Addresses can be entered by first entering the town, post code, or by selecting a town from a list of towns you have already used as destinations. Also provides access to your address book (my addresses) or to create a route to a town centre.
Main Menu - Page 2 Trip Planner: Opens the Trip Planner menu where you can create, edit, delete, rename or activate a trip. POI Near Exit: (Accessible only while on a motorway.) Provides a list of restaurants, petrol stations, auto repair shops or hotels near approaching motorway exits. You can select one of the presented POIs and create a route to it. User Options: Accesses the User Options menu. This menu can be used to access functions used for tailoring the Magellan Maestro to your individual needs.
The Keypad Understanding the keypad while entering an address is an important part of using your Magellan Maestro. The keypad is the most common method of entering data into the Magellan Maestro, and with key features like QuickSpell, data entry is quick and easy.
Selecting From List After tapping “OK” to accept your input, you may be presented with a list of items found in the database. Notes on Entering Data If you are having trouble getting the results you expected, here are a few useful tips. • Make sure that you have spelled the name correctly. If you are unsure of the spelling, just enter a few characters and tap “OK”. A long list of names will be displayed, but you can step through the list and you will probably be able to find the correct spelling.
Voice Control The Magellan Maestro includes voice control software for many of the most commonly used commands. This provides hands-free operation of the Magellan Maestro for most of the functions you will use on a daily basis. Activating Voice Control To place the Magellan Maestro in a ‘listening’ mode for voice commands, you need to first ‘wake up’ the voice control software by speaking the attention word “Magellan”. Upon waking up the Magellan Maestro, the Say a Command screen is displayed.
3. Speak “Chinese Food”. Speak the number of the item in the list to select it. Speak “Previous” or “Next” to scroll up and down the list of items. Say the number of the restaurant you want to go to and the Magellan Maestro will begin calculating the route to the chosen destination. Say a Command’ Choices The following is a list of some of the commands that can be spoken after saying the wake up word “Magellan.
Voice Control • Roll up the window if road noise is too high. In some cars, the interior noise increases dramatically with car speed. The best thing to do with noisy cars is to close the windows. Positioning the Magellan Maestro closer to you can also help. • Avoid shouting. Shouting puts stress into the voice which actually degrades speech recognition performance. If the navigator is not hearing you, try moving the Magellan Maestro closer and lowering your voice.
Map Screen The most commonly used screen will be the Map screen. Whether you are following a route or just travelling around town, the chances are that the Map screen will be displayed. There are two unique modes that the Map screen can be displayed in; normal and routing. In normal mode, your position is shown on the map along with the time and your speed. As you travel, your position will be updated, giving you a clear view of your position and surrounding streets.
In routing mode additional information is displayed providing detailed information about the route you’ve selected. A B N C M D L E K F J G I H Map Screen - Routing Mode A Street name currently on. B Direction indicator. Tap to view the Current Location screen where you can save your position into your Address Book. C Zoom out D POI icon. Example shown here is for a petrol station. Tap on the POI icon to create a route to that POI.
Accessing the Map Screen 1. On the Main Menu, tap Show Map. 2D Mode The map is normally displayed in 3D mode but you can set the map to 2D mode if so desired. Choose the mode that is most suitable for you. In 2D mode, you can pan across the map looking for a location to route to or save in your address book. Setting the Map Modes (2D or 3D) 1. From the Map screen, tap MENU. 2. Tap the Next arrow to access page 2 of the Main Menu. 3. Tap User Options. 4. Tap Map Options. 5. Tap 3D Map or 2D Map.
6. When the details for this address are acceptable, tap Save. 7. If you want to now route to this address tap 8. Tap or if you have finished tap . to exit panning and return the icon to your current position. Routing to a Panned Position 1. Pan the map until the icon crosshairs are over the location you want to route to. 2. Tap in the centre of the circle icon. (If nothing happens then you have not zoomed in enough. Tap the zoom in icon and try again.) 3.
List of Directions Screen This screen is accessed from the Map screen and only when routing. (Note: The List of Directions screen is not available until you begin moving on the route.) Each line in the list of directions provides details about the segment in the order that they are to be made, with the next segment at the top. The bottom bar of the List of Directions screen indicates the distance and time to the next segment as well as the total distance computed for the route.
GPS Status Screen 1. The GPS Status screen is also accessed from the Map screen and displays the status of the GPS satellites in a graphical format. (More technical information on the GPS status can be found in the User Options menu: Main Menu Page 2 > User Options > GPS Options > GPS Status.
Home Address Your home address can be entered and saved in the Magellan Maestro for quick and easy access when you need to create a route home. Creating a Home Address These instructions only apply if you have never entered a home address or if it has been deleted. 1. Tap the Home Address icon on the Main Menu screen. 2. Confirm “Do you want to enter your HOME address?” Tap Yes. 3. Follow the prompts to enter the address to be used as your HOME address. 4.
Changing the Home Address 1. Tap the Home Address icon on the Main Menu screen. 2. Tap Change. 3. Confirm “Do you want to replace the HOME address with a new address?” Tap Yes. 4. Follow the prompts to enter the address to be used as your new HOME address. 5. When the Address screen is displayed, edit the information and tap SAVE to continue. 6. The new HOME address will be saved in your address book and you will be returned to the Main Menu screen.
Enter Address The Enter Address function is used to create a route from a newly entered address, an address in your address book or to an intersection of two streets. Entering an Address While creating an address the first step is to indicate what town the address is in. This can be done by inputting the name of the town, entering the postcode for the town or by selecting a town that has been previously used. Creating a Route to a New Address 1. From the Main Menu, tap the Enter Address icon. 2.
3. With the town selected, the keypad will be displayed prompting you for the street name. Use the keypad with QuickSpell to enter the street name. Enter the first few characters the street name and tap OK or continue entering characters until the list of streets is displayed. You can use street prefixes (N, E, W, S, etc.) if desired. 4. Use the scroll bar to the right, if necessary, to view the desired street name. Tap on the street name to continue. 5.
Routing to a Previous Destination (Method 2) 1. From the Main Menu, tap the Enter Address icon. 2. Tap on the My addresses icon. 3. Tap on Previous Destinations. 4. Select the destination from the list of previous destinations. 5. Tap on Route. 6. Select the Routing Method and tap the orange Calculate Route button. Saving a Previous Destination to Your Address Book 1. From the Main Menu, tap the Enter Address icon. 2. Tap on the My addresses icon. 3. Tap on Previous Destinations. 4.
It is possible to delete all of the destinations in the Previous Destination List by accessing User Options > Address Book Options > Clear Previous. Address Book Accessing an Address in Your Address Book 1. From the Main Menu, tap the Enter Address icon. 2. Tap on the My addresses icon. 3. Tap Address Book 4. Tap List All to view the entire contents of your address book, or tap on Search Address Book to search for entries by name. 5.
Favourites Favourite addresses work just like other addresses in your address book. Addresses in your address book can be marked as favourites to speed up the search for frequently used addresses. Accessing an Address from Favourites 1. From the Main Menu, tap the Enter Address icon. 2. Tap on the My addresses icon. 3. Tap on Favourites 4. From the resulting list of addresses, tap on the address record you require. Routing to an Address from Your Favourites List 1.
Creating a New Entry in Your Address Book by Selecting it on the Map 1. From the Main Menu, tap the Enter Address icon. 2. Tap on the My addresses icon. 3. Tap on Create New Entry. 4. Tap on Select on Map. 5. The Map screen will be displayed in 2D mode. Use your finger or stylus to pan around the map. When the crosshair icon is over the location you want to add to your address book, tap in the centre of the crosshairs.
6. If a subcategory list is displayed, select ALL Subcategories or one from the list. 7. Select search criteria: Near Current Position Displays POIs in the category selected nearest to your current position. If there are no POIs within a 50 mile radius, the search will be empty and an alert will be displayed. Near Town: Enter a town name using the keypad (no QuickSpell) and select the desired town centre from the resulting list.
Points of Interest (POI) The Magellan Maestro has preloaded POIs that can be used as a destination for a route. Selecting a restaurant or finding a petrol station nearby is as simple as tapping the screen. Categories and Subcategories POIs are categorised into unique categories from petrol stations to wineries. Most, but not all categories are further organised into subcategories.
Creating a Route to a POI by Name 1. From the Main Menu, tap the Points of Interest icon. 2. Select Search by Name. 3. Spell the name of the POI to be used as the destination. You need not enter the full name, but the more characters you enter, the easier it will be to find the exact POI you are searching for. 4. Select the search criteria: Near Current Position, Near Which Town? (requires entering a town name) or Near Address (requires entering an address). Sample Search by Name Input 5.
Enhanced POI Enhanced POIs are points of interest that are user-created using the POI Manager software found on the CD-ROM. After loading a POI file to an SD / MMC card and loading it in the Magellan Maestro, you can route to those POIs quickly. Loading a POI File 1. Save a POI file created with the POI Manager to an SD/MMC card and install the card in the SD/MMC slot on the left side of the Magellan Maestro. 2. From the Main Menu, tap the Points of Interest icon. 3. Select Enhanced. 4.
Setting Alarms A POI file must be loaded (see Loading a POI File) for this function to operate. An enhanced POI can have an alarm that will alert you when you are in a range set by “Alert Parameters.” Note that all POIs in the selected categories will have their alarms set to on. A POI file must be loaded (see Loading a POI File) for this function to operate. 1. From the Main Menu, tap the Points of Interest icon. 2. Select Enhanced. 3. Select My POI. 4. Select Change My POI file. 5.
Routing to an Enhanced POI A POI file must be loaded (see Loading a POI File) for this function to operate. 1. From the Main Menu, tap the Points of Interest icon. 2. Select Enhanced. 3. Select My POI. 4. Select Select Category. 5. Select the category containing the POI you want to route to from the category list. 6. Select Nearest (near your current position) or Spell POI Name (requires entering the POI name). 7. Select the POI to be routed to from the “Select POI” list. 8. Tap Route. 9.
Marco Polo The Marco Polo Tour Guide is a special feature of the Magellan Maestro that gives users access to a special set of detailed POIs from Marco Polo Travel Guides. Magellan is happy to give you free access to the Sightseeing category for capital cities with detailed information regarding museum and monuments, etc. Other categories are locked and require a subscription to be viewed. Please visit www.magellanGPS.com for detailed information about subscribing to Marco Polo points of interest.
Travelling on a Route Map Screen When a route has been calculated it will be displayed on the Map screen in green with blue arrows indicating the direction of travel. The top of the screen displays the name of the street you are on. The bottom provides information about the next segment. The sample to the right shows that the next manoeuvre will be to turn right in 3.3 miles on Fairplex Dr. The total distance to the destination is 4.6 miles.
You Have Arrived Finally, the Magellan Maestro will provide a visual alert when you have arrived at your destination. Tap the Back arrow to return to the Map screen. (The Magellan Maestro will automatically return to the Map screen after a fixed time if you do not tap the Back arrow.) You Have Arrived. Types of Routes There are a wide variety of methods you can use to create a route. Each method is discussed in the chapter which is associated with it.
Special Routing Functions When a route is active, the Main Menu functions are changed to support special routing functions. Routing to a POI Near an Approaching Motorway Exit Note: This function is available only while on a motorway. Also, when you create a route to a POI near an exit, the original route will be cancelled. You will need to reset the original route when you are ready to continue. 1. From the Map screen, tap MENU. 2. Tap the POI Near Exit icon. 3.
Changing the Route Method If you travel off the computed route, the Magellan Maestro will automatically re-calculate the routing information to get you to your original destination using the routing method you selected when creating the route. However, if you want to change the routing method (while on or off the route), you will need to use the re-route function. 1. From the Map screen, tap MENU. 2. Tap the Reroute icon. 3. Select the desired routing method and tap the orange Calculate Route button.
Trip Planner The Trip Planner is used to create a route with multiple destinations. In this document we will refer to a route with multiple destinations as a “Trip”. Creating a Trip 1. From page 2 of the Main Menu, tap the Trip Planner icon. 2. Select New from the Trip Planner Menu. 3. Use the keypad to enter a name for this trip. 4. Tap OK. Enter a Trip Name 5. Begin by adding the first destination in the trip. Tap Add. 6.
9. The list of trip destinations will be displayed. First Destination Added 10. Tap on the destination name to bring up the menu. 11. Repeat steps 5 to 9 until the trip is complete with all your desired destinations. Tap to open menu. 12. Tap Save. Saving completed trip. Optimising a Trip While creating a trip or editing a trip you can optimise the order of the destinations but using the Optimise button. 1.
Starting a Trip 1. From page 2 of the Main Menu, tap the Trip Planner icon. 2. Select Guide Me from the Trip Planner Menu. 3. Select the trip to be used from the stored trips list. 4. Tap on the destination in the list to be used as the first destination in the trip. 5. Select the routing method to be used and tap the orange Calculate Route button. Select first destination. Editing a Trip 1. From page 2 of the Main Menu, tap the Trip Planner icon. 2. Select Edit from the Trip Planner Menu. 3.
Deleting a Trip 1. From page 2 of the Main Menu, tap the Trip Planner icon. 2. Select Delete, Rename from the Trip Planner Menu. 3. Tap Delete. 4. Select the trip to be deleted from the stored trips list. 5. Confirm that you want to delete the trip. Tap Yes. Renaming a Trip 1. From page 2 of the Main Menu, tap the Trip Planner icon. 2. Select Delete, Rename from the Trip Planner Menu. 3. Tap Rename. 4. Select the trip to be renamed from the stored trips list. 5.
Exit POIs The POI Near Exit function provides a way of accessing commonly used POIs that are near an exit you are approaching while travelling on a motorway. POI near exit include restaurants, petrol stations and hotels. POI near Exit can be accessed while following a route or just driving without a route, as long as you are on a motorway. Routing to a POI Near an Approaching Motorway Exit Note: This function is available only while on a motorway.
Roadside Assistance Overview Touching the tow truck icon displays the list of all the Points of Interest listed in the Auto Service and Maintenance category that are close to your current position. Accessing Roadside Assistance 1 From the Main Menu, tap on the tow truck icon. Tap on the tow truck to access Roadside Assistance. 2 The list of garages close to your current position is displayed with contact information.
Bluetooth Introduction The Bluetooth function of the Magellan Maestro allows you to use the Magellan Maestro as a handsfree device for a Bluetooth enabled mobile phone. You can answer and dial your phone by using the Magellan Maestro touchscreen.. Accessing the Bluetooth Main Menu 1.
5. A passkey input window will pop up on your Magellan Maestro. In this popup window, you will need to input the same numbers as you entered into your mobile phone.. Passkey Request screen Establish Connection Once paired, you will still need to establish a connection with the mobile phone if the message “No paired phone connected” appears at the bottom of the Bluetooth Main Menu screen.
Placing a Call Using the Address Book 1. Access the Bluetooth Main Menu. 2. Tap the Call icon. 3. Select the search criteria; List All or Search Address Book. 4. After searching or listing your entire address book, select the address from the displayed list. 5. If there is a phone number recorded for the address “w:” (work), “h:” (home) or “m:” (mobile) will appear as a button. Tap the desired button and the call will be initiated.
Call Connected If a call connects, the “Connected” window will pop up: • Tap to display a keypad to enter the extension after you have been connected. • Tap to transfer the call to your mobile phone. • Tap to turn off the microphone in the Connected screen Magellan Maestro. • Tap to end the call. Incoming call Answering an Incoming Call 1. When there is an incoming call, the “Incoming Call” window will pop up: Tap to answer the incoming call. Tap to mute the incoming call ring.
Setting User Options Use User Options to customize the Magellan Maestro to better suit your needs from a GPS navigator. Tapping the Back arrow from any of the User Option screens will cancel the changes. Selecting Destination Country Choose the country you will be travelling in. 1. From page 2 of the Main Menu, tap User Options. 2. Tap Destination Country. 3. Tap on the desired country. Accessing System Settings Commonly used settings are found in the System Settings section of User Options. 1.
Adjusting the Display Brightness 1. From page 2 of the Main Menu, tap User Options. 2. Tap System Settings. 3. Tap Brightness. 4. Tap along the adjustment bar to increase or decrease the display brightness. 5. Tap On-battery dimming (75%) to set it on or off. (Checked is on.) If checked, battery life will be saved when operating the Magellan Maestro without external power. 6. Tap Save.
Selecting Units of Measure 1. From page 2 of the Main Menu, tap User Options. 2. Tap System Settings. 3. Tap Units of Measure. 4. Select Miles/Feet or Kilometers/Meters. 5. Tap Save. Displaying Contact Us Information 1. From page 2 of the Main Menu, tap User Options. 2. Tap System Settings. 3. Tap 4. Tap Contact Us. 5. Tap Back arrow. . Displaying Product Information 1. From page 2 of the Main Menu, tap User Options. 2. Tap System Settings. 3. Tap Next. 4.
Performing Diagnostics 1. From page 2 of the Main Menu, tap User Options. 2. Tap System Settings. 3. Tap Next. 4. Tap Diagnostics. 5. Tap Audio Test, Touchscreen Test or Video Test. 6. When done, tap the Back arrow to exit. Accessing the Trip Computer The trip computer records your average speed, the time in hours of the trip, the time in hours that you were driving, and the distance of the trip. This information can be saved to a file for easy access when the information is needed. 1.
Selecting POIs to be Displayed on the Map In some areas the map can be cluttered with POIs, making it difficult to find what you are looking for. Use POI Selection to set which categories of icons will be shown and which will be hidden. 1. From page 2 of the Main Menu, tap User Options. 2. Tap POI Selection. 3. Tap on the POI category in the list to toggle its display setting on or off. (Checked POIs will be displayed. Tap Mark All to check all POI categories.
Setting the Map Display to Heading Up or North Up The map can be displayed with the top of the display in the direction of your heading or North. 1. From page 2 of the Main Menu, tap User Options. 2. Tap Map Options. 3. Select Heading Up or North Up. (Note that ‘North Up’ is only available when the map is set to 2D mode.) 4. Tap Save to record the changes and exit. Setting Split Screen (TrueView™) Options As you approach a segment, the display will change to the split screen mode.
Setting Auto Night Map Display Normally the map is displayed in pastel colours for daytime use and a black background for nighttime use. Unchecking the Auto Night Mode will keep the map display that uses pastel colours. 1. From page 2 of the Main Menu, tap User Options. 2. Tap Map Options. 3. Tap on Auto Night Mode. (Checked indicates that the map will automatically change to night colours; unchecked and the map will always use the day colours.
Using the Simulator When turned on, the simulator will offer the option of simulating movement on a route. Useful for learning about the Magellan Maestro while not driving. 1. From page 2 of the Main Menu, tap User Options. 2. Tap Simulator Mode. 3. Tap Propose simulator mode when calculating route. When checked, the Magellan Maestro will ask if you want the route simulated when it is created. Simulation mode will ignore actual movement and should only be used for training purposes.
Viewing Technical GPS Information This screen provides technical information about the satellites being used to compute the GPS position. 1. From page 2 of the Main Menu, tap User Options. 2. Tap GPS Options. 3. Tap GPS Status. PRN: pseudo random number that identifies the satellite AZ: Azimuth of the satellite EL: Satellite elevation SNR: Satellite signal-to-noise ratio TTFF: Time to First Fix (in seconds) 4. Tap Back arrow to exit.
Backing Up Data 1. From page 2 of the Main Menu, tap User Options. 2. Insert a SD or MMC card with available space into the SD slot on the Magellan Maestro. Note that backing up data will overwrite any back up files on the SD or MMC card. 3. Tap Backup and Restore. 4. Tap Backup. 5. Confirm backup. Tap Yes. 6. Operation successful! Tap OK. 7. Tap Back arrow to exit. Restoring Data 1. From page 2 of the Main Menu, tap User Options. 2.
Premium POI Subscription Your Magellan Maestro is preloaded with points of interest from Marco Polo travel guides. The Sightseeing category can be accessed free of charge for capital cities, but a subscription is required to access the other categories of Marco Polo POIs. To subscribe to Marco Polo Premium POIs, visit www.magellanGPS.com. 1. From page 2 of the Main Menu, tap User Options. 2. Tap Premium POI Subscription to display a screen showing your current subscriptions to Premium POIs. 3.