Magellan® Triton™ 1500 User Manual Magellan Navigation, Inc.
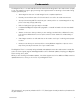
IMPORTANT SAFETY WARNINGS The Magellan Triton is a navigation aid designed to assist you in arriving to your selected destination. When using the Magellan Triton, these safety rules must be followed to prevent accidents that can result in injury or death to yourself or others: IN THE INTEREST OF SAFETY, DO NOT USE THIS NAVIGATION DEVICE WHILE DRIVING A VEHICLE. Please do not try and change any settings on the Magellan Triton while driving. Come to a complete stop or have a passenger make any changes.
IMPORTANT SAFETY WARNINGS Federal Communication Commission Interference Statement This equipment has been tested and found to comply with the limits for a Class B digital device, pursuant to Part 15 of the FCC Rules. These limits are designed to provide reasonable protection against harmful interference in a residential installation.
IMPORTANT SAFETY WARNINGS IC statement Operation is subject to the following two conditions: 1. 2. This device may not cause interference and This device must accept any interference, including interference that may cause undesired operation of the device. IMPORTANT NOTE: IC Radiation Exposure Statement: This equipment complies with IC radiation exposure limits set forth for an uncontrolled environment. End users must follow the specific operating instructions for satisfying RF exposure compliance.
Table of Contents Table of Contents ....................................................................................................................1 Fundamentals ..........................................................................................................................1 Navigation Screens .................................................................................................................3 Map Screen Overview ...................................................................
Route ........................................................................................................................... 12 Creating a Route .............................................................................................. 12 Go To Menu .......................................................................................................................... 14 Accessing the Go To Menu ............................................................................... 14 Waypoints .........
Setting Track Log Options ................................................................................ 25 Maps .................................................................................................................. 25 Viewing Map Information .................................................................................. 25 Media ................................................................................................................. 25 Viewing Stored Media .........................
Fundamentals The Magellan Triton is a hand-held GPS receiver that has been designed for the outdoorsman. Simple to use, yet powerful enough to get you through the toughest terrain or returning to that same fishing hotspot, year after year. • Store waypoints that can include images for the complete experience. • Record your track from start to finish and save it as a trail to be used over and over.
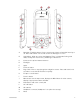
D O A L B M C F I N K J G H E Fundamentals A Backlight / Flashlight button. Press to step though 3 levels of backlight intensity or off. Press and hold for 2-3 seconds to turn the flashlight on or off. B Hold Switch. Slide up to place the Magellan Triton in hold mode. During hold mode, the keys will not function, preventing accidental use. C Connector for optional external antenna D Flashlight E Stylus F Zoom out button G Page / Goto. Press to step through the navigation screens.
Navigation Screens The Map Screen will be the most commonly viewed screen while using the Magellan Triton. It has been simplified to provide the best possible outdoor experience while providing access to all of the information needed at the touch of a finger.
Buttons While viewing the map screen the keys on the Magellan Triton provide additional input and feature access. Menu Accesses the Main Menu Page/Goto Pages through the Navigation screens. (Press and hold to set a GO TO route to a location indicated by the panning cursor.
due to the data not being computed as you are not moving or the data is only displayed when a route or a goto are active.) Additional Navigation Screens There are four additional navigation screens and a Satellite Status screen that can be viewed while using the Magellan Triton. Accessing the Navigation Screens 1. Press the Page/GOTO button. Each time the Page/GOTO button is pressed the next navigation screen is displayed. Pressing and holding the Page/GOTO button displays the GO TO screen.
A screen will be displayed with all of the options available. (Note that some fields are displayed with dashes. This can be due to the data not being computed as you are not moving or the data is only displayed when a route or a goto are active.) Speedometer Screen This screen displays your current speed, your maximum speed and two odometers in a large easy-to-read type. Resetting the Odometer or Maximum Speed 1. While viewing the Speedometer screen, press MENU. 2.
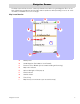
Satellite Status This screen graphically displays the satellites and their signal strength that is being used to compute your location. This is a handy screen to view when you are getting weak to poor signal reception. There are also two navigational screens displayed at the bottom of the display. Changing a Navigation Field 1. Tap on the field you want to change. A screen will be displayed with all of the options available.
Using the Keypad The Magellan Triton displays a keypad on the screen whenever data needs to be entered. Understanding the various components of the keypad will make entering data easier. The Keypad The keypad is used to enter names, notes, latitude, longitude or data that the user needs to enter. Key Functions Moves the cursor to the left. Moves the cursor to the right. Deletes the character to the left of the cursor. Carriage return. Shift key. Alternates between lowercase and uppercase characters.
Create Menu The Create Menu is used to access the functions needed to create waypoints, trails, geocaches and routes. Accessing the Create Menu 1. From the Map screen, press the MENU button. 2. Tap on ‘Create’. Waypoints Creating a Waypoint 1. Access the Main Menu and tap “Create”. 2. Tap “Waypoint” from the Create Menu. 3. Select “Current Location”, “Point On Map”, or “Coordinates”. Current Location displays the Waypoint screen with the coordinates for your present location filled in.
Add Media: waypoint. 5. (Top center of display). Tap the add media icon to add pictures for this Tap the green check button to accept the information and save the waypoint. Trail Creating a Trail from Current Track History 1. Access the Main Menu and tap “Create”. 2. Tap “Trail” from the Create Menu. 3. Select “Current Track”. 4. Use the keypad to enter a name for the trail. (The default name “TrailXXX” will be used if no name entered.) 5. When the name has been entered, tap .
4. The Geocache screen provides the fields needed to identify the waypoint and its location. The fields can be modified to customize the waypoint. 5. Icon: Tap the icon to display all possible icons that can be used to represent the waypoint. Tap the desired icon to select and close the window. Geocache Name: (Default “GCXXX”). Tap the waypoint name field to display the keyboard. Enter the name and tap the green button.
5. Tap “Add Point” to repeat step 3 to continue adding waypoints to the route. 6. Tap “Done” when the route is complete. 7. Tap “Save Route”. 8. The Save Route Screen is displayed. Tap on the Route name (default “RouteXXX”) to assign a name to the route. Tap on the alert button to turn alerts for this route on or off. 9. Create Menu Tap ‘Save’ to store the route into memory.
Go To Menu The Go To Menu is used to access the functions used to activate Go To’s and saved routes. Accessing the Go To Menu 1. From the Map screen, press the MENU button. 2. Tap on ‘GO TO’ and the Go To Menu will be displayed. Waypoints Go To a Waypoint 1. Access the Main Menu and tap “GO TO”. 2. Tap Waypoint icon. 3. Select a waypoint from the list of saved waypoints. 4. Tap 5. The Waypoint information screen is displayed. 6. If it is correct waypoint, tap 7. Tap , . .
9. Tap 10. Tap to enter or modified stored media. to turn waypoint alarms on or off. 11. When the information for the waypoint is correct, tap . Deleting a Waypoint 1. Access the Main Menu and tap “GO TO”. 2. Tap Waypoint icon. 3. Select a waypoint from the list of saved waypoints. 4. Tap 5. Confirm deleting the waypoint by tapping , . Duplicating a Waypoint 1. Access the Main Menu and tap “GO TO”. 2. Tap Waypoint icon. 3. Select a waypoint from the list of saved waypoints. 4.
Places Creating a Go To to a Place 1. Access the Main Menu and tap “GO TO”. 2. Tap “Places” from the Go To Menu. 3. Select the map to be used. (Basemaps contain limited places to select from. Detailed maps include a wide variety of points of interest to be chosen.) 4. Select a detailed map and tap 5. Select a category and tap 6. Select a subcategory and tap 7. Select a place from the list and tap 8. The Place Information screen is displayed. To activate the Go To, tap 9. Tap , , , , . .
Deleting a Trail 1. Access the Main Menu and tap “GO TO”. 2. Tap “Trail”. 3. Select a trail from the list of saved trails. 4. Tap 5. Confirm deleting the waypoint by tapping , . Duplicating a Trail 1. Access the Main Menu and tap “GO TO”. 2. Tap “Trail” from the Go To Menu. 3. Select a saved trail from the list and tap 4. The Trail Information screen is displayed. 5. Tap 6. Tap ‘Duplicate Trail’. 7. Use the keypad to enter a name for the trail. 8. Tap , . .
Elevation: Tap the Elevation field to display the keyboard. Enter the elevation and tap the green button. Difficulty: Assign a difficulty rating to this cache. Terrain: Indicate the type of terrain the cache is located in. GCType: Geocache type. Hint: Field for including hints about the cache site. Hider: Name of the person that originated the cache site. Date: Date the cache site was created. Add Media: cache site. (Top center of display). Tap the add media icon to add pictures for this 5.
Route Activating a Route 1. Access the Main Menu and tap “GO TO”. 2. Tap “Route” from the Go To Menu. 3. Select a saved route, 4. 5. To activate the route, tap Tap . . Editing a Route 1. Access the Main Menu and tap “GO TO”. 2. Tap “Route” from the Go To Menu. 3. Select a saved route. 4. Tap . 5. Tap to save the route. Duplicating a Route 1. Access the Main Menu and tap “GO TO”. 2. Tap “Route” from the Go To Menu. 3. Select a saved route. 4. Tap 5. Tap ‘Duplicate Route’. 6.
4. Tap 5. Tap ‘Delete Route’. 6. Tap Go To Menu . to confirm.
View Menu Local Info The Local Info option provides a way of viewing tide and current information (if a detailed map has been installed with tide and current information), best fishing and hunting times, and sunrise/sunset/ lunar information. Viewing Best Fishing and Hunting Times for Current Location 1. Access the Main Menu and tap “View”. 2. Tap ‘Fish And Hunt’. 3. The Fish and Hunt screen is displayed for your current location. 4.
User Profiles You can set user profiles for various operations of the Magellan Triton that can be loaded easily. Activating User Profiles 1. Access the Main Menu and tap “View”. 2. Tap ‘Profiles’. 3. Select Hiking, Marine, or Geocaching. 4. Tap to access the display options. Tap to access the map options. Tap to access the navigation options. Tap to access the alert options.
Map options Map Detail Low, Medium, High Waypoint Names On or Off Displays waypoint names on the map screen Geocache Icons Not Found, All, Off Displays geocache waypoint icons on the map screen Place Names On or Off Displays names of waypoints stored in the receiver as places Places Shown List of possible places Select from list of places which ones are to be displayed on the map screen Trail Lines On or Off Display of trail (track) lines on the map screen Orientation North or Course Set
Anchor Off, 1 mi, 0.5 mi Off Course Off, 10 ft, 20 ft Arrival On or Off Route Proximity Off, 1 mi, 0.5 mi Trail Proximity Off, 1 mi, 0.5 mi Waypoint Proximity Off, 1 mi, 0.5 mi Geocache Proximity Off, 1 mi, 0.5 mi Place Proximity Off, 1 mi, 0.5 mi Low Battery On or Off Alarm Clock Set time for alarm Tracks Viewing Track Vertical Profile 1. Access the Main Menu and tap “View”. 2. Tap Track. 3. Tap Vertical Profile. 4.
Setting Track Log Options 1. Access the Main Menu and tap “View”. 2. Tap Track. 3. Tap Options. 4. Select parameters for if and how track logs are recorded. 5. Tap to accept. Maps Viewing Map Information 1. Access the Main Menu and tap “View”. 2. Tap Maps to view details on the installed background map and detail map (if loaded). 3. Tap OK to exit. Media Viewing Stored Media 1. Access the Main Menu and tap “View”. 2. Tap Media to view images stored on an optional SD card.
Settings Navigation Setting Navigation Options 1. Access the Main Menu and tap “View”. 2. Tap Settings. 3. Tap Navigation. Units (of Measure) Miles, Kilometers, Knots North Reference Magnetic or True Coordinate system Lat/Lon (DD), Lat/Lon (DM), Lat/Lon (DMS), UTM Map Datum Select from list. Volume & Brightness Setting Volume & Brightness 1. Access the Main Menu and tap “View”. 2. Tap Settings. 3. Tap Volume & Brightness. 4.
3. Tap Clear Memory. 4. Confirm. (Use this option with caution.) Restoring Factory Settings 1. Access the Main Menu and tap “View”. 2. Tap Settings. 3. Tap Restore Factory Settings. 4. Confirm. Formatting SD Card 1. Access the Main Menu and tap “View”. 2. Tap Settings. 3. Install SD card to be formatted. 4. Tap Format SD Card. 5. Confirm. (This will erase all information on the SD card.) About Displaying Information About the Triton Receiver 1. Access the Main Menu and tap “View”. 2.