® MapSend Lite ® Quick Reference* * For Magellan® eXploristTM 210, eXplorist 400, eXplorist 500, eXplorist 600 and eXplorist XL GPS Receivers © 2006 Thales Navigation, Inc. All rights reserved. The Magellan logo, Magellan, eXplorist and MapSend are trademarks of Thales Navigation, Inc.
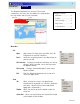
1 Introduction Overview Magellan MapSend Lite version 2.0 is a freely licensed PC application that offers a user a means to view and work with maps that are usable on supported Magellan handheld GPS receivers. The Magellan MapSend Lite can: • Chapter Contents: Introduction....................1 Installation ......................2 Open maps that work with supported Magellan First Time Use.................3 handheld GPS receivers. Maps must be in eXporist format with an .imi extension.
2 Introduction Overview PC Requirements • Microsoft® Windows® 2000 and XP • Pentium® 800MHz or better (or equivalent) • Minimum of 128 MB RAM • Minimum of 20 MB hard disk space • DirectX 8.0 compatible video card Installation Magellan MapSend Lite is downloadable from the Web free of charge for Magellan handheld GPS receiver users. Set your browser to: http://www.magellangps.com/support/mapsendlite/ 1.
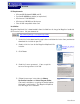
3 Introduction Overview 6. If the installation is successful, an InsallShield Wizard Complete window is displayed. Click Finish. First Time Use After the successful installation, a window will appear displaying shortcuts to the files that have been installed. • Magellan on the Web is an Internet Shortcut that opens your browser and takes you to the Magellan Home Page. • MapSend Lite is the icon that opens the MapSend Lite application.
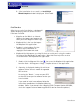
4 Introduction Overview 3 Every time you launch the Magellan MapSend Lite application, a check of new updates is performed. If there is an update to the application, an auto update window is displayed. You can update now or close the window and update later. The application opens and is ready for use. The next chapter descibes the major components of the Magellan MapSend Lite application.
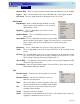
4 Introduction Overview The Magellan MapSend Lite consists of five major components; the menu bar, the toolbar, the map window, the map viewer and the search window. Chapter Contents: Toolbar Menu Bar Menu Bar ........................1 Toolbar............................2 Overview Map Map Viewer Overview Map.................3 Map Viewer.....................4 Search Window ...............
5 Introduction Overview Overview Map Legend When checked, displays the overview map above the search window. When checked replaces the Search Window with a map legend window. Full Screen Sets the application to be displayed on the full screen. GPS Contents Map Manager Opens a Map Manager window accessing maps saved on your hard drive. You can open, add or delete a map. Waypoints This is a drop down menu that accesses waypoint tools.
6 Introduction Overview Preferences Window Size Locked When unchecked the Map Viewer window can be resized. When checked the Map Viewer window is locked. North Reference Used to select the north reference used (true north or magnetic) for the map in the Map Viewer window. Distance Units Used to select the units of measure (metric, U.S., nautical + meters or nautical +feet). POI Properties Displays a POI window that can be used to turn off or on POI icons.
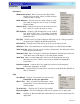
7 Introduction Overview Toolbar The Toolbar provides quick access to some of the functions found in the Menu Bar. These were chosen as they will be the most common functions used. Map Manager Cntl+M Opens a Map Manager window displaying maps saved on your hard drive. You can open, add or delete a map. Open Cntl+O Opens data files from either your GPS Unit, SD Programmer or your PC hard drive. Zoom In Selects the zoom cursor to zoom in on the map displayed in the Map Viewer window.
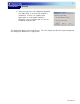
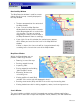
8 Introduction Overview Overview Map Window The Map Overview window is used for a more global view of the map currently displayed in the Map window. • The box corresponds to the contents of the Map window. • If you click on the Map Overview window, both the box and the contents of the Map window will re-center to the click location. The box can also be dragged by the mouse, and the map in the Map Window will move accordingly.
9 Introduction Overview Smart Search The Smart Search dialog finds addresses, POIs, coordinates and other searchable map objects with single text input. The Search Window is located in the right part of the Main Window and is displayed after MapSend starts. In the search field enter the name of the object you are searching for and press the Search button. Tips: It is better to enter at least several first letters or numbers of the object's name.
10 Introduction Overview Address Search This is an advanced address search which allows to search by some specified address fields. Fill in the search address fields: House: Type or insert a number of a house (if known). Street: Type or insert the name of the street. This is a required field. City: Type or insert a name of the city (if known). State: Type or insert a name of the state (if known). ZIP: Type or insert the specific ZIP code (if known). Press the Search button.
11 Introduction Overview POI Search The POI Search dialog finds POIs and other searchable map objects. In the Search for field, enter the name of the object you are searching for. Tips: It is possible to enter only several starting letters or numbers in the object name. From the Search criterion list-box choose an appropriate search criterion: By Name Searches objects by its name. On Current View Searches objects within Map Window.
12 Introduction Overview Coordinate Search The Coordinates Search dialog finds a location by its coordinates. From the Search window click Coordinates. The following dialog appears: Latitude: N/S Choose N (north) or S (south) from the list. º Type the number or click the arrows to input the latitude degrees. ' Type the number or click the arrows to input the latitude minutes. " Type the number or click the arrows to input the latitude seconds. Longitude: W/E Choose W (west) or E (east) from the list.