
User's Manual


6
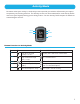
Recording an Activity
Before the start of an activity, select the
Activity Profile that matches the activity
type and desired settings of the activity you
are performing. Activity Profiles are fully
customizable and include: Activity Types (run,
bike, swim, other), data screens, alerts, and
many more customizable features.
Setting the Activity Profile
1. Press and hold the DOWN button.
2. Use the DOWN button to highlight
“Settings”.
3. Press ENTER.
4. Use the DOWN button to highlight
“Activity Profiles”
5. The first line displays the currently
selected activity. If it needs to be
changed, press ENTER.
6. Use the UP and DOWN buttons to
highlight the activity type and press
ENTER.
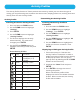
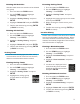
Preset Activity Profiles
Icon Name Full Name
MULTI Activity made up of
multiple activities.
ROAD Running - Road
MRTHN Running - Marathon
TRAIL Running - Trail
ROAD Bicycling - Road
MNTN Bicycling - Mountain
CRIT Bicycling - Criterium
OPEN Swimming
WALK Walking
HIKE Hiking
Setting the Activity Profile (Shortcut)
1. Press and hold the UP and DOWN
buttons.
2. Use the UP and DOWN buttons to
highlight the Activity Profile and press
ENTER.
Starting the Activity Recording
With the appropriate Activity Profile selected,
start recording an activity. If you are already
recording an activity, you will need to reset the
recording before continuing. (See
Saving the
Activity Recording
.)
1. While viewing an Activity screen press
ENTER.
2. The New Activity popup is
displayed and Switch will
begin recording the activity.
3. To Stop recording, press
ENTER.
4. Press ENTER again to
resume.
5. The recording can pause
automatically when there is
no change in location (i.e.,
stopped). Auto Pause can be turned on
or off in the Activity Settings.
Note: By default, Auto Pause is active
only for biking activities.
Saving the Activity Recording
The activity recording can be saved to the
history which can then be uploaded to various
fitness sites.
1. Press ENTER to stop the
recording.
2. Press and hold ENTER. The
Reset popup is displayed.
Note: If the recording is not stopped or
if there is no active recording, the “Action
Not Permitted” popup is displayed.
3. Select “Save & Reset” to store the activity
to History or select “Delete & Reset” to
erase the recording.
Note: Press the BACK button to cancel.