USB Capture Plus User Manual Revised on 17/08/2017
Content 1 Function of the Interfaces............................................................................................... 1 1.1 USB Capture HDMI Plus ........................................................................................... 1 1.2 USB Capture SDI Plus ............................................................................................... 1 1.3 USB Capture DVI Plus...............................................................................................
1 / 18 1 Function of the Interfaces 1.1 USB Capture HDMI Plus INPUT: The input interface of HDMI signal. Support up to “4096x2160 4:4:4/4:2:2 30fps” or “4096x2160 4:2:0 60fps” LOOP THRU: The loop through interface. The received HDMI signal will be sent to the other device without being processed. Headphones: The headphone interface, through which source audio or audio from the computer can be monitored. Mic: The microphone interface, through which voice can be recorded.
2 / 18 1.3 USB Capture DVI Plus 1. INPUT: The input interface of HDMI, VGA, component (YPbPr), composite (CVBS) and YC(S-video) signal. Line Out Line In : Output the HDMI audio to other devices. : Connect to external audio device to add an audio input. USB: The USB interface, by which the capture device can be connected to the USB 3.0 interface on the computer.
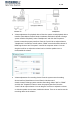
3 / 18 2 Status of the Indicator Light On: The indicator light will be on steadily when a signal source is connected. Breathing: The indicator light is pulsing slowly when there is no signal, the signal cannot be locked or supported. Flashing: The indicator light flashes when there is a problem with the device. 3 System Device Display 3.1 How to Find the System Device Windows Select System Tools - Device Manager under the Computer Manager. Select Imaging Devices to view the video device name.
4 / 18 *-usb description: product: vendor: USB id: info: version: serial: Mac Capture HDMI+ Magewell physical bus Video 7 usb@2:7 19.2f B204161124003 capabilities: usb-3.00 Click System to open the System Preferences interface. configuration: driver=usbhid maxpower=800mA speed=5000Mbit/s Click Sound to view the audio device name as below. 3.
5 / 18 USB Capture HDMI+ Mic【Microphone audio device name】 USB Capture SDI Plus: Imaging devices: USB Capture SDI+【SDI Plus video device name】 Sound, video and game controllers: USB Capture SDI+【SDI Plus audio device name】 USB Capture DVI Plus: Imaging devices: USB Capture DVI+【DVI Plus video device name】 Sound, video and game controllers: USB Capture DVI+【DVI Plus audio device name】 4 Typical Solutions for USB Capture Devices 4.
6 / 18 3. Volume adjustment for playback device: Enter the system sound playback device interface (Start Menu>>Control Panel>>Hardware and Sound>>Sound>>Change system sounds>>Playback). Select “Headphones” and click the “Properties” button to enter the property interface. Enter the “Levels” tab to adjust volumes. “Headphones” controls the overall volume, “HDMI” controls the audio volume of HDMI signal source and “Computer” controls the computer volume.
7 / 18 5. The audio part can be easily set by using USB Capture Utility. Please refer to the document for details. Capture the signal of PC itself There are 4 solutions according to the computer type and the number of monitors.
8 / 18 For audio device connection, please refer to the “Capture signal from camera / game console / video player / another computer”. 1. Capturing: Connect the HDMI output interface of the laptop to the “INPUT” interface of the USB Capture HDMI Plus via HDMI cable. Then the desktop of the laptop is captured by USB Capture HDMI Plus. 2. Loop Through: “LOOP THRU” is not needed in the solution. 3. Connect the USB Capture HDMI Plus to the laptop via the included USB 3.0 cable. 4.
9 / 18 Solution B Required device: one laptop, one monitor 1. Capturing: Connect the graphics output interface of the laptop to the “INPUT” interface of the USB Capture HDMI Plus via HDMI cable. Then the desktop of the laptop is captured by USB Capture HDMI Plus. 2. Loop Through: Connect the monitor to the “LOOP THRU” interface of the capture device to control the third party software or display any content that does not need to be captured. 3.
10 / 18 5. In the third party capture / recording / live streaming software, select "USB Capture + Computer" as the audio input device. In this solution, the HDMI playback device and the recording device are invalid. To adjust the volume, please refer to the“Capture video and audio information of the camera / game console / video player / another computer” section to adjust the corresponding “Computer” and “Mic” volume. 6.
11 / 18 2. Loop Through: Connect the monitor to the “LOOP THRU” interface of the capture device. Or users can connect the monitor to the graphic interface of the desktop instead of connecting it to the “LOOP THRU” interface 3. Connect the USB Capture HDMI Plus to the computer via the included USB 3.0 cable. 4. If users want to use the headphones connected to the capture device to play the audio, please select USB Capture HDMI Plus as the system default playback device. 5.
12 / 18 1. Capturing: Connect the graphics output interface of the desktop computer to the “INPUT” interface of the USB Capture HDMI Plus via a HDMI cable. 2. Connect Monitor 1 to the output graphic interface of the desktop. 3. Loop Through: Connect Monitor 2 to the “LOOP THRU” interface of the capture device. 4. Connect the USB Capture HDMI Plus to the computer via the included USB 3.0 cable. 5.
13 / 18 console / video player / another computer” section to adjust the corresponding “Computer”and “Mic”volume. 7. To avoid video feedback when previewing the screen, users can disable the software preview function, or minimize the software. 4.2 Typical solution for USB Capture SDI Plus Capture signal from camera / professional video equipment 1. Connect the SDI output interface of the camera to the “INPUT” interface of the USB Capture SDI Plus via a SDI cable. 2.
14 / 18 4.3 Typical solutions for USB Capture DVI Plus Capture signal from camera / professional equipment / another computer via DVI cable 1. Capturing: Connect the DVI output interface of the camera / professional equipment / another computer to the “INPUT” interface of the USB Capture DVI Plus via DVI cable. You can connect the line in audio device according to your needs. 2.
15 / 18 A: Enter the system sound playback device interface (Start Menu>>Control Panel>>Hardware and Sound>>Sound>>Change system sounds>>Playback). Check if the Headphones is ticked. If not, right click the device and select “Set Default” and “Set as the default communication device”. 2. Q: How to use the computer speakers to play the captured sound after capture device is connected? A: Set the audio card as the default device in the "Playback device". 3.
16 / 18