0.1 Cu. Ft. Top Mount Refrigerator Specifications are subject to change without prior notice for purpose of product improvement.
1
4-5 6 6 6 TEMPERATURE CONTROL PANELS 7 SETTING THE TEMPERATURE CONTROL 7 FREEZING FRESH FOODS 8 9 - 11 12 12 12 12 13 - 14 LIMITED WARRANTY 15 2
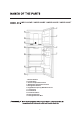
HMDR1000WE / HMDR1000BE / HMDR1000SE / HMDR1000ST 1. Freezer Section 2. Freezer Shelf 3. Freezer Temperature Control 4. Refrigerator Temperature Control 5. Refrigerator Shelves 6. Vegetable Crispers (2) With Glass Cover 7. Leveling Leg 8. Freezer Door 9. Freezer Door Bins 10. Refrigerator Door 11.
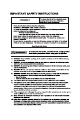
WARNING 4
5
Do not attempt to repair or replace any part of your refrigerator unless it specifically recommended in this manual. All other servicing should be referred to a qualified technician, so as to minimize the risk of possible ignition due to incorrect parts or improper service.
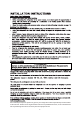
Temperature Control Panels Refrigerator Temperature Control SET(HOLD 3 SEC ON/OFF): This will turn off all cooling functions but not the power to the unit. Freezer Control Setting the Temperature Control Your refrigerator has one control for regulating the temperature. The temperature control is located on the top of the refrigerator compartment. As well as a control knob in the freezer to balance the cold air distribution between the two compartments.
NOTE: If the unit is unplugged, has lost power, or is turned off, you must wait 3 to 5 minutes before restarting the unit. If you attempt to restart before this time delay, the refrigerator-freezer will not start. NOTE: We do not recommend the installation of the refrigerator where the temperature will drop below 50ºF (13ºC) or rise above 110ºF(43ºC). The compressor will not be able to maintain proper temperatures inside the refrigerator.
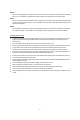
Tool required: Philips screwdriver, Flat bladed screwdriver, Hexagonal spanner. Ensure the unit is unplugged and empty. To take the door off, it is necessary to tilt the unit backwards. You should rest the unit on something solid so that it will not slip during the door reversing process. All parts removed must be saved to do the reinstallation of the door. Do not lay the unit flat as this may damage the coolant system. It’s better that 2 people handle the unit during assembly. 1.
5. Move shaft sleeve and pin hole plug from left side to right side. 6. Move the middle hinge hole covers from left side to right side. 7. Unscrew bottom hinge. Then remove the adjustable feet from both side. 8. Move the bottom hinge hole covers from left side to right side. 9. Disassemble right hinge, find out right bottom hinge from spare parts bags and fix it.
10. Refit the bracket fitting the bottom hinge pin. Replace both adjustable feet. Transfer the lower door to the property position. 11. Make the middle hinge reverse the direction 180º, then transfer it to the left property position. Make the middle hinge pin in the upper hole of the lower door, then tight the bolts. 12. Place the upper door back on. Ensure the door is aligned horizontally and vertically so that the seal are closed on all sides before finally tightening the top hinge.
12
13
14
In Home In Home In Home In Home HMDR1000WE HMDR1000BE HMDR1000SE HMDR1000ST 15
Refrigerador de 10.1 pies cúbicos Las especificaciones están sujetas a cambios sin previo aviso para mejorar el producto.
1
INSTRUCCIONES DE SEGURIDAD IMPORTANTES 4-5 6 6 6 CÓMO OPERAR TU REFRIGERADOR PANELES DE CONTROL DE TEMPERATURA 7 CÓMO CONFIGURAR EL CONTROL DE TEMPERATURA 7 CÓMO CONGELAR ALIMENTOS FRESCOS 8 CÓMO CAMBIAR LA PUERTA REVERSIBLE 9 - 11 12 12 12 12 13 - 14 GARANTIA LIMITADA 15 2
HMDR1000WE / HMDR1000BE / HMDR1000SE / HMDR1000ST 1. Sección del congelador 2. Repisa del congelador 3. Control de temperatura del congelador 4. Control de temperatura del refrigerador 5. Repisas de refrigerador 6. Cajones para vegetales (2) con cubierta de vidrio 7. Pata de nivelación 8. Puerta del congelador 9. Recipientes en la puerta del congelador 10. Puerta del refrigerador 11.
INSTRUCCIONES DE SEGURIDAD IMPORTANTES ADVERTENCIA ADVERTENCIA ADVERTENCIA ADVERTENCIA ADVERTENCIA ADVERTENCIA 4
5
No intente reparar o reemplazar ninguna parte de su refrigerador a menos que se recomiende específicamente en este manual. Todos los demás servicios deben ser remitidos a un técnico cualificado, para minimizar el riesgo de una posible ignición debido a piezas incorrectas o un servicio inadecuado.
CÓMO OPERAR TU REFRIGERADOR PANELES DE CONTROL DE TEMPERATURA Control de temperatura del refrigerador CONFIGURAR (MANTENER 3 SEG ON/OFF): Así se apagarán todas las funciones de enfriamiento, pero no el suministro de corriente a la unidad. Control del congelador CÓMO CONFIGURAR EL CONTROL DE TEMPERATURA Tu refrigerador tiene un control para regular la temperatura El control de temperatura está ubicado en la parte superior del compartimiento del refrigerador.
NOTA: Si la unidad está desenchufada, pierde potencia o se apaga, tienes que esperar de 3 a 5 minutos antes de reiniciarla. Si intentas reiniciar antes de este retraso temporal, el refrigerador-congelador no arrancará. NOTA: No recomendamos instalar el refrigerador donde la temperatura descienda a menos de 50ºF (13ºC) o suba por encima de 110ºF (43ºC). El compresor no podría mantener las temperaturas apropiadas dentro del refrigerador.
CÓMO CAMBIAR LA PUERTA REVERSIBLE Herramientas necesarias: Desarmadores Philips y de cabeza plana, llave hexagonal. Asegura que la unidad está desenchufada y vacía. Para desmontar la puerta, es necesario inclinar la unidad hacia atrás. Debes colocar la unidad sobre algo sólido para que no resbale durante el proceso de inversión de la puerta. Todas las partes retiradas tienen que conservarse para reinstalar la puerta.
5. Pasa la funda del eje y el tapón del orificio del pasador del lado izquierdo al derecho. 6. Pasa las cubiertas del orificio de la bisagra intermedia del lado izquierdo al derecho. 7. Desenrosca la bisagra inferior. Después, quita las patas ajustables de ambos lados. 8. Pasa las cubiertas del orificio de la bisagra inferior del lado izquierdo al derecho. 9. Desarma la bisagra derecha, busca la bisagra inferior derecha en las bolsas de piezas de repuesto y fíjala.
10. Reajusta el pasador que fija la bisagra inferior a su soporte. Vuelve a colocar ambas patas ajustables. Pasa la puerta inferior a su debida posición. 11. Invierte la dirección de la bisagra intermedia en 180º y pásala enseguida a la debida posición a la izquierda. Pon el pasador de la bisagra intermedia en el orificio superior de la puerta inferior y aprieta enseguida los tornillos. 12. Vuelve a colocar la puerta superior.
12
13
14
HMDR1000WE HMDR1000BE HMDR1000SE HMDR1000ST En Casa En Casa En Casa En Casa 15