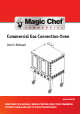
Commercial Gas Convection Oven User's Manual Model M38COD PLEASE READ THIS MANUAL CAREFULLY BEFORE USING YOUR COMMERCIAL STOCKPOT RANGE AND KEEP IT FOR FUTURE REFERENCE.
PRODUCT REGISTRATION Thank you for purchasing a Magic Chef Commercial product. The first step to protect your new product is to complete the product registration on our website: www.mcappliance.com/register. The benefits of registering your product include the following: 1. Registering your product will allow us to contact you regarding a safety notification or product update. 2. Registering your product will allow for more efficient warranty service processing when warranty service is required. 3.
CONTENTS PRODUCT REGISTRATION . . . . . . . . . . . . . . . . . . . . . . . . . . . . . . . . . . . . . . . . . . . . . . . . . . . . . 2 PRECAUTIONS . . . . . . . . . . . . . . . . . . . . . . . . . . . . . . . . . . . . . . . . . . . . . . . . . . . . . . . . . . . . . . . .4 IMPORTANT SAFETY INSTRUCTIONS . . . . . . . . . . . . . . . . . . . . . . . . . . . . . . . . . . . . . . . . . . . 5 SPECIFICATIONS. . . . . . . . . . . . . . . . . . . . . . . . . . . . . . . . . . . . . . . . . . . . . . . . . . .
PRECAUTIONS EXPLANATION OF SYMBOLS WARNING Hazards or unsafe practices which COULD result in severe personal injury or death. CAUTION Hazards or unsafe practices which COULD result in minor personal injury or property damage. WARNING: Read and understand all safety precautions. Failure to follow all instructions described in this user manual may result in electric shock, fire and/or serious personal injury.
IMPORTANT SAFETY IN STRUCTIONS WARNING Hazards or unsafe practices which COULD result in severe personal injury or death. CAUTION Hazards or unsafe practices which COULD result in minor personal injury or property damage. IMPORTANT In the event a gas odor is detected, shut down units at main shutoff valve and contact the local gas company or gas supplier for service. FOR YOUR SAFETY Do not store or use gasoline or other flammable vapors or liquids in the vicinity of this or any other appliance.
22. The appliance is strictly for professional use and must be used by qualified personnel. 23. The installation, start-up and maintenance of the appliance must be carried out by qualified personnel. 24. Installation must be done in accordance with all local and federal codes. The manufacturer is not responsible for damages due to an incorrect installation, bad maintenance or incorrect use.
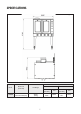
SPECIFICATIONS Figure 1 Gas Type Model M38COD Dimensions (W x H x D) Net Weight 38.2” x 57.8” x 40.1” 970 x 1468 x 1019 (mm) 408 lbs. (185 kg) NG 7 Pressure (PSI/W.C.) 0.144 PSI 4” W.C. LP BTU Pressure (PSI/W.C.) BTU 54,000 0.36 PSI 10” W.C.
INSTALLATION INSTRUCTIONS CAUTION : Read all instructions before installing BEFORE INSTALLING 1. Remove all packing material and tape, as well as any protective plastic from the equipment. 2. Place the equipment in the desired position and height. 3. Install the four (4) legs onto the equipment. 4. Clean and dry the equipment thoroughly before using. INSTALLATION The installation of this equipment must conform with local codes, or with the National Gas Code, ANSIZ223.
ELECTRICAL CONNECTION Your oven is supplied for connection to a 115V, single phase grounded circuit. The electric motor, oven lights, indicator lights and control circuits are connected through an electric supply cord found at the rear of the oven. Warning: This appliance is equipped with a three-prong (grounding) plug for your protection against shock hazard and should be plugged directly into a properly grounded three-prong receptacle. DO NOT cut or otherwise remove the grounding prong from this plug.
INSTRUCTIONS FOR FIELD CONVERSION TO LPG GAS WARNING: Improper installation, adjustment, alteration, service or maintenance can cause property damage, injury or death. Read the installation, operating and maintenance instructions thoroughly before installing or servicing equipment. WARNING: This conversion kit shall be installed by a qualified service agency in accordance with the manufacturer’s instructions and all applicable codes and requirements of the authority having jurisdiction.
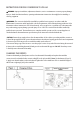
GAS VALVE CONVERSION 1. Remove the regulator cap screw and pressure regulator adjusting screw. (See Figure 3) 2. Remove the existing regulator spring from the regulator housing. 3. Insert the replacement spring into regulator housing 4. Install the pressure regulator adjusting screw and give it eight (8) full turns. This would set the manifold pressure close to required setting for normal operation. 5. Replace the regulator cap screw. 6.
• Example B Installation Plate • Example C Warning Label fixed to side of the unit 12
OPERATION CONTROL PANEL Power Switch: Main power supply to this oven Fan Mode: In COOK mode, the fan runs continuously unless the door is open. In COOL mode, the fan runs continuously even if the doors are open. This is to cool down the unit with the door open. Cook Timer: Turn knob to set cooking time. A buzzer will sound when pre-set time is up. Turn the knob to OFF to disable the buzzer. The timer is just a reminder and is independent of the oven control.
Wait until the HEAT ON indicator cycles on and off three times, indicating that the pre-set temperature has been reached. Open the oven doors, load the food to be cooked into the oven, and close the doors. Set the cook timer as desired (up to 55 minutes). Be aware that the timer does not control the temperature of the oven. The timer knob will rotate counterclockwise as the timer runs down, indicating how much time remains. You can turn the knob while cooking to increase or decrease the remaining time.
TROUBLESHOOTING Before requesting any service on your unit, please check the following points: Problem No Heat Oven has not reached proper temperature Convection fan does not run Food cooks unevenly Food is dry Oven cycles 3 times and locks itself out Possible Cause Solution Defective Ignitor Call Customer Service Power switch on control panel is off Turn Power Switch to ON Doors are open Close Doors Defective door switch Call Customer Service Gas valve set to the closed position Turn gas v
LIMITED WARRANTY MC Appliance Corporation warrants each new Commercial Stockpot Range to be free from defects in material and workmanship, and agrees to remedy any such defect or to furnish a new part(s), at the company’s option, for any part(s) of the unit that has failed during the warranty period. Parts and labor expenses are covered on this unit for a period of one year from the date of purchase. A copy of the dated sales receipt or invoice is required to receive warranty service, replacement or refund.
CNA International, Inc. d/b /a MC Appliance Corporation. All rights reserved. Magic Chef® logo is a registered trademark of CNA International, Inc. www.mcappliance.