BLENDER MCBL5CG CAUTION: BEFORE USE, PLEASE READ AND FOLLOW ALL IMPORTANT SAFEGUARD, PRECAUTIONS AND OPERATING INSTRUCTIONS.
Table of Contents Safety Instructions -------------------------------------------- 3-4 Part and Features ---------------------------------------------- 5 Assembling Blender ------------------------------------------ 6 2-Way Safety System ------------------------------------ 6-7 Operating Instructions --------------------------------------- 7 Cleaning and Maintenance ---------------------------------- 8 Warranty -------------------------------------------------------------- 9 Spanish section --
What You Need to Know About Safety Instructions Warning and Important Safety Instruction appearing in this manual are not meant to cover all possible conditions and situations that may occur. Common sense, caution and care must be exercised when installing, maintaining, or operating appliance. Always contact your dealer, distributor, service agent or manufacturer about problems or conditions you do not understand.
10) Do not use attachments or accessories not recommended or sold by the manufacturer. They may cause fire, electric shock or injury. 11) Unplug the appliance from the outlet when not in use, assembling and disassembling, and before cleaning. Make sure the appliance stops completely before disassembling. 12) Do not let cord hang over edge of table or counter, or touch hot surfaces. 13) Do not place the appliance on or near a burner or a hot oven.
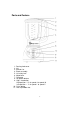
Parts and Feature 1 - Pouring hole cover 2 - Lid 3 - Blender Jar 4 - Blade assembly 5 - Lid safety lock 6 - Motor base 7 - Off button 8 - 10 speeds buttons 9 - High / Low button High position – ‘H’ for speed 6 to speed 10 Low position – ‘L’ for speed 1 to speed 5 10 - Pulse button 11 - Non-slip rubber feet 5
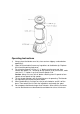
Assembling Blender To use the blender, start by assembling the blender jar (3), and then place the blender jar (3) on the motor base (6) as described below. Assembling: 1) Put the motor base (6) on a steady and even surface 2) Place the rubber seal ring on the blade assembly (4). 3) Position the blade assembly (4) on the inside of the blender jar(3). 4) Turn it counter-clockwise to lock it tightly into position. Important: The blade is sharp. Handle carefully.
Operating Instructions 1) 2) 3) 4) 5) 6) Always place the blender on a flat, clean and non-slippery surface before operating it. Open the lid and add all necessary ingredients to the blender jar. Replace the lid and the pouring hole cover. For using low speeds (1-5) the ‘H’ / ‘L’ button must be recessed, then choose low speeds 1-5. To change to high speeds (6-10) turn unit off, make sure the ‘H’ / ‘L’ button is up, then choose speeds 6-10.
Cleaning and Maintenance 1) 2) 3) Always unplug the blender from the electrical outlet before cleaning. Pour warm water and some drops of washing detergent into the jar. Mix the liquid by pressing the pulse button for a short while. Caution: handle the blade assembly carefully. It is sharp and may cause injury. Do not attempt to remove blades from cutting assembly.
Magic Chef Limited Warranty This Magic Chef product is warranted, to the original purchaser or gift recipient, to be free from any manufacturing defects under normal use and conditions for a period of one (1) year from the date of purchase as shown on retailer’s receipt. The obligation of Magic Chef under this warranty shall be limited to repair or replacement (at our option) during the warranty period, of any part that proves to be defective in material or workmanship under normal installation and use.
Licuadora MCBL5CG PRECAUCIÓN: Antes de usar, sírvase leer y observar todas las advertencias, precauciones e instrucciones de operación.
Tabla de contenidos Instrucciones de seguridad ------------------------------ 13 - 14 Partes y características ----------------------------------- 15 Para armar la licuadora ----------------------------------- 16 Sistema de seguridad de dos posiciones ----------- 16 - 17 Para usar la licuadora ------------------------------------- 17 Limpieza y cuidado ---------------------------------------- 18 Garantía -------------------------------------------------------- 19 12
¿Qué necesita saber sobre las instrucciones de seguridad? Las advertencias y las instrucciones de seguridad importantes que aparecen en este manual no cubren todas las condiciones y situaciones que pueden ocurrir. Cuando instale, utilice o realice el mantenimiento del electrodoméstico, utilice el sentido común y opere con precaución y cuidado. Si tiene alguna duda no dude en contactarse con su proveedor, distribuidor, agente de servicios o fabricante.
9) 10) 11) 12) 13) 14) 15) 16) Evitar el contacto con las partes móviles cuando el aparato esté en funcionamiento. No utilizar accesorios no recomendados o vendidos por el fabricante, ya que pueden provocar incendios, golpes de corriente o lesiones a las personas. Desenchufar el aparato del tomacorriente cuando no esté en uso o antes de colocar o sacar un accesorio y antes de limpiarlo. Asegúrese de que el aparato se detenga por completo antes de desarmarlo.
Partes y características 1 - Cubierta del orificio vertedor 2 - Tapa 3 - Jarra 4 - Juego de cuchillas 5 - Anillo obturador de goma 6 - Base del motor 7 - Botón de apagado (OFF) 8 - Botones para 10 velocidades 9 - Botón de High / Low (alta/baja) velocidad Posición alta - 'H' para velocidad 6 a velocidad 10 Posición baja - 'L' para velocidad 1 a velocidad 5 10 - Botón pulsador 11 - Base de goma antideslizante 15
Para armar la licuadora Para utilizar la licuadora se debe empezar por armar la jarra (3) y luego colocar la jarra (3) sobre la base del motor (6) siguiendo las instrucciones a continuación: Armado: 1) Colocar la base del motor (6) sobre una superficie plana y uniforme. 2) Colocar el anillo obturador de goma sobre el juego de cuchillas (4). 3) Ubicar el juego de cuchillas (4) en el interior de la jarra (3). 4) Girar en sentido contrario a las agujas del reloj para que quede trabado en su posición correcta.
Para usar la licuadora 1) 2) 3) 4) 5) 6) Siempre ubicar la licuadora sobre una superficie plana, limpia y no resbaladiza antes de ponerla en funcionamiento. Abrir la tapa e introducir todos los ingredientes necesarios en la jarra de la licuadora. Colocar la tapa y la cubierta del orificio vertedor en su lugar. Para utilizar las velocidades bajas (1-5), el botón 'H' / 'L' debe estar pulsado, luego seleccione velocidades bajas 1-5.
Limpieza y cuidado 1) 2) 3) Siempre desenchufar la licuadora del tomacorriente antes de limpiarla. Verter agua tibia y algunas gotas de líquido limpiador en la jarra. Mezclar los líquidos presionando el botón pulsador brevemente. Precaución: manipular el juego de cuchillas cuidadosamente. Es filoso y puede causar lesiones. No intente extraer las cuchillas del dispositivo.
Garantía limitada de Magic Chef Se garantiza al comprador original o a la persona que lo reciba como obsequio que el presente producto Magic Chef se entrega sin defectos de fabricación y en perfecto estado de funcionamiento por el período de un (1) año a partir de la fecha de compra según se indica en el recibo del minorista.