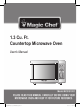
.3 Cu. Ft. Countertop Microwave Oven User's Manual M/W DEF TIMER LOCK lb MCD1311ST Popcorn Frozen Pizza MORE Dinner Plate LES S Fresh Frozen Beverage Vegetable Vegetable AUTO DEFROST Meat Poultr y POWER 1 4 7 KITCHE N TIMER STOP/CLEAR Fish DEFROST 2 5 8 0 3 6 9 CLOCK STAR T/ SPEEDY COOK Model MCD1310ST PLEASE READ THIS MANUAL CAREFULLY BEFORE USING YOUR 2 MICROWAVE OVEN AND KEEP IT FOR FUTURE REFERENCE. CNA_MCD1311ST_R-1B4H0A(영).indd 2 15. 4. 21.
Product Registration Thank you for purchasing a Magic Chef product. The first step to protect your new product is to complete the product registration on our website: www.mcappliance.com/register. The benefits of registering your product include the following: 1. Registering your product will allow us to contact you regarding a safety notification or product update. 2. Registering your product will allow for more efficient warranty service processing when warranty service is required. 3.
PRECAUTIONS TO AVOID POSSIBLE EXPOSURE TO EXCESSIVE MICROWAVE ENERGY (a) Do not attempt to operate this oven with the door open since open-door operation can result in harmful exposure to microwave energy. It is important not to defeat or tamper with the safety interlocks. (b) Do not place any object between the oven front face and the door or allow soil or cleaner residue to accumulate on sealing surfaces. (c) Do not operate the oven if it is damaged.
IMPORTANT SAFETY INSTRUCTIONS When using electrical appliances, basic safety precautions should be followed, including the following: WARNING-To reduce the risk of burns, electric shock, fire, injury to persons or exposure to excessive microwave energy: 1. Read all instructions before using the appliance. 2. Read and follow the specific “PRECAUTIONS TO AVOID POSSIBLE EXPOSURE TO EXCESSIVE MICROWAVE ENERGY” found on page 1. 3. This appliance must be grounded. Connect only to properly grounded outlet.
FEDERAL COMMUNICATIONS COMMISSION RADIO FREQUENCY INTERFERENCE STATEMENT (U.S.A ONLY) WARNING: This equipment generates and uses ISM frequency energy and if not installed and used properly, that is in strict accordance with the manufacturer's instructions, may cause interference to radio and television reception.
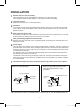
INSTALLATION 1 Examine the oven after unpacking. Check for damage such as a misaligned door, broken door or dent in the cavity. If any damage is visible, DO NOT INSTALL, and notify your dealer immediately. 2 Level, flat location. Install the microwave oven on a level, flat surface. 3 Ventilation Do not block air vents. If they are blocked during operation, the oven may overheat and eventually cause a failure.
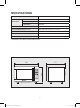
SPECIFICATIONS POWER SUPPLY MICROWAVE 120V AC 60 Hz SINGLE PHASE WITH GROUNDING POWER CONSUMPTION 1500 W OUTPUT POWER 1000 W FREQUENCY 2450 MHz OUTSIDE DIMENSIONS (W X H X D) 560 x 344 x 471 mm (22 x 13.5 x 18.5 in.) CAVITY DIMENSIONS (W X H X D) 369 x 246 x 394 mm (14.5 x 9.7 x 15.5 in.) NET WEIGHT APPROX. 16.7 kG (36.8 lbs.) TIMER 99 min. 99 sec. POWER LEVELS 10 LEVELS * Specifications are subject to change without notice.
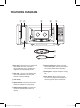
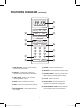
FEATURES DIAGRAM 1 2 3 4 5 M/W DEF TIMER LOCK lb MCD1311ST Frozen Pizza Popcorn MORE Beverage Dinner Plate LESS Fresh Frozen Vegetable Vegetable AUTO DEFROST Meat Poultry POWER 1 4 7 KITCHEN TIMER Fish DEFROST 2 5 8 0 STOP/CLEAR 3 6 9 CLOCK START/ SPEEDY COOK 8 6 7 1 Door latch - When the door is closed it will automatically lock shut. If the door is opened while the oven is operating, the magnetron will automatically shut off.
FEATURES DIAGRAM (continued) 0 M/W DEF TIMER LOCK lb MCD1311ST Popcorn w Frozen Pizza MORE q Dinner Plate LESS e Fresh Frozen Beverage Vegetable Vegetable r AUTO DEFROST Meat t u o Poultry POWER 1 4 7 KITCHEN TIMER Fish DEFROST 2 5 8 0 3 6 9 CLOCK START/ STOP/CLEAR SPEEDY COOK 9 TIME SET PAD - Used to set the cooking time and the present time. y 9 i p t POWER - Used to set power level. y DEFROST - Used to defrost foods.
OPERATION PROCEDURE This section includes useful information about oven operation. 1. Plug power supply cord into a standard 3- pronged 15 Amp, 120V AC 60Hz power outlet. 2. After placing the food in a suitable container, open the oven door and put it on the glass tray. The glass tray and roller guide must always be in place during cooking. 3. Shut the door. Make sure that it is firmly closed. 1 The oven light is on when the microwave oven is operating or the door is opened.
CONTROLS SETTING THE CLOCK When the oven is first plugged in, the display will flash ":0" and a tone will sound. If the AC power ever goes off, the display shows ":0" when the power comes back on. CLOCK 1. Touch CLOCK pad. This is a 12 hour clock system. 2. Touch CLOCK pad once more. This is a 24hour clock system. NOTE: This oven has multiple clock system. If you want 12 hour clock system, omit this step. 3. Enter the correct time of day by touching the numbers in sequence. 4. Touch CLOCK pad. 5.
WEIGHT DEFROSTING WEIGHT DEFROSTING lets you easily defrost food by eliminating guesswork in determining defrosting time. Follow the steps below for easy defrosting. MEAT POULTRY FISH 1. Touch MEAT pad. The Ib indicator light and "1.0" is displayed. 2. Select desired defrosting weight. The display will show what you touched. 3. Touch START pad. MEAT DEFROSTING begins. 1. Touch POULTRY pad. The Ib indicator light and "1.5" is displayed. 2. Select desired defrosting weight.
COOKING IN ONE STAGE POWER x6 1. Touch POWER pad. (Select desired power level.) The M/W indicator lights. The display will show what you touched. NOTE: If steps 1 is omitted, the oven will cook at full power. 2. Touch the number pads for the cooking time. This example shows power level 5. The display will show the numbers you pressed in the order you touched. NOTE: Your oven can be programmed for 99 minutes 99 seconds. (99:99) 3. Touch START pad.
KITCHEN TIMER MODE Timer operates as a minute timer, can be set to delay cooking and used as a hold setting after cooking.However delay cooking can not be programmed for defrost. Timer operates without microwave energy. HOW TO USE AS A MINUTE TIMER KITCHEN TIMER 1. Touch KITCHEN TIMER pad. The TIMER indicator lights and “ : 0” is displayed. 2. Press the amount of time you want to count down. The display will show the numbers you pressed in the order you touched. 3. Touch START pad.
SPEEDY COOK SPEEDY COOK allows you to reheat for 30 seconds at 100% (full power) by simply touching the SPEEDY COOK pad. By repeatedly touching the SPEEDY COOK pad, you can also extend reheating time to 5 minutes by 30 second increments. SPEEDY COOK 1. Touch SPEEDY COOK pad. When you touch SPEEDY COOK, ":30" is displayed. After 1.5 seconds, the oven starts reheating. ONE TOUCH COOKING One touch cook allows you to cook or reheat many of your favorite foods by touching just one pad.
ONE TOUCH COOKING (CONTINUED) BEVERAGE 1. Pour beverage in microwave mug. Place it on the turntable. Do not cover. Stir before serving. 2. Touch BEVERAGE pad once for 1 cup, twice for 2 cups or three times for 3 cups. When you touch BEVERAGE pad once, "1" is displayed. After 1.5 seconds, the display changes into cooking time of quantity and the oven starts cooking. * BEVERAGE * (200ml/cup) • 1 cup(mug) : Touch BEVERAGE once. • 2 cups(mugs) : Touch BEVERAGE twice within 1.5 seconds.
LESS, MORE To alter one touch cooking or cooking time whilst oven is in operation, use LESS or MORE.(except for defrosting) Press LESS/MORE to decrease/increase the one touch cooking time in multiples of 10 seconds. The overall one touch cooking time can be increased to a maximum of 99 minutes 50 seconds. Press LESS/MORE to decrease/increase the cooking time in multiples of 1 minute. The overall cooking time can be increased to a maximum of 99 minutes.
UTENSIL TEST Dishes that do not absorb microwave energy are best for microwave cooking. Lock on the label to verify that particular cups, glasses, plates are indeed suitable, especially paper goods. If you are not sure, try this utensil test to check. • Put the empty utensil in the microwave oven. • Put one cup of water in a glass measure next to the empty utensil. • Heat on P-HI for 1 minute. • After 1 minute the water should be warm but the utensil should not.
COOKING TECHNIQUES Stirring Stir foods such as casseroles and vegetables while cooking to distribute heat evenly. Food at the outside of the dish absorbs more energy and heats more quickly, so stir from the outside to the center. The oven will turn off when you open the door to stir your food. Arrangement arrange unevenly shaped foods, such as chicken pieces or chops, with the thicker, meatier parts toward the outside of the turntable where they receive more microwave energy.
DEFROSTING GUIDE GENERAL INFORMATION ➪ Put the food on a microwave rack (roasts, bone-in pieces) or in a microwave casserole (small pieces such as cubes or strips) or weigh at home on a kitchen scale. Round number to the nearest tenth of a pound and choose that number with each item pads. ➪ The shape of food items, especially larger ones, will vary affect the way defrost. Always check the status after the standing time.
DEFROSTING CHART Item and Weight BEEF Mineed beef 454g (1 lb.) Stew Meat 681 (11/2 lbs.) Loin Roast 907g (2 lbs.) Patties 4 (113g (4 oz.)) PORK Loin Roast 907g (2 lbs.) Spareibs 454g (1 lb.) Chops 4 (142g (5 oz.)) Minced 454g (1 lb.) POULTRY Whole Chicken 1134g (21/2 lbs.) Chicken Breasts 454g (1 lb.) Fryer Chicken (cut up) 907g (2 lbs.) Chicken Thighs 681g (11/2 lbs.) FISH & SEAFOOD Whole Fish 454g (1 lb.) Fish Fillets 681g (11/2 lb.) Shrimp 227g (1/2 lb.
COOKING CHART MEAT ITEM POWER LEVEL COOKING TIMER PER POUND Beef Standing/rolled Rib - Rare P-80 7-9 min. - Medium P-80 8-10 min. - well done P-80 10-12 min. Ground Beef(to brown for casserole) P-HI 4-6 min. Hamburgers, Fresh or defrosted (4 oz. Each) 2 patties P-HI 2-4 min. 4 patties P-HI 3-5 min. Pork Loin, Leg P-80 10-12 min. Bacon 4 slices P-HI 1-2 min. 6 slices P-HI 2-3 min. NOTE: The above times should be regarded only as a guide. Allow for difference in individual tastes and preferences.
VEGETABLE ITEM Asparagus, fresh Asparagus, frozen Broccoli, fresh Broccoli, frozen Brussels sprouts, fresh Brussels sprouts, frozen Carrots, fresh Carrots, frozen Cauliflower, frozen Celery, fresh Corn, fresh Corn, frozen Eggplant, fresh Leeks fresh Lima beans, frozen Mixed vegetables frozen Mushrooms, fresh Okra, frozen Onions, fresh Pea pods(snow peas), frozen Peas and carrots Parsnips, fresh Potatoes, white or sweet, fresh Squash, summer, fresh Squash, summer, frozen Squas
ITEM Fried chicken QUANTITY POWER LEVEL 2 pieces P-HI 4 pieces P-HI 6 pieces P-HI 2 fillets P-HI Fried fresh fillets 4 fillets P-HI 1 P-HI Pizzas (sliced) 2 P-HI 4 P-HI 140~160g(5-6 oz.) P-HI Pouch dinners 280~300g(10-11 oz.) P-HI 2 P-60 Bagels 4 P-60 1 P-60 2 P-60 Danish 4(6 oz. pkg) P-60 6(13 oz. pkg) P-60 Dinner rolls 6 P-60 1(1-11/4 oz.) P-60 Hard rolls 2 P-60 4 P-60 Frozen Juice 170g(6 oz.) P-HI Concentrates 340g(12 oz.) P-HI Non-Dairy creamer 450g(16 oz.
CARE OF YOUR MICROWAVE OVEN 1. Turn the oven off before cleaning. 2. Keep the inside of the oven clean. When food spatters or spilled liquids adhere to oven walls, wipe with a damp cloth. Mild detergent may be used if the oven gets very dirty. The use of harsh detergent or abrasives is not recommended. 3. The outside oven surface should be cleaned with soap and water, rinsed and dried with a soft cloth.
USE YOUR MICROWAVE OVEN SAFELY General Use Do not attempt to defeat or tamper with safety interlocks. Do not place any object between the oven front frame and the door or allow residue to build up on sealing surfaces. Wipe with a mild detergent, rinse and dry. Never use abrasive powders or pads. Do not subject the oven door strain or weight such as a child hanging on an open door. This could cause the oven to fall forward resulting in injury to you and damage to the oven.
QUESTIONS AND ANSWERS ● Q : I accidentally ran my microwave oven without any food in it. Is it damaged? ● A : Running the oven empty for a short time will not damage the oven. However, it is not recommended. ● Q : Can the oven be used with the glass tray or roller guide removed? ● A : No. Both the glass tray and roller guide must always be used in the oven before cooking. ● Q : Can I open the door when the oven is operating? ● A : The door can be opened anytime during the cooking operation.
WEIGHT & MEASURE CONVERSION CHART ■ POUNDS & OUNCES TO GRAMS POUNDS(lb.) 1/4 1/2 3/4 1 2 3 4 5 6 7 8 9 10 11 GRAMS(g) 114 227 341 454 907 1361 1814 2268 2722 3175 3629 4082 4526 4990 OUNCES(oz.) 1 2 3 4 5 6 7 8 GRAMS(g) 28 57 85 113 142 170 198 227 OUNCES(oz.) 9 10 11 12 13 14 15 16 ■ FLUID MEASUREMENTS 1 Cup 1 Pint 1 Quart 1 Gallon = 8 fluid ounces = 16 fluid ounces = 32 fluid ounces = 128 fluid ounces GRAMS(g) 255 284 312 340 369 397 425 454 = 240 ml. = 480 ml. = 960 ml. = 3840 ml.
Limited Warranty MC Appliance Corporation warrants each new Microwave Oven to be free from defects in material and workmanship, and agrees to remedy any such defect or to furnish a new part(s), at the company's option, for any part(s) of the unit that have failed during the warranty period. Parts and labor expenses are covered on this unit for a period of one year from the date of purchase. A copy of the dated sales receipt or invoice is required to receive warranty service by an authorized service agent.
CNA International, Inc. d/b/a MC Appliance Corporation. All rights reserved. Magic Chef® logo is a registered trademark of CNA International, Inc. www.mcappliance.com CNA_MCD1311ST_R-1B4H0A(영).indd 28 Printed in China 15. 4. 21.
1.3 Cu. Ft. Encimera horno de microondas Manual del usuario M/W DEF TIMER LOCK lb MCD1311ST Popcorn Frozen Pizza MORE Dinner Plate LES S Fresh Frozen Beverage Vegetable Vegetable AUTO DEFROST Meat Poultr y POWER 1 4 7 KITCHE N TIMER STOP/CLEAR Fish DEFROST 2 5 8 0 3 6 9 CLOCK STAR T/ SPEEDY COOK Modelo MCD1310ST LEA ESTE MANUAL ANTES DE UTILIZAR SU HORNO DE MICROONDAS Y GUÁRDELO PARA FUTURA REFERENCIA. CNA_MCD1311ST_R-1B4H0A(스페인).indd 2 15. 4. 21.
Registración del producto Gracias por comprar el producto Magic Chef. El primer paso para proteger su nuevo producto es completar la forma de registración en nuestra pagina web: www.mcappliance/register. Los beneficios de registrar su producto incluyen lo siguiente: 1. Al registrar su producto nos permite contactarle para notificarle de un cambio de seguridad o actualización del producto. 2.
PRECAUCIONES QUE DEBEN TENERSE PARA EVITAR QUEDAR EXPUESTO A LA ENERGIA DIRECTA DE LAS MICROONDAS (a) N o intente operar el horno con la puerta abierta, ya que la operación en tal condición puede causarle un daño muy grave debido a la exposición directa con la energía de microondas. Es importante no obstruir los orificios de sujeción de los ganchos de seguridad de la puerta.
INSTRUCCIONES IMPORTANTES DE SEGURIDAD Cuando se usan equipos eléctricos deben seguirse ciertas reglas básicas de seguridad, incluyendo lo siguiente: ADVERTENCIA - Para reducir el riesgo de quemaduras, electrocución, incendio, daños a personas o exposición excesiva a la energía de microondas: 11. Lea todas las Instrucciones antes de usar el equipo. 12. Lea y siga las recomendaciones en: “PRECAUCIONES QUE DEBEN TENERSE PARA EVITAR QUEDAR EXPUESTO A LA EXCESIVA ENERGIA DE MICROONDAS” señalado en la pág. 1.
DECLARACION SOBRE INTERFERENCIA DE RADIOFRECUENCIAS DE LA COMISION FEDERAL DE COMUNICACIONES (SOLO EE.UU.) ADVERTENCIA: Este equipo genera y utiliza energía de frecuencia ISM, por lo que si no es instalado y utilizado apropiadamente, conforme a las instrucciones del fabricante, podría causar interferencia en la recepción de la radio y television.
INSTALACION 1. Examine el horno después de abrirlo. Revise que no esté dañado, no tenga abolladuras, que la puerta esté alineada y que la cavidad no esté rayada o abollada. Si existe algún desperfecto visible, NO INSTALE EL HORNO y notifíquelo inmediatamente a su vendedor. 2. Superficie regular y estable. Coloque el microondas sobre una superficie plana y estable. 3. Ventilación. No obstruya las rejillas de ventilación.
ESPECIFICACIONES Fuente de Alimentación MICROONDAS 120 V ~ / 60 Hz. Fase sencilla con tierra Consumo 1500 W Potencia de salida de microondas 1000 W Frecuencia de microondas 2450 MHz Dimensiones externas (Ancho x Alto x Fondo) 560 x 344 x 471 mm (22 x 13,5 x 18,5 pulgadas) Dimensiones de la cavidad (Ancho x Alto x Fondo) 369 x 246 x 394 mm (14,5 x 9,7 x 15,5 pulgadas) Peso neto Aproximadamente 16,7 Kg (36,8 lb.) Cronómetro 99 min. 99 seg.
DIAGRAMA DE CARACTERISTICAS 1 2 3 4 5 M/W DEF TIMER LOCK lb MCD1311ST Frozen Pizza Popcorn MORE Beverage Dinner Plate LESS Fresh Frozen Vegetable Vegetable AUTO DEFROST Meat Poultry POWER 1 4 7 KITCHEN TIMER Fish DEFROST 2 5 8 0 STOP/CLEAR 3 6 9 CLOCK START/ SPEEDY COOK 8 6 7 1. Ganchos del seguro de la puerta - Este horno funciona solamente cuando la puerta está cerrada totalmente.
DIAGRAMA DE CARACTERISTICAS (CONTINUACIÓN) 0 M/W DEF TIMER LOCK lb MCD1311ST Frozen Pizza Popcorn w MORE Beverage r t u o q Dinner Plate LESS e Fresh Frozen Vegetable Vegetable AUTO DEFROST Meat Poultry POWER 1 4 7 KITCHEN TIMER Fish DEFROST 2 5 8 0 STOP/CLEAR 3 6 9 CLOCK START/ SPEEDY COOK 9. Botones numéricos- Se usan para seleccionar el tiempo de cocción de los alimentos y la hora actual. y 9 i p 15. Potencia - Botón para establecer el nivel de potencia de cocinado. 16.
PROCEDIMIENTO DE OPERACION Esta sección presenta información importante sobre el manejo del horno. 1. Revise que el suministro de energía sea monofásico de 120 V ~ / 60 Hz con conexión a tierra. 2. Ponga los alimentos en un recipiente adecuado para microondas. Después, abra la puerta del horno y coloque el recipiente sobre el plato de cristal. El plato deberá girar y permanecer en su lugar durante la cocción de los alimentos. 3. Cierre la puerta. Asegúrese que esté bien cerrada.
FUNCIONES DEL PANEL DE CONTROL AJUSTE DEL RELOJ Cuando el horno se conecte por primera vez a la toma de corriente, la pantalla digital desplegará " : 0" y se escuchará un sonido. Si la energía se suspende momentáneamente, y luego regresa, la pantalla digital volvera a desplegar " : 0". Reloj 1. Presione el botón RELOJ. Se muestra en modo de 12 horas. NOTA: Este horno tiene reloj con doble sistema de horario. Si usted prefiere usar el reloj con sistema de 12 horas, omita el segundo paso. 2.
DESCONGELAMIENTO POR PESO El DESCONGELAMIENTO POR PESO le permitirá descongelar los alimentos de forma fácil, sin tener que hacer conjeturas sobre la cantidad de tiempo requerido. Para el uso de ésta función siga los pasos que se presentan a continuación. Carne 1. Presione el botón de CARNE. Se muestra el valor mínimo de peso y aparece un indicador sobre la marca “grs.” 2. Oprima el botón de CARNE para ajustar el peso a descongelar.
COCINADO EN UNA ETAPA Potencia X6 1. Presione el botón POTENCIA. (Ajuste el nivel de potencia deseado.) Aparece un indicador sobre la marca MWO. La pantalla mostrará el nivel ajustado. Este ejemplo muestra el nivel de potencia al 50%. (P - 50) NOTA : Si se omite el paso número 1, entonces el horno cocinará a la potencia máxima. 2. Oprima los botones numéricos para ajustar el tiempo de cocción deseado. 3. Presione el botón COMIENZO. La pantalla mostrará el tiempo ajustado.
ALARMA / ENCENDIDO AUTOMATICO / TIEMPO DE REPOSO Esta función de cronómetro puede utilizarse como alarma; para ajustar el tiempo de espera en el encendido automático o para agregar algún tiempo de reposo después de la cocción. Cabe señalar que el cronómetro de encendido automático no puede programarse junto con el descongelamiento. Esta función trabaja sin generar energía de microondas. PARA UTILIZAR LA FUNCION COMO: ALARMA DE TIEMPO Alarma / Com. Auto. 1. Presione el botón: ALARMA / COM. AUTO.
COCCION RAPIDA Esta función le permitirá recalentar por 30 segundos al 100% (máxima potencia) de forma fácil, con sólo oprimir el botón COMIENZO / COCCION RAPIDA. Asimismo, presionando repetidamente este botón, usted podrá extender el tiempo de recalentado hasta cinco minutos en intervalos de 30 segundos. Cocción Rápida 1. Presione el botón COMIENZO / COCCION RAPIDA. Cuando presione el botón COCCION RAPIDA, en la pantalla aparecerá “ :30” Inmediatamente el horno empezará a recalentar.
COCINADO EN UN TOQUE (continuación) Plato de cena 1. Presione una vez el botón PLATO DE CENA para una porción de 350 gr o dos veces para una porción de 430 gr. Cuando presione una vez el botón PLATO DE CENA, la pantalla mostrará “350”. Si oprime otra vez mostrará “430”. Después de 1.5 segundos, la pantalla mostrará el tiempo de cocción y el horno empezará a operar. * PLATO DE CENA * • 350 gr : Oprima PLATO DE CENA una vez.
MENOS, MAS Utilice los botones MENOS o MÁS para ajustar el tiempo de cocción mientras el horno se encuentra en operación de cocinado en una etapa, cocinado en un toque o cocinado automático. (Esta función no opera durante el descongelamiento) Oprima el botón MENOS / MÁS para disminuir / aumentar en intervalos de 10 segundos el tiempo de cocción, mientras se efectúa el cocinado en los modos de “cocinado en un toque” o “cocinado automático”.
PRUEBA DE UTENSILIOS La vajilla que no absorbe la energía de las microondas es la mejor para cocinar de esta forma. Consulte la etiqueta de las tazas, vasos y platos para verificar que realmente sean apropiados, especialmente cuando se trata de utensilios de papel o cartón. Si usted no está seguro, haga esta prueba para verificar los utensilios. • Coloque el utensilio vacío dentro del horno de microondas. • Coloque una taza de agua en un vaso medidor, al lado del utensilio vacío.
TÉCNICAS PARA COCINAR Revolver Revuelva los platillos guisados y las verduras mientras se estén cocinando, para distribuir el calor de manera uniforme. La comida que se queda en el borde del recipiente absorbe más energía y se calienta con mayor rapidez, por lo que debe revolver del borde hacia adentro. El horno se apagará cuando abra la puerta para revolver la comida.
GUÍA PARA DESCONGELAR INFORMACIÓN GENERAL ➪ Coloque los alimentos en una parrilla para microondas (asados, piezas con hueso) o en una cacerola para microondas (piezas pequeñas, como cubitos o tiras), o péselas en casa con una pesa de cocina. Redondee el número a décimos de libra más cercanos y aplique esa cantidad al utilizar el botón o almohadilla de ajuste del microondas. ➪ La forma de las piezas, especialmente de las más grandes, afectará el modo en que se descongelan.
TABLA DE TIEMPOS DE DESCONGELACIÓN Artículo y peso CARNE DE RES Carne molida de res 454g (1 lb.) Tiempo de descongelación Tiempo de reposo 7 a 9 minutos 5 a 7 minutos 8 a 10 minutos 5 a 7 minutos 12 a 15 minutos 7 a 10 minutos Voltee después de que haya transcurrido la mitad del tiempo. Proteja como sea necesario. 5 a 6 minutos 5 a 7 minutos Voltee después de que haya transcurrido la mitad del tiempo. 12 a 14 minutos 7 a 10 minutos Voltee después de que haya transcurrido la mitad del tiempo.
TABLA DE TIEMPOS DE COCCIÓN CARNE TIPO NIVEL TIEMPO DE COCCIÓN POR LIBRA Carne de res Costilla rodada - Poco cocida P-80 7 a 9 minutos - Término medio P-80 8 a 10 minutos - Bien cocida P-80 10 a 12 minutos Carne molida (para dorarla para un guisado) P-HI 4 a 6 minutos Hamburguesas, frescas o descongeladas ( 4 oz cada una) 2 piezas P-HI 2 a 4 minutos 4 piezas P-HI 3 a 5 minutos Carne de cerdo Lomo, pierna P-80 10 a 12 minutos Tocino 4 rebanadas P-HI 1 a 2 minutos 6 rebanadas P-HI 2 a 3 minutos NOTA:
VERDURAS TIEMPO DE TIEMPO DE TIPO NIVEL PREPARACIÓN CANTIDAD COCCIÓN REPOSO Espárragos frescos P-HI Pedazos de 11/2-in.
ALIMENTO Pollo frito CANTIDAD NIVEL 2 piezas P-HI 4 piezas P-HI 6 piezas P-HI 2 filetes P-HI Filetes fritos frescos 4 filetes P-HI 1 P-HI Rebanadas de pizza 2 P-HI 4 P-HI Cenas en paquete 140 a 160 g (5 a 6 oz) P-HI (bolsa) 280 a 300 g (10 a 11 oz) P-HI 2 P-60 Bagels 4 P-60 1 P-60 2 P-60 Panecillos daneses 4 (paq. de 6 oz) P-60 6 (paq.
MANTENIMIENTO Y CUIDADO DE SU HORNO 1 2 3 Desconecte el horno antes de limpiarlo. 6 Ocasionalmente es necesario retirar el plato de cristal para limpiarlo. Lávelo en agua tibia con jabón o en lavaplatos automático. 7 El arillo y la base de la cavidad, deben limpiarse regularmente para evitar que hagan demasiado ruido. Simplemente limpie la superficie con agua y detergente suave o con limpiador de ventanas y seque. El eje puede lavarse con agua tibia. Mantenga limpio el interior del horno.
USE SU HORNO DE MICROONDAS CON SEGURIDAD Uso general No intente alterar o forzar con interruptores de seguridad. No coloque ningún objeto entre el marco frontal del horno y la puerta, ni permita que los residuos se acumulen en las superficies sellantes. Límpielo con un detergente suave, enjuáguelo y séquelo. Nunca utilice polvos o paños abrasivos. No permita que la puerta esté sujeta a tensiones o que soporte peso, como en el caso de que un niño se cuelgue de la puerta abierta.
PREGUNTAS Y RESPUESTAS ● P: Accidentalmente puse a funcionar mi horno de microondas estando vacío. ¿Se habrá dañado? ● R: El operar el horno durante un tiempo corto estando vacío no lo dañará. Sin embargo, no se recomienda hacerlo. ● P: ¿Se puede utilizar el horno si se retiran la charola de vidrio o la guía de rodillos? ● R: No. Tanto la charola de vidrio como la guía de rodillos siempre deben estar en el horno para cocinar.
TABLA DE CONVERSIÓN DE PESOS Y MEDIDAS ■ LIBRAS Y ONZAS A GRAMOS LIBRAS (lb) 1/4 1/2 3/4 1 2 3 4 5 6 7 8 9 10 11 GRAMOS (g) 114 227 341 454 907 1361 1814 2268 2722 3175 3629 4082 4526 4990 LIBRAS (lb) 1 2 3 4 5 6 7 8 GRAMOS (g) 28 57 85 113 142 170 198 227 LIBRAS (lb) 9 10 11 12 13 14 15 16 ■ MEDIDAS DE LÍQUIDOS 1 taza 1 pinta 1 cuarto 1 galón = 8 onzas líquidas = 16 onzas líquidas = 32 onzas líquidas = 128 onzas líquidas GRAMOS (g) 255 284 312 340 369 397 425 454 =240 ml =480 ml =960 ml =3840 ml ■
Garantía limitada MC Appliance Corporation garantiza que todas las Encimera horno de microondas carecen de defectos en el material y la mano de obra y acuerda solucionar cualquiera de estos defectos o instalar la(s) parte(s) nueva(s) (a elección de la compañía) en caso de que la unidad haya fallado durante el periodo de garantía. Las partes y gastos de reparación están cubiertos en esta unidad por un periodo de un año a partir de la fecha de compra.
CNA International, Inc. realiza negocios bajo el nombre de MC Appliance Corporation. Derechos reservados. El logotipo Magic Chef® es una marca registrada de CNA International, Inc. www.mcappliance.com CNA_MCD1311ST_R-1B4H0A(스페인).indd 28 Impreso en China 15. 4. 21.