MICROWAVE OVEN MCD795SW OPERATING INSTRUCTIONS Before operating this oven, please read these instructions completely.
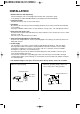
PRECAUTIONS TO AVOID POSSIBLE EXPOSURE TO EXCESSIVE MICROWAVE ENERGY (a) Do not attempt to operate this oven with the door open since open-door operation can result in harmful exposure to microwave energy. It is important not to defeat or tamper with the safety interlocks. (b) Do not place any object between the oven front face and the door or allow soil or cleaner residue to accumulate on sealing surfaces. (c) Do not operate the oven if it is damaged.
IMPORTANT SAFETY INSTRUCTIONS When using electrical appliances, basic safety precautions should be followed, including the following: WARNING-To reduce the risk of burns, electric shock, fire, injury to persons or exposure to excessive microwave energy: 16. To reduce the risk of fire in the oven cavity: a) Do not overcook food. Carefully attend appliance when paper, plastic, or other combustible materials are placed inside the oven to facilitate cooking.
FEDERAL COMMUNICATIONS COMMISSION RADIO FREQUENCY INTERFERENCE STATEMENT WARNING: This equipment generates and uses ISM frequency energy and if not installed and used properly, that is in strict accordance with the manufacturer's instructions, may cause interference to radio and television reception.
INSTALLATION 1. Examine the oven after unpacking. Check for damage such as a misaligned door, broken door or dent in the cavity. If any damage is visible, DO NOT INSTALL, and notify your dealer immediately. 2. Level, flat location. Install the microwave oven on a level, flat surface. 3. Ventilation. Do not block air vents. If they are blocked during operation, the oven may overheat and eventually cause a failure.
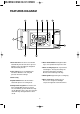
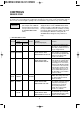
FEATURES DIAGRAM 2 7 3 4 5 1 6 9 8 6. Door release button-Pushing this button stops oven operation and opens the door. 1. Door latch-When the door is closed it will automatically shut off. If the door is opened while the oven is operating, the magnetron will automatically shut off. 7. Glass cooking tray-Made of special heat resistant glass. The tray must always be in proper position before operating. Do not cook food directly on the tray. 2.
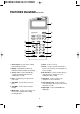
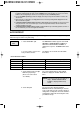
FEATURES DIAGRAM (continued) 2 e 3 4 8 0 6 1 5 9 7 q w 8 Clock - Used to set clock. 1 Time set pad - Used to set the cooking time and the present time. 2 Display - Cooking time, power level, indicators and present time are displayed. 9 Power - Used to set power level/Used to increase (or decrease) the cooking time for Sensor cooking. 3 Sensor cook - Used to automatically compute the microwave power and cooking time for foods.
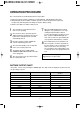
OPERATION PROCEDURE This section includes useful information about oven operation. 1. Plug power supply cord into a standard 3 - pronged 20 Amp, 120V AC 60Hz power outlet. 2. After placing the food in a suitable container, open the oven door and put it on the glass tray. 2. The glass tray and roller guide must always be in place during cooking. 3. Shut the door. Make sure that it is firmly closed. 1 2 The oven light is on only when the microwave oven is operating.
CONTROLS SENSOR COOK Sensor is a semi-conductor device that detects the vapor (moisture and humidity) emitted from the food as it heats. The sensor adjusts the cooking time and power level for various foods and quantities and you don’t need to enter the weight or quantity of the food. Follow the steps below for easy sensor cooking. REHEAT 1. Touch REHEAT pad. (This example shows “REHEAT” menu and other menus have the same procedures. Please refer to the SENSOR COOK CHART below.
NOTE: 1. Any sensor cooking selection can be programmed with more or less time adjustment. In case of cooking more food than the quantity listed in the chart, touch the POWER pad once after touching one of sensor cook menus and before the oven beginning to start. In case of cooking less food, touch POWER pad twice. 2. If you touch POWER pad during operation, the display shows the present power level and then returns to the chosen menu. 3. Each menu has a cooking hint.
TIME DEFROST When TIME DEFROST is selected, the automatic cycle divides the defrosting time into periods of alternating defrost and stand times by cycling on and off. TIME DEF. 1. Touch TIME DEF. pad. The DEFROST indicator appears and “TIME DEFROST--ENTER DEFROST TIME” is displayed. “TIME” blinks three times. The selected time appears and “PRESS START” is displayed. “START” blinks three times. 2. Touch number pads for the desired defrosting time.
TIME COOK POWER 1. Touch POWER pad. program the desired power level. (Please refer to the wattage output chart in the page 7.) “SELECT POWER LEVEL OR COOKING TIME DEFAULT POWER LEVEL HIGH” is displayed. “HIGH” blinks three times. 2. Touch number pads for the cooking time. The selected time appears and “PRESS START” is displayed. “START” blinks three times. NOTE: Your oven can be programmed for 59 minutes 99 seconds.
KITCHEN TIMER HOW TO USE AS A MINUTE TIMER KITCHEN TIMER 1. Touch KITCHEN TIMER pad. The TIMER indicator appears and “ENTER TIME” is displayed. “TIME” blinks three times. 2. Touch number pads for the time you want to count down. The selected time appears and “PRESS START” is displayed. “START” blinks three times. 3. Touch Start pad. The TIMER indicator starts blinking. The display is changed into the time in kitchen timer mode and counts down the remaining time.
KITCHEN TIMER (continued) HOW TO USE TO SET A HOLDING TIME KITCHEN TIMER 1. Program the desired defrost or time cook. 2. Touch KITCHEN TIMER pad. The TIMER indicator appears and “ENTER STANDING TIME” is displayed. “TIME” blinks three times. 3. Touch number pads for the time you want to hold. The selected time appears and “PRESS START” is displayed. “START” blinks three times. 4. Touch Start pad.
MINUTE PLUS MINUTE PLUS allows you to cook at 100% or to increase the cooking time during time cooking by simply touching the Minute Plus pad. Each time Minute Plus pad is touched, the cooking time is extended by 1 minute to a maximum of 59 minutes. MINUTE PLUS 1. Touch MINUTE PLUS pad. If you touch MINUTE PLUS pad once, “1:00” appears and the oven starts cooking. The display counts down the cooking time. When the time ends, you will hear a beep. 1. Touch CLOCK pad. This is a 12 hour clock system.
HELP HELP provides 6 features which enable you to use the oven easily. CHILD LOCK This function prevents unwanted oven operation such as by small children. LB, G This allows you to choose the weight unit between LB and G. BEEP If “OFF” mode is set, you can operate the oven with no audible signal. CLOCK MODE This allows you to choose the clock mode between 12 and 24 hour clock system. ENERGY SAVE If “ON” mode is set, the display turns off except during operation.
NIGHT LIGHT NIGHT LIGHT 1. Touch NIGHT LIGHT pad. If you touch NIGHT LIGHT pad ones, the night light turns ON. 2. Touch NIGHT LIGHT pad again. If you touch NIGHT LIGHT pad again, the night light turns OFF. NOTE: 1. Night light will be automatically off during cooking operation. (except kitchen timer). 2. If you turn on the night light after the clock setting, night light will be automatically off after 10 hour. TO STOP THE OVEN WHILE THE OVEN IS OPERATING 1. Touch STOP/CLEAR pad.
CARE OF YOUR MICROWAVE OVEN 1 2 Turn the oven off before cleaning. 3 The outside oven surface should be cleaned with soap and water, rinsed and dried with a soft cloth. To prevent damage to the operating parts inside the oven, water should not be allowed to seep into the ventilation openings. 4 If the Control Panel becomes wet, clean with a soft, dry cloth. Do not use harsh detergents or abrasives on Control Panel. 5 6 It is occasionally necessary to remove the glass tray for cleaning.
QUESTIONS AND ANSWERS * Q : I accidentally ran my microwave oven without any food in it. Is it damaged? * A : Running the oven empty for a short time will not damage the oven. However, it is not recommended. * Q : What does “standing time” mean? * A : “Standing time” means that food should be removed from the oven and covered for additional time to allow it to finish cooking. This frees the oven for other cooking. * Q : Can the oven be used with the glass tray or roller guide removed? * A : No.
BEFORE YOU CALL FOR SERVICE Refer to following checklist, you may prevent an unnecessary service call. * The oven doesn’t work : 1. Check that the power cord is securely plugged in. 2. Check that the door is firmly closed. 3. Check that the cooking time is set. 4. Check for a blown circuit fuse or tripped main circuit breaker in your house. * Sparking in the cavity; 1. Check utensils. Metal containers or dishes with metal trim should not be used. 2.
COOKING INSTRUCTIONS Utensil Guide Only use utensils that are suitable for use in microwave ovens. To cook food in the microwave oven, the microwaves must be able to penetrate the food, without being reflected or absorbed by the dish used. Care must therefore be taken choosing the utensil. If the utensil is marked microwave-safe, you do not need to worry. The following table lists various of utensil and indicates whether and how they should be used in a microwave oven.
USE YOUR MICROWAVE OVEN SAFELY General Use Do not attempt to defeat or tamper with safety interlocks. Do not place any object between the oven front frame and the door or allow residue to build up on sealing surfaces. Wipe with a mild detergent, rinse and dry. Never use abrasive powders or pads. Do not subject the oven door to strain or weight such as a child hanging on an open door. This could cause the oven to fall forward resulting in injury to you and damage to the oven.
MICROWAVING PRINCIPLES Microwave energy has been used in this country to cook and reheat food since early experiments with RADAR in World War ll. Microwaves are present in the atmosphere all the time, both naturally and manmade sources. Manmade sources include radar, radio, television, telecommunication links and car phones. HOW MICROWAVES COOK FOOD ▲ The microwaves bounce off the metal walls and the metal door screen. ▲ ▲ In a microwave oven, electricity is converted into microwave by the MAGNETRON.
COOKING TECHNIQUES STANDING TIME STARTING TEMPERATURE Dense foods e.g. meat, jacket potatoes and cakes, require standing time(inside or outside of the oven) after cooking, to allow heat to finish conducting to cook the center completely. Wrap meat joints and jacket potatoes in aluminium foil while standing. Meat joints need approx. 10-15 minutes, jacket potatoes 5 minutes. Other foods such as plated meal, vegetables, fish etc require 2-5 minutes standing.
DEFROSTING GUIDE ▶ When defrosted, food should be cool, but softened in all areas. If still slightly icy, return to microwave oven very briefly, or let stand a few minutes. After defrosting, allow food to stand 5-60 minutes if there are any icy areas. Poultry and fish may be placed under running cool water until defrosted ➪ Turn over : Roast, ribs, whole poultry, turkey breasts, hot dogs, sausages, steaks, or chops.
COOKING & REHEATING CHART Cooking chart Power Level Cooking Time Per lb./450g P-80 5-7 min. -Medium P-80 6-8 min. -well done P-80 7-9 min. Pork Joint P-HI 8-10 min. Bacon joint P-HI 6-8 min. Whole chicken P-HI 6-8 min. Portions chicken P-80 5-7 min. Breast (boned) P-80 5-7 min. Fish Fillets P-HI 3-5 min. Whole Mackerel, Cleaned and prepared P-HI 3-5 min. Whole Trout, Cleaned & Prepared P-HI 3-5 min. Salmon steaks P-HI 3-5 min.
Reheating chart • Baby food particularly needs to be checked carefully before serving to prevent burns. • When heating pre-packaged ready-cooked foods, always follow the pack instructions carefully. • If you freeze foods which were bought from the fresh or chilled counters, remember that they should be thoroughly thawed before following the heating instructions on the packed. It’s worth putting a note on them so that other members of the household will remember too.
VEGETABLE CHART Use a suitable glass pyrex bowl with lid. Add 30-45ml cold water(2-3 tbsp.) for every 250g unless another water quantity is recommended - see table. Cook covered for the minimum time - see table. Continue cooking to get the result you prefer. Stir once during and once after cooking. Add salt, herbs or butter after cooking. Cover during a standing time of 3 minutes. Hint : cut the fresh vegetables into even sized pieces. The smaller they are cut, the quicker they will cook.
RECIPES TOMATO & ORANGE SOUP 1. Melt the in a large bowl at P-HI for 1 minute. 2. Add the onion, carrot and potato and cook at PHI for 6 minutes. stir halfway through cooking. 3. Add the tomatoes, orange juice, orange rind and stock. Mix thoroughly. Season with salt and pepper to taste. Cover the bowl and cook at P-HI for 10 minutes. stir 2-3 times during cooking, until the vegetables are tender. 4. Blend and serve immediately. 1 oz.
BLUE CHEESE & CHIVE JACKETS 1. Prick each potato in several places. Cook at P-HI for 6-8 minutes. Halve and scoop the flesh into a bowl, add the butter, cheese, chives, mushrooms, salt and pepper, mix thoroughly. 2. Pile mixture into the potato skins and place in a flan dish, on the rack. 3. Cook at P-80 for 8 minutes. 2 baking potatoes, (approx.9 oz.(250g) each) 2 oz.(50g) butter 4 oz.(100g) blue cheese, chopped 1 tbsp(15ml) fresh chives, chopped 2 oz.
SCRAMBLED EGG 1/2 oz.(15g) butter 2 eggs 2 tbsp(30ml) milk salt & pepper 1. Melt the butter in a bowl at P-HI for 1 minutes. 2. Add the eggs, milk and seasoning and mix well. 3. Cook at P-HI for 2 minutes, stirring every 30 seconds. SAVORY MINCE 1. Place onion, garlic and oil in casserole, and cook at P-HI for 2 minutes or until soft. 2. Place all other ingredients in casserole. Stir well. 3. Cover and cook at P-HI for 4 minutes then P-80 for 4-6 minutes or until the meat is cooked.
Microwave Oven Warranty Daewoo Electronics America, Inc. warrants each new Microwave Oven to be free from defects in material and workmanship and agrees to remedy any such defect or to furnish a new part(s) (at the company’s option) for any part(s) of the unit that has failed during the warranty period. Parts and labor expenses are covered on this unit for a period of one year after the date of purchase. In addition Daewoo Electronics America, Inc.