2 BOTTLE SEMICONDUCTOR WINE COOLER INSTRUCTION MANUAL Model No.: MCWC12SV To ensure proper use of this appliance and your safety, please read the following instructions completely before operating this appliance.
TABLE OF CONTENTS NAMES OF THE PARTS……………………………………………………… 2 SPECIFICATIONS…………………………………………………………….. 3 IMPORTANT SAFETY INSTRUCTIONS……………………………………. 4 INSTALLATION INSTRUCTIONS BEFORE USING YOUR WINE COOLER……………………..…… 4 INSTALLING YOUR WINE COOLER ……………………………… 4 INSTALLING THE SPACER ……………………………………….. 4 INSTALLING THE LEGS …………………………………………… 5 ELECTRICAL CONNECTION………………………………………… 5 OPERATING YOUR WINE COOLER TEMPERATURE CONTROL…………………………………………..
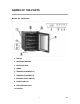
NAMES OF THE PARTS MODEL NO. MCWC12SV 1. RACKS 2. RECESSED HANDLE 3. LEVELING LEGS 4. HINGE 5. TEMPERATURE DISPLAY 6. TEMPERATURE SWITCH 7. INTERIOR LIGHT SWITCH 8. ON/OFF SWITCH 9. LED INTERIOR LIGHT 10.
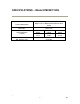
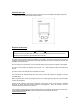
SPECIFICATIONS – Model # MCWC12SV Product Description Magic Chef 12 Bottle Semiconductor Wine Cooler Model No. MCWC12SV Unit Dimensions ( inches ) Width Height Depth 14.17” 19.65” 22.32” Net Weight ( lbs) 30.
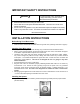
IMPORTANT SAFETY INSTRUCTIONS aWARNINGa • • • To reduce the risk of fire, electrical shock, or injury when using your wine cooler, follow these basic precautions: Read all instructions before using the wine cooler. Never clean wine cooler parts with flammable fluids. The fumes can create a fire hazard or explosion. Do not store or use gasoline or any other flammable vapors and liquids in the vicinity of this or any other wine cooler. The fumes can create a fire hazard or an explosion.
Installing the Legs • Install the legs by screwing them into the screw holes on the unit (Please note that the leg that is positioned on the hinge is shorter than the others). Electrical Connection aWARNINGa Improper use of the grounded plug can result in the risk of electrical shock. If the power cord is damaged, have it replaced by an authorized service center. This wine cooler should be properly grounded for your safety.
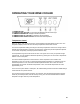
OPERATING YOUR WINE COOLER 1. POWER BUTTON 2. INTERIOR LIGHT BUTTON: To manually illuminate/extinguish the interior light 3. TEMPERATURE DISPLAY: Displays cabinet temperature 4. TEMPERATURE “UP” BUTTON: Increase Pre-Set Temperature 5. TEMPERATURE “DOWN” BUTTON: Decrease Pre-Set Temperature Temperature Control When you plug in your unit for the first time, the temperature will automatically be set to 50°F. The temperature display window will show the cavity temperature at that exact moment.
CARE AND MAINTENANCE Cleaning Your Wine cooler • • • • • • • • • Upon installation of your new appliance, it is recommended that it be cleaned thoroughly. Turn off the wine cooler first and then unplug the unit from the wall outlet. Remove all contents. Wash the inside with a damp warm cloth soaked in lukewarm water and baking soda solution. The solution should be about 2 tablespoons of baking soda to a quart of water. Be sure to keep the door gasket (seal) clean to keep the unit running efficiently.
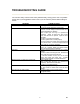
TROUBLESHOOTING GUIDE You can solve many common wine cooler problems easily, saving you the cost of a possible service call. Try the suggestions below to see if you can solve the problem before calling for service. PROBLEM Wine cooler does not operate. POSSIBLE CAUSE Not plugged in. The circuit breaker tripped or a blown fuse. Temperature control is set too warm. Turn the control to a cooler setting and allow several hours for the temperature to stabilize.
Wine cooler Warranty MC Appliance Corporation warrants each new Wine cooler to be free from defects in material and workmanship and agrees to remedy any such defect or to furnish a new part(s) (at the company’s option) for any part(s) of the unit that has failed during the warranty period. Parts and labor expenses are covered on this unit for a period of one year after the date of purchase. A copy of the dated sales receipt / invoice is required to receive warranty service or a refund.