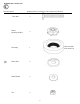
Magic Home Part A B Description Tank with Cover Toilet Bowl PACKAGE CONTENTS HIGH EFFICIENCY ELONGATED TOILET Quantity 1 1 Part C D Description Seat with Lid Tank Lever Handle Assembly Quantity 1 1
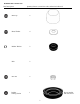
© HARDWARE CONTENTS Part Description Floor Bolt 物 Quantity Picture (Actual size unless otherwise indicated) 2 Plastic Retaining Washer 2 Wax Ring 1 Plastic Disc 2 Metal Washer 2 Nut 2 Shown smaller than actual size 2
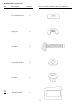
HARDWARE CONTENTS Part Description o Quantity Picture (Actual size unless otherwise indicated) Bolt Cap 2 Brass Washer 4 Rubber Washer 2 Bolt 2 Hex Nut 2 Rubber Sealing Gasket 1 Shown smaller than actual size 3
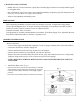
HARDWARE CONTENTS Part 命 Description Quantity Oval Metal Washer 2 Wing Nut 2 Lock Bolt 2 Toilet Seat Washer 2 Lock Nut 2 Anti-slip Washer 2 Picture (Actual size unless otherwise indicated) 4
A WARNINGS AND CAUTIONS • Handle with care. Vitreous chinaware is glass-like with sharp edges if broken. Do not drop, handle roughly or overtighten bolts. • Risk of hazardous gases. If new toilet is not installed immediately, temporarily plug floor flange hole with a towel (or cover) to block sewer gases from escaping. • Observe local plumbing and building codes. PREPARATION Before beginning installation of product, make sure all parts are present.
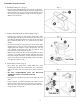
ASSEMBLE INSTRUCTIONS 2. Install Wax Ring (CC), (Fig. 2) • Turn toilet bowl (B) upside down onto a towel or cushioned surface. With the rounded (tapered) end of the ring facing the toilet, place the wax ring (CC) around the raised outlet ring of the bowl (B), and press firmly enough so the wax ring (CC) adheres to the bowl (B). Fig. 2 3. Position Toilet Bowl (B) on Toilet Flange, (Fig. 3) • Unplug waste opening in toilet flange.
ASSEMBLE INSTRUCTIONS Install Tank (A), (Fig. 5) • Place brass washer (HH) followed by rubber washer (II) onto bolt (JJ). Insert bolt (JJ) with washers through hole inside the tank (A). • Place brass washer (HH) followed by hex nut (KK) onto bolt (JJ) protruding from bottom of tank (A). Tighten hex nut (KK) to create a proper and secure seal. • Attach rubber sealing gasket (LL) to center drain hole under tank (A). • Gently place tank (A) on toilet bowl (B) with bolts (JJ) protruding out underneath.
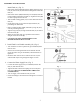
ASSEMBLE INSTRUCTIONS Install Seat with Lid (C), (Fig. 8) Fig. 8 • First, turn the toilet seat with lid upside-down. • Second, insert the lock-bolt (00) in the bolt trough, then adjust the lock-bolt (00) to make the hole distance match with the toilet. • Third, put the anti-slip washer (RR) through the lock-bolt (00) and press it into the bolt trough. • Then turn the toilet seat with lid over, so lock-bolts (00) protrude downward.