
Instructions / Assembly

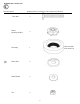
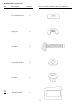
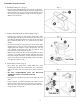
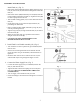
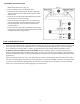
Table Of Contents

ASSEMBLE INSTRUCTIONS
6
2. Install Wax Ring (CC), (Fig. 2)
• Turn toilet bowl (B) upside down onto a towel or cushioned
surface. With the rounded (tapered) end of the ring facing the
toilet, place the wax ring (CC) around the raised outlet ring of
the bowl (B), and press firmly enough so the wax ring (CC)
adheres to the bowl (B).
3. Position Toilet Bowl (B) on Toilet Flange, (Fig. 3)
• Unplug waste opening in toilet flange. Gently place toilet
bowl (B) (right side up) in position with the floor bolts (AA)
protruding up through the holes in the base of the toilet bowl
(B). Level toilet bowl (B) as it is lowered onto the toilet
flange.)
• Once toilet bowl (B) is in position, press down with a slight
twisting motion on the top center of the bowl (B) eventually
applying full body weight to evenly compress the wax ring
(CC) creating a water-tight seal. (Do not rock the bowl
back-and-forth as this may break the seal.)
• Make sure the toilet bowl (B) is as level as possible. It may be
necessary to use small wedges (shims) under the edge of the
bowl due to slight variations in vitreous chinaware or uneven
floors. (Toilet bowl (B) should be firmly seated on the floor,
so it does not wobble or rock.)
4. Secure Bowl to Floor, (Fig. 4)
• Place plastic disc (DD) (Note: "THIS SIDE UP"), metal
washers (EE) and nuts (FF) on floor bolts (AA). Alternately
tighten nuts (FF) until toilet bowl (B) is firmly seated on
floor.
• DO NOT OVERTIGHTEN NUTS (FF) BECAUSE
VITREOUS CHINA CAN EASILX CRACK
OR CHIP.
• Pour water into toilet bowl (B) to prevent the escape of sewer
gases.
• Using a hacksaw, cut off excess length of floor bolts (AA) so
bolt caps (GG) will fit. (Leave no more than 1/4-in length
above nuts (FF)). Place bolt caps (GG) over floor bolts (AA)
and press down for secure fit.
Fig. 2
Fig. 3
Fig. 4