
Installation Instructions
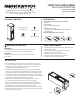


Tools required for assembly (not included):
• pliers (A)
• tape measure
• electric drill with #2 drill bit (B)
• level
• (x 2) #8 x 2” screws (C)
• (x 2) wall anchors - if the cabinet will not be screwed
to wall studs (D)
Estimated installation time: 1/2 hour
PREPARATION
WARNINGS & CAUTIONS
WARNING:
Two people are required for safe installation. Take extra precautionary
measures to ensure a secure grip on the cabinet when lifting.
CAUTION:
The bathroom wall and oor must be nished prior to installation
of the cabinet.
INSTALLATION
1: Using a level, locate any uneven oor and / or wall areas where the linen
cabinet will be installed. Unevenness can cause the linen cabinet to become
misaligned resulting in twisting of the cabinet. Repair any uneven areas
by reducing high spots or shimming low spots.
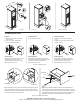
2: 1) Provide sucient protection on the oor to protect the linen cabinet from
damage. 2) Tilt the linen cabinet backwards and remove the shipping feet from
the bottom of the linen cabinet using a pair of pliers (A - not included). Figure 1.
3: 1) Place the linen cabinet in the desired position. 2) Ensure the linen cabinet is
level front to back and conrm at both sides. Also ensure that the linen cabinet is
level side to side, conrming at both the front and back rail.
4: Secure the linen cabinet to the wall by inserting (x 2) #8 x 2 in. screws
(C - not included) through the back rail of the linen cabinet. Figure 2.
Note: It is recommended that the cabinet be installed to at least 1 wall stud. In
order to locate wall studs, you can use a stud nder or tap along the wall until you
nd a spot that sounds solid. If you are unable to locate a wall stud, it is
recommended that you use wall anchors (D - not included) to secure your cabinet.
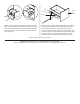
5: Attach the knob for the door by using the 1-3/8” screw, and the knob for the drawer
by using the 1-9/16” screw. Figure 3.
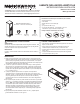
PACKAGE CONTENTS
CARE & MAINTENANCE
• To maintain the beauty of the furniture nish, avoid placing the
cabinet in direct sunlight.
• Avoid exposing the cabinet to extreme temperatures by
installing away from heat and air vents.
• Dust frequently with a clean, soft and dry cloth.
• Wipe away any water or liquid spills on the cabinet
immediately with a clean, soft and dry cloth.
LIBERTYVILLE LINEN CABINET
INSTALLATION INSTRUCTIONS
Deep mocha model: 30265
Cloud gray model: 30277
Linen cabinet (x 1)
18”W x 60”H x 18”D
Figure 1
A
B
C
D
Knobs (x 2)
1-3/8” screw (x 1)
1-9/16” screw (x 1)
Questions? Call our customer service department at
1-855-995-5578, 8:30 a.m. - 5 p.m., CST, Monday - Friday
or e-mail: contactus@magickwoods.com.