IMPORTANT FOR FUTURE REFERENCE Please complete this information and retain this manual for the life of the equipment: Model #: __________________________ Serial #: __________________________ Date Purchased: ___________________ FOCUS SERIES GAS BROILER INSTALLATION - OPERATION - MAINTENANCE MAGIKITCH'N P.O. BOX 501 CONCORD NH 03302-0501 509 ROUTE 3A BOW NH 03304 603-225-6684 FAX 603-225-8497 www.magikitchn.
Keep appliance area free and clear of combustibles. TO THE PURCHASER Post in a prominent location the instructions to be followed in the event that an operator smells gas. Obtain this information from your local gas supplier. WARNING DO NOT alter or remove structural material on the appliance to accommodate placement under a ventilation hood. FOR YOUR SAFTEY DO NOT store or use gasoline or other flammable vapors or liquids in the vicinity of this or any other appliance.
Table of Contents 1. INSTALLATION & LOCATION.................................................................................................................. 4 LOCATION................................................................................................................................................. 4 INSTALLATION ........................................................................................................................................... 4 2. Charbroiler Specifications .......
1. INSTALLATION & LOCATION LOCATION • Place the unit in a properly ventilated area. • Keep the area free and clear of all combustibles such as paper, cardboard, and flammable liquids and solvents. • This unit requires 0cm minimum clearance to non– combustible construction. The unit is not approved for installation in areas with combustible construction. • Provisions must be made for an adequate air supply to the broiler.
A. Uncrate unit and put into place. The hitch pins securing burners must be removed. This will permit the burners to be readily removed for weekly inspection, cleaning and future service. B. FOR INSTALLATION ON LEGS: A set of 4" legs is packed in the top section of the broiler (unless unit is specifically ordered without). A threaded receptacle is located near each corner base of the machine. Each leg has a similar mating thread. Raise unit sufficiently to allow legs to be screwed tightly into receptacles.
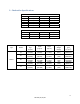
2. Charbroiler Specifications FC(L) 24 FC(L) 36 FC(L) 48 FC(L) 60 FC(L) 72 NOMINAL GAS CONSUMPTION OF MODELS BTU/HR kW MJ/HR 40 000/60 000 11.72/17.57 42.20/60.30 60 000/80 000 17.58/23.45 63.30/84.40 80 000/100 000 23.45/29.30 84.40/105.50 100 000/120 000 29.30/35.17 105.50/126.60 120 000/140 000 35.17/41.03 126.60/147.71 NATURAL PROPANE Type Model 24 36 FOCUS 48 60 72 TEST POINT PRESSURES kPa W.C. 1.0 4.0 2.5 10.0 Height with Legs (in)(cm) 21.625 (54.928) 21.625 (54.928) 21.625 (54.928) 21.
3. GAS HOOK UP An adequate gas supply is imperative. Undersized lines or low-pressures will restrict the volume of gas required for satisfactory performance. A steady supply pressure between 7" and 8" w.c. for natural gas and 11" to 12" w.c. for propane gas is required. With all gas appliances operating simultaneously, the manifold pressure on all gas appliances should not show any appreciable drop.
4. GAS SETTINGS Regulator pressure must be measured and adjusted before the unit goes into service, following installation and when operational performance is in question. A soft blue flame, just short of a yellow tip, gives the best results; combustion air can be adjusted by opening or closing the air shutter slightly. 5. LIGHTING INSTRUCTIONS A. FOCUS SERIES MODELS WITHOUT SAFETY PILOT 1. Turn all burners to OFF. 2. Remove the top grid(s). 3. Remove the last radiant(s) closest to the side(s) of the unit.
B. FOCUS SERIES MODELS WITH SAFETY PILOT 1. 2. 3. 4. 5. Turn all burners to OFF. Remove the top grid(s). Turn the shut off valve to ON. Light the runner tube. Press and hold the (red) button on the safety pilot valve. Wait 15‐30 seconds. Light the runner tube. DO NOT release the reset button. Note: If runner tube does not light wait a few seconds, then try again.
6. INITIAL SET‐UP ALL MODELS PROPER SET‐UP OF THE CHAR BROILER – After the installation of the broiler by a qualified technician, a thorough cleaning is necessary. After this cleaning, be sure the broiler is set‐up properly. TOP GRID - Your top cooking grid has two positions, either flat or slightly tilted. Whenever you are broiling, may use one the tilted position. This allows grease to drain into the front trough, reducing both smoke and flare-up.
STAINLESS STEEL RADIANT - It is very important that the stainless steel radiants are placed over the burners. This will provide radiant heat and protect the burners from dripping grease. PREHEATING - It is necessary to preheat a cold broiler each time before cooking. The recommended time is 30-40 minutes for radiant style charbroilers, at which time the cooking grid should be hot enough to cook on without sticking, and will produce the proper searing effect.
7. CLEANING AND MAINTENANCE DAILY CLEANING AND MAINTENANCE TOP GRID - The top grid can be cleaned in numerous ways. The recommended procedure is to remove the grid and clean the frame, tubes and angles on front, sides and back with steel wool. The rods need only be scraped free of all cooking debris, especially the underside of the rods, using the MagiKitch'n scraper provided. The light oily sheen will aid in cooking, acting like a seasoned iron skillet.
8. IMPORTANT OPERATION INSTRUCTIONS RECAP 1. Always cook in a tilted position. This will allow excess grease to drain into the front grease trough and reduce smoke and flare-up. 2. Keep the top cooking grids clean, especially the underside of the rods. This will insure that the grease will drain toward the front grease trough.
9. TYPICAL FOCUS SERIES ILLUSTRATION NOTE: Your unit may vary from this typical diagram.
10. ACCESSORY/PARTS LIST FOR FOCUS SERIES MODELS Not all parts are illustrated, nor are all parts listed. If you need a part that is not listed here, call Magikitch’n for a quote. Always have your model and unit serial numbers available when phoning or ordering. Ref. No. Ref. No.
11. WARRANTY ORIGINAL EQUIPMENT WARRANTY (For U.S. and Canada) MagiKich'n warrants to each original Buyer that its electrically‐heated or gas‐fired charbroilers will be free from defects in material and workmanship for the period specified below. MagiKitch'n's obligation under this warranty shall be limited to replacing or repairing, at its option, any part found to be defective within the specified warranty period.
THIS WARRANTY AND THE OBLIGATIONS ASSUMED BY MAGIKITCH'N ARE EXCLUSIVE AND IN LIEU OF ALL OTHER LIABILITIES AND WARRANTIES, EXPRESS OR IMPLIED. MAGIKITCH'N MAKES NO REPRESENTATION OR WARRANTY OF ANY KIND, EXPRESS OR IMPLIED, AS TO MERCHANTABILITY, FITNESS FOR A PARTICULAR PURPOSE, OR ANY OTHER MATTER WITH RESPECT TO THE PRODUCTS SOLD HEREUNDER, WHETHER USED ALONE OR IN COMBINATION WITH OTHER EQUIPMENT.
NOTES: 18 L25‐056 (11/13) R1
In the event of problems with or questions about your order, please contact the MagiKitch’n factory at: PH‐ (603) 225‐6684 World Wide Website www.magikitchn.com In the event of problems with or questions about your equipment, please contact the MagiKitch’n Authorized Service and Parts representative (ASAP) covering your area, or contact Pitco at the numbers listed to the left. MAILING ADDRESS – P.O. BOX 501, CONCORD, NH 03302-0501 SHIPPING ADDRESS – 10 FERRY ST.