Dear customer, Congratulations on purchasing a high quality MAGINON® product. You have acquired a modern digital video camera with excellent technical features and respective accessories, which is particularly easy to operate. Please study this information in detail observing, in particular, the safety instructions. The device comes with a 3 year warranty. You will need the enclosed warranty card and your sales receipt in the event of the video camera developing a fault.
2. Contents REPAIR AND REFURBISHED GOODS OR PARTS NOTICE PREFACE 1. CONTENTS OF BOX 2. CONTENTS 3. HAZARD, SAFETY AND WARNING NOTICES 4. YOUR VIDEO CAMERA 4.1. Introduction 4.2. Front view 4.3. Top view 4.4. Rear view 4.5. Installation of accessories 2 3 3 4 6 9 9 10 10 11 12 5. 13 13 14 15 15 16 17 FUNCTIONAL DESCRIPTION 5.1. Initial start-up 5.2. Charging the battery 5.3. Switching on the camera 5.4.
6. CONNECTION TO COMPUTER AND TV 6.1. Downloading videos and photos 6.2. Webcam function 6.3. Connecting to TV 6.4. Surveillance operation including motion detection 20 20 20 21 22 7. SYSTEMS SETTINGS 7.1. System menu 7.2. Setting the system time 7.3. Resetting the system 24 24 26 27 8. 9. 10. 11. 12. 13. 14.
3. Hazard, Safety and Warning notices Incorrect use of the camera and accessories can be dangerous for you and others and can damage or destroy the camera. We therefore ask you to read and strictly observe the following hazard, safety and warning notices. Intended use This video camera is intended for taking video clips and digital photos. It has been designed for private use and is not suitable to be used for commercial purposes.
Electrical hazard Switch off camera if a foreign body or liquid has entered the camera. Wait until completely dry, otherwise there is danger of fire and electrocution. Switch off camera if housing is damaged, otherwise there is danger of fire and electrocution. The camera may not be dismantled, modified or repaired, otherwise there is danger of fire and electrocution.
Injuries and material damage Do not amend settings of the camera whilst running or driving. You could fall or cause a traffic accident. Only use the USB power supply specified for the camera. No liability shall be accepted for damage caused by an incorrect USB power supply. The 230V socket used for the USB power supply must be accessible at all times so that the power supply can be quickly disconnected from the mains if necessary.
4. Your video camera 4.1. Introduction The MAGINON® AC 5 Action Video Camera is ideal for outdoor and underwater pursuits. Apart from a dynamic look and elegant design the camera is also waterproof up to a depth of 30 m. The HD lens is equipped with a 120 degree wide angle lens and also operates effectively in low light conditions. You will never again miss an opportunity of taking beautiful underwater shots.
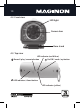
4.2. Front view LED light Camera lens Base stand 4.3.
4.4. Rear view Charging indicator Microphone hole / Reset port microSD card slot USB port Waterproof cover TV-out port 4.5. Installation of accessories The operating elements on the rear of the camera are covered in order to waterproof the camera. The cover can be removed by slightly twisting and simultaneous pulling the provided metal ring. To replace the cover, apply and push down evenly into the recess until flush with the housing wall.
Using the supplied fixings, the video camera can be secured to a support, such as the handlebars of a bicycle, to a crash helmet or other sports equipment. Open the bicycle holder by partially releasing the securing nuts and pushing the bolt to the side. Open the bicycle holder, place it on the support, close the bracket again and tighten the securing Bicycle holder nut again until the stand is firmly secured. You can now slide the video camera with the fixing on its base onto the bicycle holder.
5. Functional description 5.1. Initial start-up A microSD or microSDHC memory card must be inserted before you are able to take videos or photos with the MAGINON® AC 5 Action Video Camera. Remove cover from rear of camera and insert the memory card in the card slot of the housing as shown in the illustration. Push memory card into the slot until it engages. To remove the memory card again push on card and the card is released ready for removal.
5.2. Charging the battery Plug the USB power supply into a socket. Then connect the power supply to the camera to charge the integral lithium-ion battery. The camera switches on automatically. During charging, the red control light on the rear of the camera is illuminated. The red light is switched off once the battery is fully charged. Charging time for a fully discharged battery is approx. 3 hours. In order to prevent longer charging times, the camera should be charged via the power supply.
5.3. Switching on the camera To switch on the video camera press the On/Off button for 2 seconds, releasing the button as soon as the blue control LED lights up. The camera then vibrates for a little while and switches to the Standby mode. The time it takes for the camera to enter the Standby mode depends on the size of the memory card. • Note: The blue control LED flashes if the camera is switched on without an inserted memory card. Switch camera off again and insert memory card. 5.4.
5.5. Switching on the LED light In low light conditions the additional camera light can be switched on or the integrated infrared light can be used. This function is available in any mode apart from TV playback. Briefly depress the LED light button to switch one of the additional lights on or off. The camera then switches between the following lighting modes: 1. The white light LEDs are switched on and colour videos can be recorded. 2.
5.6. Modes of operation Whilst the camera is switched on you can switch between four different operating modes by pressing the Mode button . Every time the mode button is pressed, the operating mode changes to the next of the subsequently listed modes (see 5.6.1. - 5.6.4.). • • Note: The camera briefly vibrates after the mode button has been pressed. This indicates that the button has been pressed.
5.6.2. Manual photographing Manual photos can be taken when the red control LED is lit. To take a photo, briefly press the recoding button . Keep the camera still until it vibrates. The vibration indicates that a photo has been taken. • Note: The red indicator disappears when taking a photo. To improve the picture quality keep the camera steady. 5.6.3.
5.6.4. Taking photos with motion detection When both yellow and red control LEDs are constantly lit, a photo is taken as soon as the camera detects any motion. As soon as the camera detects moving objects, a photo is taken automatically. During loop recording with motion detection all earlier videos or photos are individually deleted in order to create storage space for new video recordings.
6. Connection to computer and TV 6.1. Downloading videos and photos To copy data from the camera to the computer, switch off camera prior to connecting it to the computer. The camera switches on automatically as soon as the connection to the computer has been set up. A new removable storage device than appears under “My Computer“. The video and image files of the video camera can be found in the sub-folders of the “DCIM” folder. You can then copy the data to the hard disk of your computer.
6.3. Connecting to TV Connect the provided AV cable to the TV-Out connection on the rear of the camera. The yellow connector is plugged into the Video input socket (yellow) on the TV and the white connector into the Audio input (white). Depending on the respective TV standard, the output signal should be set to PAL or NTSC in the systems settings. Switch on the camera. After several seconds the red and blue LED indicators will light up simultaneously and the last photo or video appears on the TV.
6.4. Surveillance operation including motion detection Connect the supplied AV cable to the TV-Out socket at the rear of the camera. The yellow connector is plugged into the Video input socket (yellow) on the TV and the white connector into the Audio input (white). Depending on the respective TV standard, the output signal should be set to PAL or NTSC in the systems settings. Switch on the camera. Switch to video recording with motion detection by briefly pressing the On/Off button .
For further details see section 7 of this Instruction Manual. To exit the surveillance mode with motion detection press the “On/Off button” until the camera is switched off. • • • Note: To change between video and photo operating modes briefly press the On/Off button . Please cover the lens during the quick change of operating mode. When not used under water remove the rear cover from the camera to ensure a better audio quality. The LED light is switched off after 3 minutes in this operating mode.
7. Systems settings 7.1. System menu The camera must be connected to the TV to match the system settings with those of the video camera. See also section 6.3. “Connection to TV”. Press and hold the Enter key until the system menu is displayed. Within the menu, a setting is selected or a submenu is terminated by pressing the Enter button . The On/Off button is used to move up and the LED light button to move down in the menu. Keeping the depressed will save the existing settings and end the system menu.
• Date Input: Setting the date and time. Please set the correct time and date if the time stamp is incorrect. • Light Freq.: 60Hz* / 50Hz Set the frequency to the mains frequency to prevent flickering of recordings made in areas lit by neon lighting. • TV output: NTSC* / PAL Select the correct output format, PAL or NTSC, to achieve the correct colours on the TV. • Language: English / French / German / Italian / Spanish / Portuguese / traditional Chinese / simplified Chinese / Japanese • Sys.
7.2. Setting the system time If time and date are incorrect these can be changed from a computer without connection to a TV. Switch on the video camera and connect it to the computer using the USB cable. Open the drive allocated to the camera and create a new file named “time.txt“. Open the “time.txt“ file and enter the data in the following format: “year. month. day hour:minute:second Y/N” Take care to include the empty spaces between individual values.
7.3. Resetting the system If the camera is required to be reset, take a sharp object and press the reset button on the rear of the camera. This switches off the camera, which can then be switched on again.
8. Conformity This device was tested according to part 15 of the FCC regulations and it was confirmed that the limits for a digital device of class B have been complied with. These limits should provide accurate protection against unwanted interference when installed in a residential area. If the device is not installed in accordance with the instructions it may interfere with televisions, radios and radio transceivers.
9. Care Do not use any corrosive cleaners, such as ethanol, thinners, etc. to clean the camera housing and camera accessory. When required, clean system components with a soft dry cloth 10. Disposal For disposal, separate packaging into different types and dispose of in line with environmental regulations in supplied collection containers. Batteries and storage batteries may not be disposed of in domestic waste.
11. Technical Specification Element Beschreibung Image sensor 5.0 mega pixels CMOS Photo format JPG, 2560 x1920 pixels Video Format AVI Motion-JPEG, 1280x720 pixels, 30 frames/sec. Video qualities Fine, Standard, Economy Lens angle 120 degrees wide-angle Refresh rate 60 Hz, 50 Hz TV output format NTSC, PAL Vibration warning Supported Battery capacity 3.7V / 850mAh Power consumption Less than 1 W Max.
12. System requirements 1. OS: Microsoft Windows® 2000 / XP / VISTA / Windows® 7 / 8 2. Processor: Intel® Pentium III Processor 667 MHz or an equivalent Processor 3. Graphic card with 256 MB with DirectX 8 support or higher 4. Sound card 5. USB 1.1 or USB 2.0 6. 1 GB free harddisk space or more 13. Warranty and Service In the event of problems with the ActionCam, our Service department will be able to assist with all queries and problems. The ActionCam comes with a 3 year warranty.
14.
M Memory card 13 Memory card slot 11 Memory card, insert 13 Microphone 11 Mode button 10 Motion detection 18, 19 O On/Off button 10 P Photo format 30 Photos, taking automatically 19 Photos, taking manually 18 R Recording button 10 Reset button 11, 27 S Safety Instructions 6ff Selfadhesive pad's 13 Service 31 Stand 12 Standard settings 24ff Surveillance mode 22ff Switching off 15 Switching on 15 System requirements 31 System reset 27 Systems settings 24ff, 25 T Technical Specification 30 Time
supra Foto-Elektronik-Vertriebs-GmbH Denisstr.