
Operation Manual
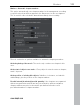
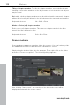

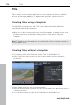

Table Of Contents
- Copyright
- Preface
- Support
- Uninstalling the program
- Serial Number
- Introduction
- Quick Start
- Workspaces
- Settings
- Video recording
- Objects
- Markers
- Multi-cam editing
- Title
- Effects
- Apply effects to objects
- Video effects in the Media Pool
- Movement effects in the Media Pool
- Stereo3D in the Media Pool
- Audio effects in the Media Pool
- Design elements in the Media Pool
- Personalized templates in the Media Pool
- Effects masks (Plus/Premium version)
- Additional effects
- Animate effects
- Attach to picture position in the video
- Image stabilization
- Image improvements for the entire movie
- Image improvements for individual objects
- Audio editing
- Stereo3D (Plus/Premium version)
- Special functions and wizards
- Video recorder
- Burning
- Export
- Managing video projects
- Menus
- File Menu
- Edit Menu
- Undo
- Redo
- Cut objects
- Copying objects
- Paste objects
- Duplicate objects
- Delete items
- Select all objects
- Save objects as takes
- Cut
- Musical editing
- Range
- Form group
- Ungroup objects
- Wizards
- Mixdown Audio
- Audio and video mixdown
- Start preview rendering...
- Remove range(s) for preview rendering...
- Edit snap point
- Marker
- Move screen view
- Multicam
- Menu effects
- Windows menu
- "Share" menu
- Tasks menu
- Help Menu
- Help
- Content
- Context help
- Quickstart/Recording/Editing/Burning and exporting tutorial video
- Ask questions online in the Knowledge Community
- Find knowledge & workshops
- Online tutorials
- Get in contact with other users
- About MAGIX Movie Edit Pro MX
- Register online
- Online Update
- Download video effects plug-ins
- Display Tool Tips
- Reset Program Settings to Default...
- Context menu (right click)
- Keyboard shortcuts
- Problems and solutions
- Integrated browser
- Activate codecs
- Annex: Digital Video and Data Storage
- MPEG-4 encoder settings
- Appendix: MPEG Encoder Settings
- MPEG glossary
- Glossary
- If you still have questions
- More about MAGIX
- Index

Multi-cam editing 115
You can activate "Multicam" mode with this button or with the
"Multicam" command in the "Edit" menu.
Source tracks and preview images
The assignment of tracks as source tracks for the multicam cut takes place
automatically. When the multicam mode is activated, the source tracks will be
assigned to all tracks containing video objects starting from track 3.
You can also conduct or change the assignment manually. To do so, right click
on the trackbox of the corresponding track to active or deactivate a track as a
source track. In this way, you can use more than two tracks for multicam
editing, but no more than two simultaneously. The source tracks are marked
using color.
www.magix.com
A preview appears in the program monitor for every assigned track, and the
source track's color corresponds to the preview images so that you can
quickly assign each preview image.
If the objects created using multicam cut are located on the target track, a
preview image of the corresponding source track highlighted with a yellow
frame will be shown for length of playback.