
PCIe Expansion System User's Manual

MAGMA
4
Before you Begin
The 500W AC power supply is auto-switching. This means that it will
automatically switch to match whatever source power you are using.
Since all products ship with a US/Canadian Standard 125V power cord,
you will need to use a locally available power cord for non-US Standard
power sources.
Install PCI Express Host Card
Begin the installation of your PCI Express (PCIe) host card by first
powering down your computer. Use the procedures for shutting down
your operating system and shutting off power to your system provided in
your owner’s manual or system documentation.
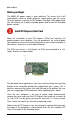
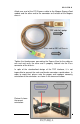
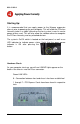
The PCIe host card is a “half-height” x8 PCIe card mounted to a “full-
height” bracket as shown below:
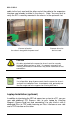
For low profile case applications, you may need to change the mounting
bracket to the low profile bracket that shipped with your system. This is
done by removing the screws that hold the card to the bracket. Be sure
you are using proper ESD procedures when completing this action.
Once the host computer is off and all power cords disconnected,
remove the cover and insert the PCI Express host card into a vacant x8
(or x16) PCIe slot by gently pushing the card until it is firmly seated.
Then secure the card to the slot with a mounting screw.
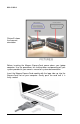
Notice that the PCI Express slots are located at a greater distance from
the edge of the computer’s mother-board than are the standard PCI
slots as illustrated in the following figure.