PCI Expansion System User's Manual 6 Slot PCI Express® to PCI-X Model: PE6R4 Model: PE6RR
Copyright © 2007 Mobility Electronics, Inc. This publication is protected by Federal Copyright Law, with all rights reserved. No part of this publication may be copied, photocopied, reproduced, stored in a retrieval system, translated, transmitted or transcribed, in any form or by any means manual, electric, electronic, electro-magnetic, mechanical, optical or otherwise, in whole or in part without prior written consent from Mobility Electronics, Inc.
M A G M A Table of Contents PREFACE ............................................................................................. III Advisories ..............................................................................................iii Safety Instructions..................................................................................iv When Working Inside a Computer .........................................................iv Protecting Against Electrostatic Discharge ..............................
M A G M A rd Support for 3 Party PCI Cards .......................................................... 27 Windows Error Codes ......................................................................... 28 CHAPTER 7 HOW TO GET MORE HELP....................................... 30 Frequently Asked Questions (FAQ)...................................................... 30 Contacting Technical Support .............................................................. 30 Magma Debug Utility.............................
M A G M A Preface Advisories Five types of advisories are used throughout this manual to provide helpful information, or to alert you to the potential for hardware damage or personal injury. They are Note, Important, Caution, Warning, and Danger. The following is an example of each type of advisory. NOTE Used to amplify or explain a comment related to procedural steps or text.
M A G M A Safety Instructions Always use caution when servicing any electrical component. Before handling the Magma PCI-X Expansion chassis, read the following instructions and safety guidelines to prevent damage to the product and to ensure your own personal safety. Refer to the “Advisories” section for advisory conventions used in this manual, including the distinction between Danger, Warning, Caution, Important, and Note. ♦ Always use caution when handling/operating the computer.
M A G M A In addition, take note of these safety guidelines when appropriate: ♦ To help avoid possible damage to systems boards, wait five seconds after turning off the computer before removing a component, removing a system board, or disconnecting a peripheral device from the computer. ♦ When you disconnect a cable, pull on its connector or on its strain-relief loop, not on the cable itself. Some cables have a connector with locking tabs.
M A G M A vi ♦ Handle all sensitive components at an ESD workstation. If possible, use anti-static floor pads and workbench pads. ♦ Handle components and boards with care. Don’t touch the components or contacts on a board. Hold a board by its edges or by its metal mounting bracket.
M A G M A Chapter 1 Introduction General Specifications The Magma 6 Slot PCI Express® to PCI-X Expansion System (Model PE6R4) is a general-purpose PCI bus expansion chassis. The expansion chassis is fully compliant with the PCI Local Bus Specification. Because PCI-X is backward compatible with PCI, both card types can be used with PE6R4. Therefore, to keep things simple, the terms PCI and PCI-X will be used interchangeably throughout this manual.
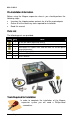
M A G M A Pre-Installation Information Before using the Magma expansion chassis you should perform the following steps: • • • Inventory the shipping carton contents for all of the required parts Gather all of the necessary tools required for installation Read this manual Parts List The following parts are provided: Item Qty Item 1 1 6 slot rack-mount expansion chassis Pair of 1-meter shielded Infiniband™ cables Half-height PCI Express host card with both full and low-profile mounting brackets 1 1 1
M A G M A Chapter 2 Hardware Installation The following steps will guide you through the installation of your Magma expansion system. Electrostatic Discharge (ESD) Warning All PCI cards are susceptible to electrostatic discharge. When moving PCI cards, it is best to carry the cards in anti-static packaging. If you need to set a PCI card down, be sure to place it inside or on top of an anti-static surface. For more information, see “Protecting Against Electrostatic Discharge” in the Preface.
M A G M A Before you Begin The 400W AC power supply is auto-switching. This means that it will automatically switch to match whatever source power you are using. Since all products ship with a US/Canadian Standard 125V power cord, you will need to use a locally available power cord for non-US Standard power sources. Install PCI Express Host Card Begin the installation of your PCI Express (PCIe) host card by first powering down your computer.
M A G M A The PCIe host card is a “half-height” x4 PCIe card mounted to a “fullheight” bracket for convenient mounting in most desktop computer systems. It is also shipped with a low profile card bracket to allow mounting on low profile computer systems. For low profile case applications, you may need to change the mounting bracket to the low profile bracket that shipped with your system. This is done by removing the screws that hold the card to the bracket.
M A G M A Connect cables to the chassis. Connect cables to the host card. When properly installed, each cable will have matching labels at both ends (x1 to x1 and x3 to x3). CAUTION All cables attached to the expansion chassis must be securely fastened. When you hear a “click,” it is properly secured. If not securely connected, the connectors may cause intermittent or lost connections. Connect the power cord to the power-in receptacle located at the rear of the enclosure.
M A G M A Applying Power Correctly Starting Up: You must apply power to the Magma expansion chassis BEFORE you power up your computer. This will allow the higher numbered PCI buses in the PCI bus hierarchy to be at a stable state when the host system issues its master power-on bus reset. In systems that perform automatic PCI bus configuration, this will allow the configuration code to recognize the PCI bus hierarchy and any attached devices.
M A G M A PCIe to PCI HIF card LEDs IMPORTANT If any LED is not solid green, power off the system and check that the cables are connected properly before powering up again. NOTE The expansion chassis can function using only the x1 (1 lane) connection. The second cable provides the additional x3 (3 lane) connection. Combining the x1 cable and the x3 cable yields 4 lanes (x4).
M A G M A Rack Installations Installing the Magma PE6R4 into an equipment rack has never been easier. Simply attach one of Magma's optional Rack-mount slide kits (PN: RSLIDES-XX) to allow you to mount the chassis in a computer rack and then simply slide the chassis in and out whenever you need to do work on, or in, it. These sets come in various lengths to accommodate various racks. Contact Magma for more information, or to order a set.
M A G M A CHAPTER 3 Verify Installation Windows To verify a successful installation on Windows, find the ‘My Computer’ icon and “right-click” on it. Then select ‘Manage’ from the pop-up menu. Next, click on ‘Device Manager’ in the leftmost Computer Management window. Finally, click on the View Menu and select View Devices by Connection. Open ACPI (BIOS) Æ Open PCI BusÆ Click the ‘+’ sign several times until your reach a PCI Express Root Port with a PCI Standard PCI-toPCI Bridge beneath it.
M A G M A If everything is OK, then the Magma expansion system installation is rd complete. You can now proceed to Chapter 4 and install your 3 Party PCI Cards and/or up to eight (8) hard drives. If, however, the installation was unsuccessful, you may not see the PCI to PCI Bridge, or it will have a small yellow in front of it. Proceed to Chapter 6 for Troubleshooting installation problems. Mac OS X When using Mac OS X no additional software or drivers are needed.
M A G M A Any PCI Cards you install in the expansion chassis will appear behind the pci-bridge device. Mac OS 10.4.x If any of these devices are not displayed as shown above, you should shut down your system (computer first, then the expansion chassis) and reconnect the cables and the PCIe expansion host card to ensure that you have a solid connection. Then restart the Magma expansion chassis followed by the computer. Next, try to verify the installation again, as shown above.
M A G M A Chapter 4 Install Cards and Drives This chapter provides information on how to install 3rd Party PCI cards or hard drives into your Magma expansion chassis. More details on the installation of individual cards are provided by the card’s manufacturer. This chapter is provided as a simple guide to help you install your PCI cards, or hard drives, in the chassis. For the purpose of installation, the Magma expansion chassis functions exactly as a standard desktop computer chassis.
M A G M A Slide the enclosure cover backward to disengage it from the guides at the front of the enclosure by firmly grasping the edges of the cover lip and pulling the cover backward about 1” until it clears the front hold-down, and then lift the cover off. Be careful to store the cover to avoid damage while you are working inside the chassis. CAUTION When replacing the enclosure cover, be sure that the front edge of the cover slides completely under the front lip of the enclosure.
M A G M A 400W, 100-240V/6.3A, 50-60HZ Power Supply Drive bay – used to mount up to seven (7) 3.5” internal hard drives using 1 or 2 optional Disk Drive Cages (PN: RDRIVECAGE) 5V load resistor – to be removed if optional hard drives are installed Installing 3rd Party PCI Cards Slot ordering in PE6R4 should begin with the slot farthest away from the power supply – labeled SLOT 4.
M A G M A Installing Hard Drives Installing up to eight (8) hard drives into your chassis is simple using one or two optional Drive Cages (PN: RDRIVECAGE), available from MAGMA. Each cage can hold up to four (4) 3.5” hard drives. The cages mount into the hard drive area in the chassis identified by a in the previous graphic. If you want to install a hard drive in your system, a PCI hard drive controller card must also be installed into one of the available PCI slots.
M A G M A If you discover that any of your 3rd Party PCI cards contain s a (exclamation) you have a problem with that card. Refer to Chapter 6 Troubleshooting for further guidance. Finishing Touches After your system is working properly, replace any empty slots with slot covers, and replace the host computer and the expansion chassis covers.
M A G M A Chapter 5 Chassis Maintenance Like all computer systems, you will need to perform some routine maintenance tasks. Some of these include making sure that the air vents in the chassis are clear of obstructions and that the cooling air from the fans flows freely. You will also need to check the foam filter behind the front panel to ensure it is clean, thus allowing for unrestricted air flow to the fans.
M A G M A Next, use a can of compressed air from your local computer store to blow out any dust that may have accumulated in the chassis fans. Be sure to keep the can of compressed air about six inches from the parts being sprayed with air. Pay particular attention to the fans in the and power supply because they are critical to air chassis movement to keeping your chassis cool. Also spray the PCI-X slots , the backplane , and the chassis bay areas and .
M A G M A “Hot-Swappable” Power Supply In spite of regular performance of routine maintenance tasks, some computer systems can experience hardware failures. Fortunately, your investment in a PE6RR provides you with the ability to easily replace the power supply in the event of power supply failure. The redundant power supply includes two hot-swappable modules that share the power load requirements during normal operations.
M A G M A Cleaning the Air Filter The chassis is equipped with an air filter that is easy to remove and clean. To keep your chassis running at its coolest, you should clean this filter regularly. How often the filter requires cleaning depends on environmental conditions where your Magma Expansion chassis is located. To clean this filter, follow these simple steps. First, power down the chassis and then remove the four screws on the front panel with a Phillips screwdriver.
M A G M A Chapter 6 Troubleshooting Locate the Problem If you are having trouble with the Magma expansion system, verify that all cards are seated properly and all cables are connected properly. Be sure you followed the instructions in earlier sections of this User Guide. Always remember to power On and Off correctly when rechecking and testing your installation. If you are still having problems, try these simple troubleshooting steps.
M A G M A My Computer Can’t Find the PCI Expansion System If the expansion system is not visible in your Windows Device Manager or your Apple System Profiler at all, you will need to turn off your computer (first) and then the Magma expansion chassis (second) and test all cords and cables to ensure you have everything connected correctly.
M A G M A When Nothing Works The following troubleshooting steps will help you when the computer or chassis won’t turn on or “nothing seems to work” correctly: NOTE Review Chapters 3 (Verify Installation) and 4 (Install Cards and Drives) as necessary to verify that you have a valid installation of the Magma expansion system and that you rd have correctly installed your 3 Party PCI card(s) and their associated drivers (as required).
M A G M A My Computer Hangs During Power Up If your computer “hangs” while being turned on and you can’t even start, follow these simple steps to try to fix this problem: 1. Shut off the computer (first) and then the Magma expansion system and verify that all cards and cables are installed correctly. Reapply power first to the expansion system and then to the computer. 2. If it still hangs, power everything back off and try switching the PCIe cables. Reapply power and see if it works. 3.
M A G M A ii. If it still hangs up, try a different card – this one is probably bad (or has driver problems). If the second cards works, troubleshoot the first card. If the second card also fails, call Technical Support. My PCI Card Doesn’t Work Follow these simple troubleshooting steps to resolve typical 3rd Party PCI card problems: The following additional steps might also help when the above troubleshooting steps for fail to resolve your problem: 26 1.
M A G M A Windows 5. Next, open the Device Manager (View by Connection selection). If the is gone, the problem is with the 3rd Party PCI card or the card drivers. You should go to the Windows Error Codes section of this chapter to learn how to troubleshoot using error codes. is still visible, the problem may be with the Magma If the expansion system. Please contact Mobility Technical Support for further guidance and/or a replacement product.
M A G M A Windows Error Codes If you are having a problem with one of your devices, and the Device status box shows a Windows Error Code, refer to the following list of error codes for guidance: Error Code Description/Action rd This code indicates that there is a problem with the 3 Party PCI Card driver. 10 If necessary, contact the PCI Card’s manufacturer for updated PNP compatible drivers. If all else fails, contact Mobility Technical Support for further assistance.
M A G M A Error Code 28 (PCI Card) 1 Description/Action The driver for the PCI Card is not installed on your system. Reinstall the PCI Card driver following the manufacturer’s instructions. If that fails to fix the problem, call the card manufacturer for new drivers. The PCI host card or expansion chassis are not working correctly. Reinstall the PCI host card into the computer’s PCI slot and recheck all cable connections. If the error code remains, try another PCI slot.
M A G M A Chapter 7 How to Get More Help Frequently Asked Questions (FAQ) You can visit the Magma Technical Support FAQ pages on the Internet at: www.magma.com/support/ Contacting Technical Support Our support department can be reached by fax at (858) 530-2733 or by phone at (858) 530-2511. Support is available Monday through Friday, 8:00 AM to 5:00 PM PT.
M A G M A Magma Debug Utility Occasionally, Technical Support may request Windows users to produce and email a Magma debug log file to help them resolve your problem. This file should be included as an attachment when submitting a Technical Support request at www.magma.com/support. 1. 2. 3. 4. 5. Locate a file called dbgview.exe on the Magma CDROM. Double-click on the file dbgview.exe While the dbgview screen is open, locate and double-click on a file called dump.exe on the Magma CDROM.
M A G M A PCIScope Software Utility PCIScope is a powerful tool for Windows users. It was designed by a Germany company called APSoft. This software utility is a valuable resource to explore, examine and debug the PCI subsystem of your computer. It was made to fit the requirements of the most demanding users, especially engineers, programmers, and system administrators, and to integrate all advanced functions and tools into one product. Please visit www.tssc.
M A G M A You should save this data as a file on your computer. Please include your name and date as part of the file name with an extension of “.bpd.” This file should be included as an attachment when submitting a Technical Support request at www.magma.com/support.
M A G M A Returning Merchandise to MAGMA If factory service is required, a Service Representative will give you a Return Merchandise Authorization (RMA) number. Put this number and your return address on the shipping label when you return the item(s) for service. Magma will return any product that is not accompanied by an RMA number. Please note that Magma WILL NOT accept COD packages, so be sure to return the product freight and duties-paid.
M A G M A Appendix A Bus Hierarchy Bus Hierarchy The following figure is representative of the Magma PE6R4. This figure pictorially conveys the overall PCI bus topology of the system. 6 Slot PCIe to PCI Topology In general, we do not know what the actual Bus numbers are. We only know how they increment starting from the PCI expansion host card.
M A G M A Appendix B Need More Slots? Multiple PCI Expansion System Configurations The PCI Local Bus Specification defines the PCI bus as a hierarchical bus, where PCI to PCI Bridges (PPBs) may be used to add "levels" to the PCI bus hierarchy. Because hierarchies are organized systems arranged into different levels, you can take advantage of this automatic organizing and layering to expand the number of available PCI slots beyond the number available in your computer’s motherboard.
M A G M A 2. The 4 and 7 Slot Magma Expansion Systems each add two (2) PCI to PCI Bridges to the PCI Local Bus. The 13 Slot adds three (3) PCI to PCI Bridges to the PCI Local Bus. The PE6R4t adds one (1) bridge. These bridges are the communication paths between the PCI cards and the computer resources. Most computers allow multiple bridges (and thus PCI buses) to be correctly configured.
M A G M A Fan-Out For reasons described in bullet #3 above, we recommend using a fanout configuration when you need to add successive PCI expansion systems to the host computer. This addition to the PCI bus hierarchy is at the "peer" level of other existing expansion buses, thus adding "breadth" to the PCI bus hierarchy, since these buses will be at the same hierarchical level within the system configuration.
M A G M A Verify your configuration Before you start installing your PCI cards (refer to Chapter 4 Install Cards and Drives for more information), you should confirm that everything is in proper working order. Refer to Chapter 3 Verify Installation for guidance in verifying the proper installation of your Expansion System. The following image shows the Windows Device Manager display when a Windows PC has 2 Expansion Systems connected in a “Fan-Out” configuration.
M A G M A Daisy-Chaining Recognizing the typical insignificance of the performance variance between the “Fan-Out” and “Daisy-Chaining” configurations, the primary reason for using this one would be limitations on physical space. This could be the number of available slots on the computer motherboard, or a lack of desk or rack space.
M A G M A Combination Configurations Depending on your business requirements, and your physical space limitations, you can add additional Expansion System in multiple configurations, such as these. These combinations are only limited by the available slot types: PCIe or PCI.
M A G M A PCI Card Conflicts If you determine that one PCI card is interfering with the operation of another card, first try reorganizing the cards on the motherboard. Moving the cards around can change the order in which the cards are configured by the system during power-on. This will go a long way toward resolving module conflicts.
M A G M A rd Problems with 3 Party cards might only be trackable once you have identified the expansion system containing the problem card. Remember, it may be necessary to identify the PCIe/PCI Slot that the Host Interface Card is in before you can properly identify the correct expansion chassis and ultimately the card. Obviously, this is only an issue if you have multiples of the same type of card installed.
M A G M A Finding the Problem Card Windows If you need help to determine which PCI card, or which expansion chassis, has the problem, you can “right-click” on the card with the and check the information contained in the “Location:” field. Look for the “Error Code” in the box in the center of the Properties Window and then go to the Windows Error Code section for information on how to resolve this issue.
M A G M A APPENDIX C Compliance FCC NOTE: This equipment has been tested and found to comply with the limits for a Class A digital device, pursuant to part 15 of the FCC Rules. These limits are designed to provide reasonable protection against harmful interference when the equipment is operated in a commercial environment.
M A G M A 46 Appendix C Compliance
M A G M A
Mobility California, Inc. 9918 Via Pasar, San Diego, CA 92126, USA Phone (858) 530-2511 • Fax (858) 530-2733 www.magma.