Thunderbolt™ 2 Installation Guide Thunderbolt™ 2 Interface Card
Magma Contents Safety Instructions .................................................................................................. 3 Thunderbolt™ 2 for Roben-3 ........................................................................................ 5 Interface Card Installation ........................................................................................ 5 Thunderbolt™ 2 for EB3T ............................................................................................
Magma Safety Instructions Always use caution when servicing any electrical component. Before handling the Magma Expansion chassis, read the following instructions and safety guidelines to prevent damage to the product and to ensure your own personal safety. Refer to the “Advisories” section for advisory conventions used in this manual, including the distinction between Danger, Warning, Caution, Important, and Note. 1. Always use caution when handling/operating the computer.
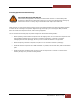
Magma Protecting Against Electrostatic Discharge Electrostatic Discharge (ESD) Warning Electrostatic Discharge (ESD) is the enemy of semiconductor devices. You should always take precautions to eliminate any electrostatic charge from your body and clothing before touching any semiconductor device or card by using an electrostatic wrist strap and/or rubber mat. Static electricity can harm system boards.
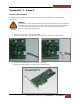
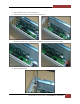
Magma Thunderbolt™ 2 for Roben-3 Interface Card Installation Uninstall the existing Thunderbolt Interface card in the chassis prior to installing the new Thunderbolt™ 2 Interface card. WARNING High voltages are present inside the expansion chassis when the unit’s power cord is plugged into an electrical outlet. Disconnect the power cord from the AC outlet before removing the enclosure cover. Turning the system power off at the power on/off switch does not remove power to components.
Magma 5. 6. Align the Thunderbolt™ 2 Interface card on top of the PCIE slot. Gently push the card until it is firmly seated in the PCIe slot. 7. Reconnect the 3-pin wire / power cable to Thunderbolt™ 2 Interface card (see pictures below). 8. Secure the Thunderbolt™ 2 Interface card.
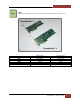
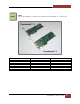
Magma NOTE The new Thunderbolt™ 2 Interface card is shorter that the Thunderbolt™ 1 Interface card. . Vendor ID (Magma) UID Mac OS Supported Speed Lane width # of LEDs Thunderbolt™ 1 0X19 0X00190003 10.8 below 10Gb/s X4 5 Thunderbolt™ 2 0X19 0X00190008 10.
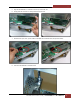
Magma Thunderbolt™ 2 for EB3T Interface Card Installation Uninstall the existing Thunderbolt Interface card in the chassis prior to installing the new Thunderbolt™ 2 Interface card. WARNING High voltages are present inside the expansion chassis when the unit’s power cord is plugged into an electrical outlet. Disconnect the power cord from the AC outlet before removing the enclosure cover. Turning the system power off at the power on/off switch does not remove power to components.
Magma 5. 6. Align the Interface card on top of the PCIE slot. Gently push the card until it is firmly seated in the PCIe slot 7. Reconnect the 3-pin wire / power cable to Thunderbolt™ 2 Interface card (see pictures below). 8. Secure the interface card.
Magma NOTE The new Thunderbolt™ 2 Interface card is shorter that the Thunderbolt™ 1 Interface card. . Vendor ID (Magma) UID Mac OS Supported Speed Lane width # of LEDs Thunderbolt™ 1 0X19 0X00190003 10.8 below 10Gb/s X4 5 Thunderbolt™ 2 0X19 0X00190008 10.
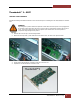
Magma Thunderbolt™ 2 for EB1T Interface Card Installation Remove Thunderbolt™ 1 Interface card in the chassis prior to installing the new Thunderbolt™ 2 Interface card. WARNING High voltages are present inside the expansion chassis when the unit’s power cord is plugged into an electrical outlet. Disconnect the power cord from the AC outlet before removing the enclosure cover. Turning the system power off at the power on/off switch does not remove power to components. High voltage is still present. 1. 2.
Magma NOTE The new Thunderbolt™ 2 Interface card comes with a standard bracket. You need to replace this bracket with the shorter bracket in order to fit in the EB1T card guide slot. 1. 2. Remove the two mounting screws on the card. Slowly slide the bracket out from the card. 3. Prepare the new bracket for EB1T Thunderbolt™ 2 Interface card as shown from the picture below. 4. Properly align the mounting holes of the card on top of the bracket and secure it firmly.
Magma 5. 6. Align the Thunderbolt™ 2 Interface card on top of the PCIE slot. Gently push the card into the PCIE slot, make sure it is firmly seated. 7. Reconnect the 3-pin wire / power cable to Thunderbolt™ 2 Interface card (see pictures below). 8. Secure the Interface card.
Magma NOTE The new Thunderbolt™ 2 Interface card is shorter than the Thunderbolt™ 1 Interface card. . Vendor ID (Magma) UID Mac OS Supported Speed Lane width # of LEDs Thunderbolt™ 1 0X19 0X00190003 10.8 below 10Gb/s X4 5 Thunderbolt™ 2 Interface Card Thunderbolt™ 2 0X19 0X00190008 10.
Magma Verify Installation Hardware Final step is to test and verify the Thunderbolt™ 2 Interface card. When the Thunderbolt™ 2 Interface card is fully operational the following GREEN LEDs are illuminated (Solid Green), see FIGURE A. • • • • • • • • • Connect Thunderbolt cable to Magma Thunderbolt™ 2 Interface card, use the bottom port. Note: You can use either top or bottom. Connect Displayport thunderbolt cable to available port. You can skip this if external monitor is not available.
Magma FIGURE B NOTE LEDs D6 and D8 are illuminated when power cord is attached to expansion unit. This means the expansion unit is on standby-mode. If you don’t see these TWO GREEN LEDs coming ON, it means there is no power being supplied to the board. Check J7 on the Interface card and make sure the 3-pin wire / power cable is firmly connected. If the two GEREN LEDs are still not coming on you need to reseat the Thunderbolt™ 2 Interface card and remove & reconnect the 3-pin wire connector to J7.
Magma FIGURE C If there is no Display Monitor attached to Thunderbolt™ 2 Interface card it would only show FIVE illuminated GREEN LEDs, which is normal. If you have a Display Monitor attached, LEDs D1 and D5 should come on. Otherwise, the Thunderbolt™ 2 Interface card is not properly working or the monitor Displayport cable is faulty.
Magma How to Get More Help You can visit the Magma Technical Support FAQ pages on the Internet at: www.magma.com/support/ Contacting Technical Support Our support department can be reached by fax at (858) 530-2733 or by phone at (858) 530-2511. Support is available Monday through Friday, 8:00 AM to 5:00 PM PT. When contacting MAGMA Technical Support make sure to include the following information: 1. 2. 3. 4. 5.
QSG P/N 09-09996-00