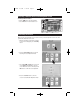
M1-NAV 8/4/08 1:27 PM Page 1 Operation and Installation Manual GPS NAVIGATION BOX M1-NAV Navigation Module
M1-NAV 8/4/08 1:27 PM Page 2 Safety Instructions Please read this section carefully and follow all the instructions given. This will help ensure reliable operation and extend the service life of the unit. Caution 1. You, as the driver, are solely responsible for the safe operation of your vehicle and the safety of your passengers and pedestrians, and abiding all state and local traffic regulations. Do not use any features of this system to the extent it distracts you from safe driving.
M1-NAV 8/4/08 1:27 PM Page 3 Index Safety Instructions. . . . . . . . . . . . . . . . . . . . . . . . . . . . . . . . . . . . . . . . . . . . . . . . . . . . . . . . . . . . . . . . 2 Caution. . . . . . . . . . . . . . . . . . . . . . . . . . . . . . . . . . . . . . . . . . . . . . . . . . . . . . . . . . . . . . . . . . . . . . . . . 2 Voice Control Set-up . . . . . . . . . . . . . . . . . . . . . . . . . . . . . . . . . . . . . . . . . . . . . . . . . . . . . . . . . . . . . .
M1-NAV 8/4/08 1:34 PM Page 4 Voice Control Set-up Navigation Voice Control: You can specify if you want the navigation’s voice to interrupt the audio of another source and give turn directions. For example, with a navigation destination selected and the Navigation Voice is On and you switch the source to the radio, the radio will be interrupted to give navigation turn directions. Note: In the navigation source screen the navigation voice is always on and can not be turned off.
M1-NAV 8/4/08 1:34 PM Page 5 Selecting a Different Source from Navigation Screen Selecting a Different Source: Press the button to leave the navigation source and return to the last selected source. Calibrating the Screen When you first connect the GPS box to the stereo receiver you should adjust the screen to the center position and calibrate the touch screen. 1. When the navigation system starts up and the Console menu is displayed, press the Setting button. 2.
M1-NAV 8/4/08 1:35 PM Page 6 Calibrating the Screen 5. You will see a + displayed on the screen. Touch the + firmly, the + will continue to move until the screen is aligned. Continue to touch the + firmly until OK appears on the screen. Press OK to exit the screen’s Touch Calibration Adjustment mode. 6. Press the X to exit the screen’s calibration screen. Note: The Navi Opt, GPS Monitor, Language Opt and System Info buttons have no user adjustable settings.
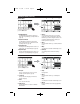
M1-NAV 8/4/08 1:35 PM Page 7 Loading a Map (Continued) 4. Locate the map containing your state by using the or buttons. Press the Select button to load the map. Your Location 5. The navigation unit will then automatically display the Main Map screen and show your location on the map. Note: If the map is blank you have selected the incorrect map. Follow the procedures again to load the correct map. Getting Started Destinations Menu: 1 2 3 4 5 6 1.
M1-NAV 8/4/08 1:35 PM Page 8 Getting Started (Continued) Options Menu: 1 2 3 4 5 From the Destinations menu press the Next button. 6 7 8 5. Extras: 1. Day/Night Mode: The Extra button button selects a secondary menu that contains a tutorial button which will familiarize your with the navigation features. Also included is a Multi-Stop Planner button (See Multi-stop Planner on page 30). The Day/Night button adjusts the display for either day or night driving. (See Maps Views on page 10). 2.
M1-NAV 8/4/08 1:40 PM Page 9 Main Map Direction Bar Current Location Zooms Display Out Zooms Display In Compass GPS Status Quick Nav No Function GPS Generated Information Area Destinations Menu Quick Nav: See Route Manager section for more information on page 28. Direction Bar: GPS Generated Information Area: When you have calculated a route, press the Direction Bar to display the Turn-by-Turn screen for a complete list of directions. Current Location: Indicates current location.
M1-NAV 8/4/08 1:40 PM Page 10 Map Views 2D Views: 3D Views: Day Map View Day Map View Night Map View Night Map View Point on the Map You can navigate to any point by touching its location directly on the Main Map screen in both 2D and 3D map views. This feature is especially helpful when you want to navigate to a specific point on the map, but you don’t have the street address. 1. Press the map at a specific point on the map. 2.
M1-NAV 8/4/08 1:40 PM Page 11 Destinations Menu Address: The Address button lets you navigate to an address by inputting an address. 1. Press the Address button. 2. Use the or buttons to select the state. You can also select the state by entering the first few letters of the state. Press the Next button to confirm your selection. Note: If you state does not appear in the display you have the incorrect map loaded into memory. See page 6 for the procedure on loading a region specific map. 3.
M1-NAV 8/4/08 1:40 PM Page 12 Destinations Menu (Continued) Address: (continued) 6. Press the GO button and the navigation system will calculate driving directions. Note: The Quick option selects the route that takes the least amount of time. Quick is the default setting. The Short option selects the route that is the shorter distance. Remember, the shorter route may not always be the quickest, as you are able to travel faster on some roads than on others.
M1-NAV 8/4/08 1:40 PM Page 13 Destinations Menu (Continued) Address: (continued) Action Button: When you have specified an address, press the Action button to select from the following commands. Set as Origin: Lets you designate the selected location as the route origin. You would use this command when calculating a route from a point other than your current location. Show on Map: Lets you see the selected address on the map.
M1-NAV 8/4/08 1:43 PM Page 14 Destinations Menu (Continued) Recent Locations: (continued) 4. Press the Go button to calculate your route. Show Button: You can display the selected Recent Locations by pressing the Show button. A map appears showing the specified location. Press the Go button to calculate the route. Action Button: When you have selected a recent location, press the Action button to select from the following commands.
M1-NAV 8/4/08 1:43 PM Page 15 Destinations Menu (Continued) My Favorites: My Favorites is a group where you can store destination for easy retrieval. My Favorites group is the default group where all favorites are stored unless you create another group. Creating other groups allow for easy organizing of your favorite destinations. To create a new group follow these instructions: Creating another “My Favorites” Group 1. Press the My Favorites button. 2. Press the Actions button. 3.
M1-NAV 8/4/08 1:44 PM Page 16 Destinations Menu (Continued) My Favorites: (continued) 6. Press the Save button. 7. Press the Back button to return to the Destinations screen. Note: Press the Action button to access a screen to Add a Group, Edit a Group or Delete a Group. Adding a Location “My Favorites” Group You can save a location to your favorite group from the Address, Recent Locations or POI menus. For more information see the “Actions” section of each menu.
M1-NAV 8/4/08 1:44 PM Page 17 Destinations Menu (Continued) My Favorites: (continued) Favorite Alerts Alerts let you know that you are within a certain distance of a favorite location. Favorite Alerts 1. Press the Alerts button. 2. Set the distances for the 1st and 2nd Alerts. After the distances are selected press the Back button. Note: The 2nd Alert must be set to go off at a closer distance than the 1st Alert. 3.
M1-NAV 8/4/08 1:44 PM Page 18 Destinations Menu (Continued) My Favorites: (continued) 2. Select your favorite location then press the Next button. 3. Select either the Quick or Short button then press the Go button to calculate your route. Note: The Quick option selects the route that takes the least amount of time. Quick is the default setting. The Short option selects the route that is the shorter distance.
M1-NAV 8/4/08 12:30 PM Page 19 Destinations Menu (Continued) POI (Points of Interest): The Points of Interest is a collection of hundreds of interesting or useful places organized by easy-to-find categories. For example, you can use the navigation system to guide you to a shopping center, hotel, restaurant or gas station. POI Button: 1. Press the POI button. 2. Use the or buttons to select the Point of Interest category. Press the Next button to confirm your selection. 3.
M1-NAV 8/4/08 12:30 PM Page 20 Destinations Menu (Continued) POI (Points of Interest): (continued) Points of Interest Features: Icons Not Displayed on Main Map Find* Icons Displayed on Main Map ( )*** Scroll Hide/Display Keyboard Search Near a Location** * If the automatic search feature does not find the specified search entry, use the Find button to conduct a sub-search, particularly useful when the address name consists of two or more words.
M1-NAV 8/4/08 12:30 PM Page 21 Destinations Menu (Continued) POI (Points of Interest): (continued) Subcategories: Many categories have subcategories to provide for an even greater list of choices. For example, gas station, may have many subcategories each representing a particular brand name. The same is also true for hotels. Restaurants have subcategories that represent different types of food, such as Indian, Italian and French.
M1-NAV 8/4/08 12:30 PM Page 22 Route Manager Menu Turn by Turn List: 1. In the Options menu press the Route Manager button. 2. In the Route Manager menu press the Turn by Turn button. 3. The Turn-by-Turn directions will be displayed. Use the or buttons to scroll through the directions list. Press the Route button to display the entire route. The Travel distance and the estimated travel time remaining will also be displayed. 4. Press the Back button to return to Turn-byTurn directions.
M1-NAV 8/4/08 12:30 PM Page 23 Route Manager Menu Turn by Turn List: (continued) Avoid Turn: The Avoid button lets you avoid the selected turn in the directions list. The navigation system will the automatically recalculate the route excluding the selected turn. Note: The recalculated route may take longer.
M1-NAV 8/4/08 12:30 PM Page 24 Route Manager Menu Avoid Roads: (continued) 3. You can avoid or allow the road categories by pressing the Allow or Avoid button to include or exclude all item located in the group. Note 1: My Roads to Avoid is a default folder that lets you store roads to avoid. Inside the folder you can select specific roads to allow or avoid. To avoid a road inside this folder the folder must be set to the Avoid setting.
M1-NAV 8/4/08 12:31 PM Page 25 Route Manager Menu Avoid Roads: (continued) 7. Select the State then press the Next button. 8. Select the City then press the Next button. 9. Select the Street then press the Next button. 10. Select the Street then press the Next button. 11. The road you have selected to avoid will display on the map. Press the Avoid button to add to the My Roads to Avoid group. The road will now be displayed in the My Roads to Avoid screen.
M1-NAV 8/4/08 12:31 PM Page 26 Route Manager Menu Avoid Roads: (continued) Creating a New Group of Roads to Avoid Group: 1. Press the Action button in the “Select or Add Avoid Groups” screen. 2. Press the Add Group button. Note: Along with adding a group, in the Action screen you can: Edit Group: Lets you rename the group. Delete Group: Select a group to remove. 3. Type in the name of the new group then press the Save button.
M1-NAV 8/4/08 1:22 PM Page 27 Route Manager Menu Route Playback: 3. To stop recording, return to the Route Playback screen and press the Stop button. Playing Back a Recorded Route 1. Select the data file and press the Play button. The navigation system plays the recorded route on the Main Map screen. 2. To stop the playback, return to the Route Playback screen and press the Stop button.
M1-NAV 8/4/08 1:22 PM Page 28 Route Manager Menu Quick Navigation: When the QuickNav button is pressed on the Main Map screen you will navigate to a predetermined location. For example, if you have selected your home as the QuickNav destination, when you click the QuickNav button on the Main Map screen, the navigation creates a route to your home. QuickNav Defining the QuickNav Button 1. Press the QuickNav button in the Options menu. 2.
M1-NAV 8/4/08 1:23 PM Page 29 Map Manager Menu Vehicle Mode: Do Not Activate Pedestrian Mode The default setting for the navigation system is Vehicle Mode. When the Pedestrian Mode is visible the navigation system is in the Vehicle Mode. The Pedestrian Mode is not applicable to this navigation system. Free Map Browsing/GPS: This feature lets you browse the map without the GPS receiver returning you to your current location.
M1-NAV 8/4/08 1:23 PM Page 30 Extras Menu In the Options menu press the Extras button. A secondary menu will appear that contains a tutorial button which will familiarize you with operation of the navigation system. Also the Multistop planner button for planning a route with up to twelve stops. Multistop Planner: The Multistop Planner lets you plan a route with up to twelve stops. 1. Press the Multistop Planner button. 2. Next you need to create a Multistop Route Group.
M1-NAV 8/4/08 1:23 PM Page 31 Extras Menu Multistop Planner: (continued) 5. With the newly created Multistop Route Group visible in the list press the Next button. 6. Add stop to the Multistop Route Group by selecting the Add Stop button. Note: Once a stop has been created you can: Set as Origin: Lets you designate the selected address as the route origin. Rename Stop: Lets you change the stop information. Delete Stop: Lets you delete a selected stop.
M1-NAV 8/4/08 1:23 PM Page 32 Extras Menu Multistop Planner: (continued) 9. Select either the Quick or Short button to calculate your route then press the Go button. Note: The Quick option selects the route that takes the least amount of time. Quick is the default setting. The Short option selects the route that is the shorter distance. Remember, the shorter route may not always be the quickest, as you are able to travel faster on some roads than on others.
M1-NAV 8/4/08 1:23 PM Page 33 Installation Windshield Antenna Warning! Do not mount in such a manner that it obstructs the driver’s view. • The windshield antenna mounts on the windshield (inside). • We suggest you mount it on the lower lefthand side of the windshield. • Try different positions in your vehicle in order to find the best reception. Installation: 1. Remove the protective tape backing. 2. Carefully align the antenna and apply to windshield. 3.
M1-NAV 8/4/08 1:23 PM Page 34 Connections Navigation Connection Cable to M1-LCD or M1-LCD2 Antenna Cable 34
M1-NAV 8/4/08 1:23 PM Page 35 Feature Locations SD ET RGB O IDE RES PWR V 1 2 3 4 1. RGB/Video Switch: Leave the switch in the RGB mode. Video mode has no function. 3. Power Indicator: Indicates when the navigation system has power. 2. Reset Button: The navigation system may fail to function normally due to the vehicle’s battery condition, and could require resetting the navigation microprocessor if: • The vehicle has been “jump started” from a dead battery condition.
M1-NAV 8/4/08 1:23 PM Page 36 Warranty ONE (1) YEAR LIMITED WARRANTY Magnadyne Corporation or its authorized agents will within one year from the date of sale to you, repair, replace or refund the retail sales price of said product or any part thereof, at the option of the Magnadyne Corporation or its authorized agents, if said product or part is found defective in materials or workmanship, when properly connected and operating on the correct power requirements designated for the specific product.