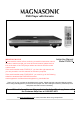
DVD Player with Karaoke IMPORTANT NOTICE Please read this notice before continuing to read this instruction manual. In order to make sure that you have the correct manual, please have a look at the back of the DVD player cabinet and check what the model number reads. If the model number reads “DVD816-4”, you have the right manual and you can proceed to use this manual for reference purposes.
IMPORTANT INFORMATION CAUTION To reduce the risk of electric shock, do not remove cover. Refer servicing to qualified service personnel. Please read the manual carefully before operating this player. DVD PLAYER PLACEMENT Please do not place the player in the following locations: x In direct sunlight or near or on top of heat sources such as heaters, stoves, or other appliances that produce heat. x Locations which are badly ventilated, dusty, contain lots of moisture, or are unsteady.
Index Important Information -----------------------------------------------------------------------------------1 Index--- -----------------------------------------------------------------------------------------------------2 Controls Overview 1. Back Panel / Front Panel Overview------------------------------------------------------------3 2. Remote Control Overview------------------------------------------------------------------------4 Connections Overview 1.
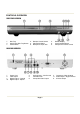
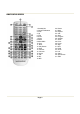
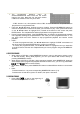
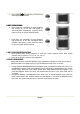
CONTROLS OVERVIEW FRONT PANEL OVERVIEW 1. 4. 7. Disc Tray Open/Close Disc Tray Button Power Button 2. 5. 8. Remote Control Sensor Play/Pause Button Microphone Input Jack 3. 6. 9. Backlit Display Stop Playback Button Microphone Volume Control BACK PANEL OVERVIEW 1. 4. 7. 10. Power Cord VGA Output Digital Output – Coaxial Digital Output - Optical 2. 5. 8. Audio Output – Left Channel Ventilation Fan Composite Video Output Page 3 3. 6. 9.
REMOTE CONTROL OVERVIEW 1. Standby/On 2. Numerical Buttons 3. Goto 4. Up 5. Title 6. Enter 7. Right 8. Down 9. Menu/PBC 10. Prev 11. Next 12. Play/Pause 13. Step 14. Volume 15. Volume + 16. Angle 17. 3D 18. R/L 19. N/P Page 4 20. Return 21. Mute 22. Repeat 23. A-B 24. Slow 25. Program 26. Subtitle 27. Audio 28. Echo 29. Echo + 30. Stop 31. REV 32. FWD 33. Zoom 34. Left 35. Setup 36. Open/Close 37.
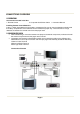
CONNECTIONS OVERVIEW 1. PREPERATIONS Accessories Included in the Box 1. Remote Control 2. Composite Audio/Video Cable 3. Instruction Manual Installing Remote Control Batteries Insert 2 x ‘AAA’ size batteries into the battery compartment. Be sure to note the polarities marked inside the battery compartment so the batteries can be inserted the proper way. There should be no large obstacles in between the remote control and the player itself. 2.
INTRODUCTION TO BASIC OPERATION 1. TURN ON THE TV AND YOUR DVD PLAYER x x Press the POWER button on the player to turn on the power to the player. The display on the player lights up and the player will start searching for a disc NOTE: You can not turn the power on using the remote if the power is off. You can only turn the player on and off using the remote when the player is in Standby mode. In Standby mode the display of the player turns off and it goes into power saving mode.
b. When a DVD disc is loaded, press Ż ŹŸź buttons to highlight a menu item you want to select. As for SVCD or VCD2.0 discs, you can press NUMERICAL buttons to select a track to play. c. Press the ENTER or PLAY button to enter a menu you have selected or start an action you have selected. d. During DVD disc playback, press the MENU button to return to Root menu. As for SVCD or VCD2.0 discs (with PBC function turned on), press PBC button to return to the menu. e. Press the STOP button to stop playback.
x x x x The programmed playback menu for SVCD/VCD/CD/CD+G discs looks like the screen image to the right. Note that only the track number needs to be entered for the entry to be valid. - If PBC function is on, this operation will turn PBC function off while the chapters/tracks are played back in a programmed order. Using the Ż ŹŸź buttons, highlight a memory location. Press the NUMERICAL buttons to enter the chapter/track numbers in the order you want them to play.
x Press PREV to beginning of the previous title/chapter/track on a disc. 6. MULTI-SPEED PLAYBACK x Press FWD key repeatedly to toggle between fast forward 2x, 4x, 8x, 20x and regular 1x speed playback. Alternatively, press the PLAY button to return to regular playback speed. x Press REV key repeatedly to toggle between fast reverse 2x, 4x, 8x, 20x and regular speed playback. Alternatively, press the PLAY button to return to regular playback speed. 7.
9. USING THE OSD (ON-SCREEN DISPLAY) FEATURE x While loading and playing DVDs, press the OSD button once.
11. CHANGING THE AUDIO LANGUAGE x x During disc playback, press the AUDIO button once to view the current audio language on screen. When a DVD or SVCD has been pre-recorded with multiple audio soundtracks, you can use the language feature to change the audio language. Note that language availability depends entirely on the disc content and not on the player. See DVD disc sleeve for details on the included languages. 12.
15. MUTING AUDIO OUTPUT x x Press the MUTE button once to mute audio output. Press the MUTE button again to resume previous audio output volume level. 16. ZOOMING FEATURE x x Press ZOOM button to active the function and choose the required zoom factor : ZOOM1, ZOOM2, ZOOM3, ZOOM1/2, ZOOM1/3, ZOOM1/4, ZOOM OFF. Use the Ż ŹŸź buttons to pan across the screen when zoom factor is 1/2/3. 17.
19. 3D SURROUND MODE Press 3D button on the remote control once and the current 3D surround mode will be displayed on the screen. Press Ż ŹŸź button to highlight 3D surround setup menu items. Press the 3D button again to turn off the menu x Use the Ÿź buttons and press ENTER to choose a surround mode. x Press the Ÿ button until SRND is highlighted and then press the Ź button to enter the EQ menu. EQ is highlighted and the EQ menu options are listed as shown in the image to the right of this text.
x EQ [JAZZ] is highlighted as the graph shown to the right of this text. x EQ [POP] is highlighted as the graph shown to the right of this text. x EQ [USER] is highlighted as the graph shown at the right. In the USER mode you can customize the graph and therefore the audio mode to your specifications Scroll down to USER and press ENTER button to access the graph Press Ż Ź buttons to highlight the band you want to tune. Then press Ÿź buttons to increase or decrease the value.
x x x x Press the Ÿ button until SRND, EQ or BAND is highlighted and then press Ż Ź buttons to highlight KEY. Press the ENTER button to enter the Key adjustment menu. Press Ÿź buttons to change the key of the tones up or down Press the ENTER button to confirm your selection NOTE : When you go to the “SRND” menu – Surround mode, the “EQ” mode is automatically set to STANDARD. You can change the SRND mode as you wish.
x x x x x x Notes: - Press the Ż / Ź buttons to switch between directory area, file area and file type switch area. - In file type switch area, you can press the Ż / Ź buttons to highlight a different file type (WMA, JPEG or MP3) and then press ENTER button. The player reads what kind of files the disc contains and then highlights the icons at the bottom of the screen (file type switch area) to show what file types are on the disc.
SYSTEM SETUP 1. GENERAL SETUP MENU INFORMATION A) Press the SETUP button, the main SETUP menu appears. x When the main menu is displayed, the DVD system will auto pause. B) Press the Ż or Ź button to highlight the desired options page. Then press the Ÿorź button to enter the options page you have chosen. For example, if you want to enter the VIDEO options page, press Ź button repeatedly to highlight the video icon. The VIDEO options page is displayed on the screen.
2) SETUP OPTIONS INFORMATION A) SYSTEM SETUP The SYSTEM SETUP options are illustrated below: z TV SYSTEM Adjust to change the Color System of the TV (Note that in North America the NTSC color system is used). You can choose from the following TV SYSTEM options. AUTO : Choose this setting if your DVD player is connected to a multi-system TV. NTSC : Choose this setting if your DVD player is connected to a NTSC TV. PAL : Choose this setting if your DVD player is connected to a PAL TV.
z TV TYPE 4:3PS (Pan & Scan) : Choose this setting if your DVD player is connected to a normal aspect ratio TV (4:3). A standard edition movie (4:3) will fill the entire screen of your TV. This might mean that parts of the picture (the left and right edges) won’t be seen. 4:3LB (Letter Box) : Choose this setting if your DVD player is connected to a normal aspect ratio TV (4:3). You will see the movies in its original aspect ratio.
Rating Limit Definitions Ǐ 1 G ν Ё for General Audiences - all ages admitted suitable for children μ2νЁRating limit between μ1 Gνand μ3 PGν μ3 PGνЁparental guidance - used for movies that do not have cursing or violence and that are suitable for children accompanied by adults μ4 PG13νЁused for movies that have some cursing and limited violence and are not suitable for children under the age of 13 μ5νЁRating limit between μ4 PG13νand μ6 Rν.
z AUDIO LANGUAGE Highlight the AUDIO LANG option and press ENTER button to access the AUDIO LANG options menu. Press ŸźŻ Ź buttons to choose the audio language you prefer. Press ENTER to confirm. If the disc you are playing has that language available, it will output audio in the language you have chosen. NOTE: Audio language availability is subject to the languages contained on the DVD disc.
SPDIF/PCM : Choose this setting if your DVD player is connected to a 2-channel digital stereo amplifier. When playing a disc recorded with Dolby Digital and MPEG audio formats, audio signals will be modulated into 2channel PCM signal and it will be output from the coaxial and/or optical output jacks. z MIC SETUP There are two MIC settings in the MIC SETUP options menu: AUTO and OFF. When selecting AUTO, the player will auto-detect and deal with the input voice from the microphone.
D) VIDEO SETUP The Video setup options are illustrated below: z BRIGHTNESS Press ENTER button to access the BRIGHTNESS options menu and then press the Ÿź buttons to adjust the BRIGHTNESS level. Select a lower number for a darker picture. Select a higher number for a brighter picture. z CONTRAST Press ENTER button to access the CONTRAST options menu and then press the Ÿź buttons to adjust the CONTRAST level. Select a lower number for a lower contrast picture.
E) SPEAKER SETUP The speaker setup options are illustrated below: z DOWNMIX Use the Ÿźbuttons to scroll through the DOWNMIX options. LT/RT : Use this setting when connecting to a Dolby Digital amplifier STEREO : Use this setting when connecting to a stereo TV or amplifier. VSS : Use this setting to make a two speaker system sound as though it includes rear speakers; the "virtual" rear speakers allow you to enjoy a surround-like effect. It is for use with Dolby Digital DVDs only.
TROUBLE SHOOTING GUIDE When there is a problem, it doesn’t necessarily mean that the player is malfunction. Before sending it for repair, please check the troubleshooting guide below for a possible solution to the problem you are having. Under no circumstances should you attempt to repair the player yourself. There are no user serviceable parts inside and this will void your warranty. PROBLEM SOLUTION No power x Make sure power cord is properly connected.
TECHNICAL SPECIFICATIONS Type Model Play Mode Disc Mode DIGITAL DVD Player DVD-816 NTSC / PAL / AUTO DVD, VCD, SVCD, CD, MP3, DVD+R, DVD+RW, JPEG, WMA, Kodak Picture CD Video Characteristic Resolution Video S/N Ratio 500 lines 56dB Audio Characteristic Frequency Response Audio S/N Ratio Dynamic Range Distortion D/A Converter fs 192KHz : 4Hz-44KHz : +/- 1dB 90dB 90dB ‹ 0.
MAGNASONIC HOME ENTERTAINMENT WARRANTY We appreciate your purchase of a MAGNASONIC Home Entertainment product. We take pride in the quality of our products and have manufactured your new Home Entertainment unit to exacting quality standards. We feel confident that in normal use, it will provide you with satisfactory performance. However, should you experience difficulty, you are protected under the provisions of this warranty.