For Customer Assistance Call: Pour joindre le Service d’assistance à la clientèle, composez le: 1-800-663-5954 MM176 K Projection Dual Alarm Clock Radio with Auto Time Set Radio-réveil projecteur à 2 alarmes avec réglage automatique de l’heure Instruction Manual Guide de l’utilisateur Thank you for your purchase of this Magnasonic product. Please read this Instruction Manual carefully before using product to ensure proper use. Keep this manual in a safe place for future reference.
WARNING: To reduce the risk of fire or electric shock, do not expose this appliance to rain or moisture. CAUTION: Use of controls or adjustments or performance of procedures other than those specified may result in hazardous radiation exposure. CAUTION RISK OF ELECTRIC SHOCK DO NOT OPEN CAUTION - TO REDUCE THE RISK OF ELECTRIC SHOCK, DO NOT REMOVE COVER (OR BACK). NO USER-SERVICING TO QUALIFIED SERVICE PERSONNEL.
TABLE OF CONTENTS IMPORTANT SAFETY INFORMATION.. .. .. .. .. .. .. .. .. .. .. .. .. .. .. .. .. .. .. .. .. .. .. .. .. .. .. .. .. .. .. .. .. .. .. .. .. .. .. .. .. .. 1-2 PRODUCT INFORMATION .. .. .. .. .. .. .. .. .. .. .. .. .. .. .. .. .. .. .. .. .. .. .. .. .. .. .. .. .. .. .. .. .. .. .. .. .. .. .. .. .. .. .. .. .. .. .. .. .. 3 LOCATION OF CONTROLS .. .. .. .. .. .. .. .. .. .. .. .. .. .. .. .. .. .. .. .. .. .. .. .. .. .. .. .. .. .. .. .. .. .. .. .. .. .. .. .. .. .. .. .. .. .. .. .. ..
IMPORTANT SAFETY INFORMATION WARNING TO PREVENT ELECTRIC SHOCK; DO NOT USE THIS PLUG WITH AN EXTENSION CORD RECEPTACLE OR OTHER OUTLET UNLESS THE BLADES CAN BE FULLY INSERTED TO PREVENT BLADE EXPOSURES.TO PREVENT FIRE OR SHOCK HAZARD; DO NOT INSTALL THIS PRODUCT IN A CONFINED SPACE SUCH AS A BOOK CASE OR SIMILAR UNIT. LASER SAFETY This unit uses a laser. Only a qualified service technician should remove the cover or attempt to service this product to avoid possible eye injury.
IMPORTANT SAFETY INFORMATION 8. Check that the power voltage stated on the rating label corresponds to your local electricity supply. 9. Do not block any ventilation openings. Install in accordance with the manufacturer’s instructions. 10. Do not place this product near any heat sources such as radiators, heat registers, stoves or other apparatus (including amplifiers) that produce heat. 11. Do not immerse this product, the power cord or any accessories in water or any other liquid. 12.
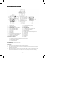
PRODUCT INFORMATION 1. 2. 3. 4. 5. 6. 7. 8. 9. 10. 11. 12. Projection Unit AM/FM Band Button Snooze / Sleep/Time zone Button ON/OFF Button Alarm 1 Radio/Buzz Button Alarm 2 Radio/Buzz Button Line In Jack Rating Label Reset Button Focus Adjustment for Projection unit Projection Time 180º Flip Button Projection ON/OFF Button 13. 14. 15. 16. 17. 18. 19. 20. 21. 22. 23. 24. 25.
OPERATING INSTRUCTIONS POWER CONNECTION 1. Plug the AC power cord to a household outlet AC source. 2. Clock display will flash “3” indefinitely. 3. Unit will go to Zone 3, which is the default setting, and correct time will be displayed. SETTING THE TIME ZONE (FACTORY PRESET TO ZONE “3” – EST) Press the >> / YEAR / DST Button (18) or << / MONTH - DAY Button (17) to select time zone 1-6.
OPERATING INSTRUCTIONS Action (during manual adjustment): Press << / MONTH-DAY / °C/°F BUTTON (17) to adjust data backward. Press>> / YEAR / DST BUTTON (18) to adjust data forward. Press and Hold << or >> button for 2 seconds to enable auto forward. SETTING ALARM OUTPUT & ALARM ON/OFF Changing Alarm Output 1. Press AL 1 (5) button / AL 2 (6) button to music position to select wake to Radio, set to Buzzer position to select wake to Buzzer, set to Alarm off position to disable all alarms. 2.
OPERATING INSTRUCTIONS PROJECTION 1. 2. Focus setting: Adjust the projection clock brightness/focus by turning the brightness/focus adjustment wheel (10) until the projected time is clearly shown on the ceiling or wall. To flip projected image by 180°, press 180° flip button (11). NOTE: PROJECTS TIME IMAGE ON THE CEILING OR WALL OF A DARKENED ROOM. MAXIMUN PROJECTION DSTANCE IS 3-9 FEET. CARE AND MAINTENANCE Precautions 1. Always turn off the unit after use. 2.
WARNING 1. 2. 3. No naked flame sources, such as lighted candles, should be placed on the apparatus. Do not place the product in closed bookcases or racks without proper ventilation. The mains plug is used as the disconnect device, the disconnect device shall remain readily operable. 4. The ventilation should not be impeded by covering the ventilation openings with items, such as newspapers, table-cloths, curtains, etc. 5.
MAGNASONIC® WARRANTY Consumer Electronics Products and Home Appliances Thank you for choosing MAGNASONIC®! BlueTronics Group gives the following express warranty to the original consumer purchaser or gift recipient for this MAGNASONIC product, when shipped in its original container and sold or distributed in Canada by BlueTronics Group or by an Authorized MAGNASONIC Dealer: BlueTronics Group warrants that this product is free, under normal use and maintenance, from any defects in material and workmanship.
TABLE DES MATIÈRES IMPORTANTES CONSIGNES DE SÉCURITÉ…………………………………………………………………………………. INFORMATION SUR L’APPAREIL ……………………………………………………………………………………………… DESCRIPTION DE L’APPAREIL…………………………………………………………………………………………………. CONTENU DE L’EMBALLAGE......................................................................................................................................... DIRECTIVES DE FONCTIONNEMENT...............................................................................................................
IMPORTANTES CONSIGNES DE SÉCURITÉ MISE EN GARDE AFIN D'ÉVITER TOUT RISQUE D'INCENDIE OU D'ÉLECTROCUTION, NE BRANCHEZ PAS LE CORDON D’ALIMENTATION DE CET APPAREIL SUR UN CORDON PROLONGATEUR DANS LEQUEL TOUTES LES TIGES DE LA FICHE POURRONT S’INSÉRER COMPLÈTEMENT. AFIN D'ÉVITER TOUT RISQUE D'INCENDIE OU D'ÉLECTROCUTION, N’INSTALLEZ PAS CET APPAREIL DANS UN ESPACE FERMÉ, TEL QU’UNE ÉTAGÈRE OU AUTRE MEUBLE SEMBLABLE. PRÉCAUTION AVEC LE LASER Cet appareil est doté d’un laser.
IMPORTANTES CONSIGNES DE SÉCURITÉ 8. 9. 10. 11. 12. 13. 14. 15. 16. 17. 18. Vérifiez que la tension du réseau électrique sur lequel vous allez brancher l’appareil correspond bien à la tension indiquée sur la plaque signalétique appose sous le radio-réveil. Ne bloquez aucun des orifices de ventilation. Installez l’appareil conformément aux directives du fabricant.
INFORMATION SUR L’APPAREILORMATION SUR L’AREIL 1. 2. 3. Projecteur Sélecteur de bande AM/FM Touche de rappel d’alarme / minuterie sommeil / sélecteur de fuseau horaire (SNOOZE/SLEEP/ TIME ZONE) 4. Interrupteur (ON/OFF) 5. Touche de l’alarme 1 – Sélecteur radio/tonalité 6. Touche de l’alarme 2 – Sélecteur radio/tonalité 7. Borne d’entrée de signal 8. Plaque signalétique 9. Touche de réinitialisation (RESET) 10. Molette de réglage de la mise au point du projecteur 11.
DIRECTIVES DE FONCTIONNEMENT RACCORDEMENT AU RÉSEAU ÉLECTRIQUE 1. Branchez le cordon d’alimentation sur une prise de courant alternatif (CA) domestique. 2. Le chiffre « 3 » clignotera indéfiniment à l’affichage. 3. L’appareil opte implicitement pour le fuseau horaire de la zone 3 (voir plus bas), et l’heure exacte apparaîtra automatiquement à l’affichage.
DIRECTIVES DE FONCTIONNEMENT Procédure à suivre pour régler l’alarme manuellement : Appuyez sur la touche (17) <>/ANNÉE/HEURE AVANCÉE (>>/YEAR/DST) pour augmenter le chiffre à l’affichage. Maintenez la touche << ou >> enfoncée pendant 2 secondes pour activer l’ajustement automatique ascendant ou descendant.
DIRECTIVES DE FONCTIONNEMENT PROJECTEUR 1. Réglage de la mise au point : Tournez la molette de réglage du projecteur (10) pour régler l’intensité lumineuse et la mise au point du projecteur jusqu’à ce que l’heure projetée sur le mur ou le plafond s’affiche clairement. 2. Pour faire basculer l’image de 180°, appuyez sur le bouton pour faire basculer le projecteur de 180° (11) REMARQUE : L’APPAREIL PROJETTE L’HEURE SUR LE PLAFOND OU UN MUR DANS UNE PIÈCE SOMBRE.
AVERTISSEMENTS 1. 2. 3. Aucune source incandescente, telle une chandelle, ne doit être posée sur l’appareil. Ne placez pas cet appareil dans une étagère fermée ou une tablette où l’aération est insuffisante. Le cordon d’alimentation de cet appareil sert aussi d’interrupteur principal pour le débrancher du réseau électrique. Par conséquent, il doit toujours demeurer facilement accessible, sans obstruction. 4.
GARANTIE MAGNASONICMD Appareils électroniques grand public et électroménagers Merci d’avoir choisi MAGNASONICMD! BlueTronics Group accorde la garantie expresse suivante à l’acheteur original de cet appareil MAGNASONIC ou à la personne qui l’a reçu en cadeau, pourvu qu’il ait été expédié et vendu ou distribué au Canada par BlueTronics Group ou un détaillant MAGNASONIC autorisé dans son emballage original.