For Customer Assistance, please send your email to : Pour joindre le Soutien à la clientèle, veuillez envoyer votre courriel à : MM178K support@magnasonic.com Auto Time Set Dual Alarm Projection Clock Radio Radio Réveil – Double Alarme – Projection Heure USER’S GUIDE GUIDE DE L’UTILISATEUR Thank you for your purchase of this Magnasonic product. Please read this Instruction Manual carefully before using product to ensure proper use. Keep this manual in a safe place for future reference.
-2-
TABLE OF CONTENTS Warnings What’s Included Important Safety Information Product Illustration Power Connection Operation Setting the Time Zone Changing Time Zone Setting Time and Date Setting Alarm Time Setting Alarm ON / OFF and Type Alarm Duration / Snooze Button Changing Display Content Sleep Function Daylight Savings Time Function Changing Temperature Display Format Radio Operation Reset Function Projection Unit Infrared Sensor Operation Specifications Warnings Magnasonic Warranty WHAT’S INCLUDED - Clo
IMPORTANT SAFETY INFORMATION WARNING TO PREVENT ELECTRIC SHOCK; DO NOT USE THIS PLUG WITH AN EXTENSION CORD RECEPTACLE OR OTHER OUTLET UNLESS THE BLADES CAN BE FULLY INSERTED TO PREVENT BLADE EXPOSURES. TO PREVENT FIRE OR SHOCK HAZARD; DO NOT INSTALL THIS PRODUCT IN A CONFINED SPACE SUCH AS A BOOK CASE OR SIMILAR UNIT. CAUTION: RETAIN THIS MANUAL FOR FUTURE REFERENCE 1. 2. 3. 4. 5. 6. 7. Read these instructions. Keep these instructions. Read all warnings. Follow all instructions.
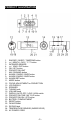
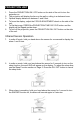
PRODUCT ILLUSTRATION 1. 2. 3. 4. 5. 6. 7. 8. 9. 10. 11. 12. 13. 14. 15. 16. 17. 18. 19. 20. 21. 22. 23. 24. 25.
POWER CONNECTION 1. Plug the AC power cord into an appropriate wall outlet to power on the unit. OPERATION Setting the Time Zone Upon plugging in the unit, the number 3 will appear on the screen. This number indicated the time zone that the clock is currently set to. The unit will default to 3 every time the unit is powered off and on again.
4. To stop the alarm press the ON / OFF button. Alarm Duration and Snooze Function The alarm will sound for 30 minutes if no key is pressed. It will shut off after 30 minutes and wait until the next day at the same alarm time to sound again. Snooze function 1. Once the alarm sounds, you can press the SNOOZE button on the unit to stop the alarm. 2. The snooze interval is 9 minutes and the alarm will sounds again after this amount of time. 3.
PROJECTION UNIT 1. 2. 3. 4. 5. 6. Press the PROJECTION ON / OFF button on the side of the unit to turn the projection on. The projection will display the time on the wall or ceiling in a darkened room. Optimal display distance is between 3 and 9 feet. To focus the display, adjust the FOCUS ADJUSTMENT wheel on the side of the unit. To flip the image, PRESS the PROJECTION TIME 180° FLIP button and the display will be flipped upside down.
4. When the radio is playing, hold your hand above the sensor for 1 second to show the current radio frequency being played. 5. In radio off mode, select the DISPLAY AUTO OFF / LOW / HIGH switch to AUTO. The LCD display will automatically go off in 15 seconds. Hold your hand over the sensor for 1 second to show the time. Note: You may also press any button on the clock to see the time displayed.
® MAGNASONIC WARRANTY Consumer Electronics Products and Home Appliances ® Thank you for choosing MAGNASONIC Consumer Electronics Products! MAGNASONIC gives the following express warranty to the original consumer purchaser or gift recipient for this MAGNASONIC product, when shipped in its original container and sold or distributed in Canada by MAGNASONIC or by an Authorized MAGNASONIC Dealer: MAGNASONIC warrants that this product is free, under normal use and maintenance, from any defects in material and w
AVERTISSEMENT : AFIN D’EVITER UN INCENDIE OU UN RISQUE DE CHOC, NE PAS EXPOSER CET APPAREIL A LA PLUIE OU L’HUMIDITE. ATTENTION : AFIN DE REDUIRE LE RISQUE D’ELECTROCUTION, VEUILLEZ NE PAS RETIRER L’AVANT OU L’ARRIERE. IL N’EXISTE AUCUNE PIECE DANS CET APPAREIL QUI SOIT COMMODE POUR L’UTILISATEUR. CONSULTEZ UN PERSONNEL QUALIFIE POUR TOUTE REPARATION.
SOMMAIRE Avertissements Ce qui est inclus Consignes de sécurité importantes Illustration du Produit Branchements et Alimentation Réglages Régler le Fuseau Horaire Modifier le Fuseau Horaire Régler l’Heure et le Date Régler l’Heure du Réveil Allumer et éteindre le Réveille-matin/Type d’alarme Durée du réveille-matin / Touche Snooze Modifier le contenu d’affichage Fonction Sleep Fonction de l’Heure d’Été Changer le format d'affichage de la température Réglages de la Radio Réinitialiser Unité de Projection Rég
CONSIGNES DE SECURITÉ IMPORTANTES La conception et fabrication de cet appareil assure votre sécurité personnelle lorsqu’il est utilisé selon les bonnes instructions. Cependant, une utilisation inappropriée peut résulter en une potentielle électrocution ou risque d’incendie. Veuillez lire toutes les consignes de sécurité avant l’installation et l’utilisation de cet appareil. Gardez des consignes pour une référence future.
ILLUSTRATION DU PRODUIT 1. 2. 3. 4. 5. 6. 7. 8. 9. 10. 11. 12. 13. 14. 15. 16. 17. 18. 19. 20. 21. 22. 23. 24. 25.
BRANCHEMENTS ET ALIMENTATION 1. Branchez le fil d’alimentation C.A. dans une prise murale appropriée pour alimenter l’appareil. RÉGLAGES Régler le fuseau horaire Lorsque vous branchez l’appareil, le numéro 3 apparaîtra sur l’écran. Celui-ci correspond au fuseau horaire actuellement programmé dans l’horloge. L’appareil se remettra sur le fuseau horaire numéro 3 à chaque fois qu’il est éteint puis allumé à nouveau.
Allumer et éteindre le réveille-matin/Type d’alarme 1. 2. 3. 4. Appuyez sur la touche ALARM 1 ou ALARM 2 pour sélectionner l’alarme radio ou appuyez deux fois pour sélectionner l’alarme vibreur Appuyez trois fois pour éteindre le mode alarme. Le réveille-matin sonnera à l’heure définie. Utilisez l’interrupteur DISPLAY AUTO / ON / OFF pour choisir d’afficher l’heure automatiquement lorsque le réveil sonne, d’afficher constamment l’heure, ou de ne pas afficher l’heure du tout sur l’écran LCD.
Remarque: La bande AM utilise une antenne directionnelle interne, faîtes tourner la radio pour améliorer la réception. Pour une meilleure réception FM, assurez-vous que l’antenne est entièrement allongée. Réinitialiser La touche de réinitialisation est située sur le dos de l’appareil. Appuyez dessus avec un stylo ou un petit objet lorsque vous remplacez les piles dans l’horloge, ou si l’horloge ne fonctionne pas correctement. Vous perdrez toute donnée sauvegardée telle que les heures de réveil.
3. Lorsque le réveil sonne, placez votre main au dessus du détecteur pendant 1 seconde pour allumer la fonction SNOOZE, le réveil sonnera de nouveau dans 9 minutes. 4. Lorsque la radio est en route, placez votre main au dessus du détecteur pendant 1 seconde pour afficher la fréquence radio actuellement en lecture. 5. Dans le mode radio éteint, sélectionnez l’interrupteur DISPLAY AUTO OFF / LOW / HIGH pour basculer vers AUTO. L’écran LCD s’éteindra automatiquement dans 15 secondes.
SPÉCIFICATIONS Fréquence Pile de Rechange Alimentation AM 530 – 1700 kHz FM 88 – 108 MHz 1 – 3V CR2032 pile plate au lithium (non-incluse) 120 V C.A. ~ 60 Hz, 5 W AVERTISSEMENT • • • • • • • • • Aucune source de flamme ou de chaleur ne devrait être placée sur l’appareil. Ne placez pas le produit sur des étagères fermées ou des casiers sans ventilation appropriée. Ne branchez pas l’adaptateur sur une prise murale qui ne soit pas fonctionnelle et prête à être utilisée.