
User`s manual


36
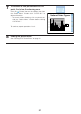
2) Select the desired file then click [Open]. The “Open
File” window closes and the image is positioned at
the center of the drawing area.
3) When the image is clicked after clicking the
[Select Object] icon on the toolbar, a frame is dis-
played. Drag at any position within the frame to
move the object to the desired position.
5
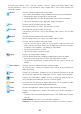
Drawing lines
1) Click the [Figure] icon on the toolbar , then on
the “Figure Menu” window click the [Line] icon.
2) Now drag. A straight line is drawn with the position
at which you started as the starting point.
• To change the thickness of the line, select the
desiredthickness(inpixels)at [Style].
3) To write freehand and draw letters, click the
[Marker] icon on the toolbar and write with the digi-
tal pen.
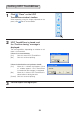
6
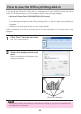
Store the data of the drawing area
1) Click the [Save] icon on the toolbar to display
the “Save As” window.
2) Select “Save as type”, and select the file type.
• The TAD format (“.tad3”) can only be selected
when in the white screen mode. Files in this for-
mat can be opened with the “Open” command
and edited with UPIC Touch&Draw. (TAD is a file
format unique to UPIC Touch&Draw.)
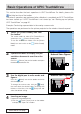
• When“.jpg”,“.bmp”,“.png”or“.tif”isselected,
the image saved is a combination of the image
in the drawing area and the Windows screen.
Files in these formats can be loaded into other
applications as image data.
• The file name is input automatically as follows:
“[product name] + [date] + [serial number].xxx”
(“xxx” being the extension for the selected file
format).
We recommend changing the file names on the
computer after quitting UPIC Touch&Draw to
names that are more easily recognizable.
3) Click “Save”.
0
1000
2000
3000
4000
5000
6000
7000
Office AOffice COffice EOffice G
Amount
Sales
National Sales Figures
0
1000
2000
3000
4000
5000
6000
7000
Office AOffice COffice EOffice G
Amount
Sales
National Sales Figures
Office G