
Owner`s manual


9
GB
POWER SWITCH (3), POWER LED (4)
The subwoofer is switched off in position "Off" and on in position "On". The power LED
is initially red (standby). When the subwoofer receives a signal from the receiver, it
automatically switches from standby to normal, the LED then turns green. When signals
to the subwoofer stop, it will automatically switch to standby after around 15 minutes. The
power switch should be switched to "Off" if the machine is not used for longer periods of
time.
AV INPUT (5)
Connect your receiver's low-level subwoofer output (sub-pre-out) to the subwoofer's AV
input (see Fig. 3). You will require a mono-cinch cable for this (not supplied).
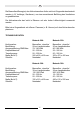
Betasub 25A, Betasub 30A, Betasub 38A:
Another subwoofer can be connected via the LINK OUT jack (11).
HIGH-LEVEL INPUTS (6)
For connection to the high-level (speaker) outputs of the receiver/amplifier, refer to
fig. 2.
LEVEL CONTROL (7)
This control is used to set the bass volume according to your preferences. Proceed as
follows:
1. Set the bass control of your amplifier into its centre (linear) position.
2. Important: Set the level control to its left stop (lowest volume).
3. Now, play back some music and set the volume control of the amplifier to the desired
level.
4. Set the subwoofer level control to the desired bass level.
CROSS-OVER FREQUENCY CONTROL (8)
Used to set the upper limit of the subwoofer operating range. The cross-over frequency
should be set to 100 to 150 Hz when the system is used in combination with shelf
loudspeakers or 50 to 100 Hz when used with stand loudspeakers.