
Owner`s manual


• Do not use any cleaning agents or chemical solvents when cleaning, as these could damage the
surface of the device.
• Repairs must always be conducted by qualified specialists, as you might otherwise be exposed to
dangerous high voltage levels or other hazards.
GENERAL NOTES ON CONNECTING YOUR MAGNAT SATELLITE SPEAKERS
The connectors are located at the rear of the satellite speakers. They are equipped with a clamping
mechanism for cables cross-sections of up to 1 mm². To connect the satellites, please use normally
available 2 x 0.75 mm² – 2 x 1 mm² loudspeaker cables. The cables are to be cut to the required length,
the ends stripped and the end of the wires twisted to make it easier to connect them to the terminals.
Always turn off the amplifier or receiver before connecting or disconnecting loudspeaker cables. For good
sound the cables must be connected so that the speakers are “in phase”. This means that the black
negative terminals on the speakers (-) must be connected to the negative (-) terminals on the amplifier,
the positive (+) speaker terminals to the positive (+) amplifier terminals.
Before switching on the system double-check all your connections and make sure that the terminal screws
are tight and that there are no short circuits caused by stray wire filaments – this could cause serious
damage to your amplifier!
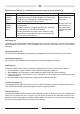
Fig. 1 shows you use of the supplied support.
POSITIONING
In the ideal configuration the speakers and the listening position should form an equilateral triangle. When
the left and right speakers are the same distance from the listening position their sound arrives at the
same time, resulting in a harmonious, natural music reproduction. (Fig. 2)
There should be a clear line of sight between the loudspeakers and the listening position. Any sound-
absorbing or reflecting obstacles in the path will distort the sound.
Placement of the subwoofer is generally not critical. It should, if possible, be located near the front
satellites.
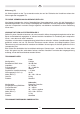
CONNECTION TO AN AUDIO RECEIVER/AMPLIFIER
Connection of the system to an audio receiver/amplifier is shown in figure 3 (receiver/amplifier without a
subwoofer output), figure 4 (receiver/amplifier with low-level subwoofer output).
Note: In the receiver set-up, the front loudspeaker channels should be set to ‘small’ if possible. Some
receivers also provide the option of setting the cross-over frequency between the subwoofer and satellites.
If this is the case, please set this frequency to 150 Hz or the frequency that comes closest to 150 Hz.
Please consult the user manual supplied with your receiver.
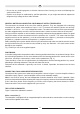
THE ACTIVE SUBWOOFER
Figure 5 shows the subwoofer’s controls:
Mains connection (1)
The subwoofer is equipped with an integrated amplifier and needs to be connected to a mains outlet by
means of the supplied mains cable.
GBGB
9