Owner’s Manual Manuel du Propriétaire Manual del Propietario 32MF301B 19MF301B LCD TV English Necesita ayuda inmediata? Français 1-866-341-3738 MODEL NUMBER SERIAL NUMBER 1-866-341-3738 Español 1-866-341-3738
Return your Product Registration Card or register online at www.magnavox.com/support today to get the very most from your purchase. Registering your model with MAGNAVOX makes you eligible for all of the valuable benefits listed below, so don't miss out. Complete and return your Product Registration Card at once, or register online at www.magnavox.
English IMPORTANT SAFETY INSTRUCTIONS Read before operating p g equipment q p 1. 2. 3. 4. 5. 6. 7. 8. 9. 10. 11. 12. 13. 14. 15. 16. Tilt/Stability - All televisions must comply with recommended international global safety standards for tilt and stability properties of its cabinet design. • Do not compromise these design standards by applying excessive pull force to the front, or top, of the cabinet which could ultimately overturn the product.
FCC WARNING This apparatus may generate or use radio frequency energy. Changes or modifications to this apparatus may cause harmful interference unless the modifications are expressly approved in the manual. The user could lose the authority to operate this apparatus if an unauthorized change or modification is made. RADIO-TV INTERFERENCE This apparatus has been tested and found to comply with the limits for a Class B digital device, pursuant to Part 15 of the FCC Rules.
English 5 Child Safety SYL Eme_Child Safety_1EMN24522_v1 1 2008/12/17 18:05:53
INTRODUCTION Features • DTV /TV / CATV • Information Display (ATSC only) • Autoprogram • Child Lock • Closed Caption Decoder • MTS / SAP Tuner • Auto Standby • Sleep Timer 12 12 12 12 13 13 14 14 14 • Choices for On-screen Language • • Stereo Sound Function PLL Frequency Synthesized Tuning • Various Adjustment for Picture and Sound 16 16 17 18 23 24 • fun-Link via HDMI Link (HDMI Cable not Included) Contents Important Safety Instructions Trademark Information Child Safety INTR
English Owner’s Manual Quick Start Guide Attaching the Base Registration card If you have any questions, please visit our website at www.magnavox.com/support Quick Start EN Installation FR Installation ES Instalación Good 3 screws 32MF301B M4 x 14 19MF301B M4 x 12 2 FRONT AAA A AA Note When using a universal remote control to operate this unit.
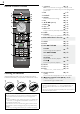
Remote Control Function 1 2 3 10 11 12 13 4 5 6 14 7 ➠ p.11 2 SAP 3 SOURCE 4 FREEZE ➠ ➠ ➠ p.13 p.12 p.12 5 6 7 8 9 ➠ ➠ ➠ ➠ ➠ p.11 p.11 p.14 p.13 p.12 1 15 (power) Press to turn the unit on and go into standby mode. To completely turn off the unit, you must unplug the AC power cord. Press to freeze screen image. OK ▲/▼/◄/►(cursor) BACK VOL +/− PREV CH Press to return to previously viewed channel. ➠ p.12 ➠ p.13 Press to select aspect ratio available for the TV screen.
English 1 VOLUME + / − p.13 2 CHANNEL + / − ➠ p.12 ➠ ➠ ➠ p.15 p.12 p.11 Press to select channels or move up (+) / down (−) through the main menu items. 7 6 3 MENU 4 SOURCE 5 POWER Press to turn the unit on and go into standby mode. To completely turn off the unit, you must unplug the AC power cord. + VOLUME - + CHANNEL - MENU SOURCE Receives infrared rays transmitted from the remote control.
Connection to Cable Receiver or Satellite Box PREPARATION No supplied cables are used with these connections: • Please purchase the necessary cables at your local store. Before you connect: Be sure your antenna or other device is connected properly before plugging in the AC power cord. Use an HDMI or Component Video cables to connect the HDMI or the Component Video Input jacks of the unit to the HDMI or the Component Video output jacks of the cable receiver / satellite box.
English 4 Use ◄/► to select the desired location setting, then press OK. Initial Setup Initial Setup Select “Retail” or “Home” for your location. Retail Make sure the unit is connected to antenna or cable. Use ▲/▼ to select the on-screen language from the choices (English / Español / Français) on the right side of the TV screen, then press OK. Use ▲/▼ to select [Antenna] for TV channels or [Cable] for CATV channels, then press OK. Initial Setup Antenna Select your signal source.
WATCHING TV Sleep p Timer can set the unit to go into standby mode after an incremental period of time. Press SLEEP repeatedly to change the amount of time (increases the time by 30 minutes up to 120 minutes). Press SLEEP once to call up the display for checking the remaining time. • To cancel sleep timer, press SLEEP repeatedly until [Sleep Off] is displayed. Sleep 120min.
English INTRODUCTION TV Screen Display Mode 5 types of display modes can be selected when the broadcasting station is sending 16:9 or 4:3 video signal. And 3 types of display modes can be selected for PC input signal. Press FORMAT repeatedly to switch the TV aspect ratio. For 16:9 video signal 4:3 Zoom For 4:3 video signal 16:9 Wide Normal Full Unscaled CONNECTING DEVICES For PC input signal Sidebars appear on both edges of the screen.
TV Screen Information ECO You can display the currently selected channel or other information such as the audio mode on the TV screen. In the digital mode, the detailed broadcasting information for the current off the air channel such as program title and program guides are displayed. You can turn on ECO Mode to conserve power. 1 Press ECO once to turn on ECO Mode and reduce power consumption. Press ECO again to turn off ECO Mode. ECO Press INFO. On Off ATSC 1 2 3 4 KABC 11.
English INTRODUCTION USING FUNCTIONS This section describes the overview of the main menu displayed when you press MENU. The main menu consists of the function setting items below. Press MENU to display the main menu. 2 Use ▲/▼ to select a desired menu and an item, then press OK K to determine the setting. Adjusting the picture mode, or customize the picture quality as your preference. Sound Setup Features Sound USB Adjusting the sound mode, equalizer and some other sound functions.
Picture Sound Before you begin: Before you begin: You must set [Home] in [Location]. ➠ p.23 Otherwise, the settings you adjusted will not be memorized after the unit goes into standby mode. You must set [Home] in [Location]. ➠ p.23 Otherwise, the settings you adjusted will not be memorized after the unit goes into standby mode. 1 2 Use ▲/▼ to select the item you want to adjust, then press OK. 1 Use ▲/▼ to select the item you want to adjust, then press OK.
English Autoprogram Select the audio output from the unit’s speakers, or not. If your amplifier is HDMI link function compatible and connected by an HDMI cable to this unit, some sound operations such as volume up can be changed by using this unit’s remote control. Make sure [fun-Link Control] is set to [On]. ➠ p.22 If you switch wires (e.g.
Channel List Antenna Confirmation The channels selected here can be skipped when selecting the channels using CH + / −. Those channels can still be selected with the Number buttons. This function lets you check the digital signal strength of each channel. 1 2 1 2 Use ▲/▼ to select [Channel List], then press OK. Use ▲/▼ to select the channel you want to remove, then press OK. Picture DTV 11.1 Sound DTV 11.2 DTV 11.3 Setup Features Language ATSC Use ▲/▼ to select [Antenna], then press OK.
English Note You can view closed captioning (CC) for TV programs, movies and news. Closed caption refers to text of dialog or descriptions displayed on-screen. Picture Caption Service On Sound Digital Caption Service On Setup Caption Style Features C. Caption Style ATSC You can change the caption style such as font, color or size, A etc. B C 1 Use ▲/▼ to select [Caption Style], then press OK. USB Use ▲/▼ to select [On], then press OK. Use ▲/▼ to select an item, then press OK.
Note • Closed caption will not be displayed when you are using an HDMI connection. • To show the closed caption on your TV screen, broadcast signal must contain the closed caption data. • Not all TV programs and commercials have the closed caption or all types of the closed caption. • Captions and texts may not exactly match the TV voice. • Changing channels may delay the closed caption for a few seconds. • Adjusting or muting the volume may delay the closed caption for a few seconds.
English Use ▲/▼ to select the desired rating, then press OK repeatedly to switch between [View] and [Block].
Clock, Phase ECO Use ◄/► to adjust [Clock] setting to stabilize the PC screen and [Phase] setting to improve the clarity of the PC screen. You can turn on ECO Mode to conserve power. 1 2 Cursor ◄ Use ▲/▼ to select [ECO], then press OK. Clock Use ▲/▼ to select the desired mode, then press OK. On Off to decrease setting value Phase Reduces power consumption Sets the backlight brighter. Cursor ► to increase setting value Note Note • You must set [Home] in [Location]. ➠ p.
English This unit will turn on when the power on signal is sent from your connected fun-Link device. Use ▲/▼ to select the desired setting, then press OK. Off Device Control You can operate some functions such as disc playback or call up the menu of the connected devices, by using this unit’s remote control. On Off Use ▲/▼ to select [E-Sticker], then press OK. Use ▲/▼ to select [Off], then press OK. Off Top Bottom Note • If you select [Home], E-Sticker will not be displayed.
Item USB This unit can play picture (JPEG) and video (Motion JPEG) files files. Use the USB storage device that contains those files. 1 2 Detail Press 1 to display file details below. ➀ [Name], [Album], [Date], [Size] and [Next]. More Detail Press 1 again to remove file details. ➃ Start show Insert the USB storage device into the USB terminal on this unit. The main menu appears automatically.
English No supplied cables are used with these connections: • Please purchase the necessary cables at your local store. Before you connect: Be sure other device is connected properly before plugging in the AC power cord. External Device Connection HDMI Connection HDMI connection offers the highest picture quality. HDMI (High-Definition Multimedia Interface) transports high definition digital video and multi-channel digital audio through a single cable.
Composite Video Connection Note • Use an HDMI cable with the HDMI logo (a certified HDMI cable). High Speed HDMI cable is recommended for the better compatibility. For HDMI connection (use HDMI Input jack) • The unit accepts 480i, 480p, 720p, 1080i and 1080p 24/30/60Hz of video signals, and 32kHz, 44.1kHz and 48kHz of audio signals. • This unit accepts 5.1 channel audio signal (Dolby Digital) and 2 channel audio signal (LPCM). • This unit accepts only signals in compliance with EIA861.
English This unit is equipped with a PC input jack. If you connect this unit to your PC, you can use this unit as a PC monitor. Use a VGA cable for this Video connection and it requires a stereo mini plug conversion cable for Analog Audio signal as well. USB Storage Device This unit offers easy playback of picture (JPEG) and video (Motion JPEG) files. Insert the USB storage device into the USB terminal shown below. [USB] ➠ p.
USEFUL TIPS FAQ Question Answer • • • • My remote control does not work. • What should I do? • • • • How come the Initial setup appears every time I turn on this unit? Why can I not watch some RF signal TV programs. Check the antenna or cable connection to the main unit. Check the batteries of the remote control. Check if there is an obstacle between the infrared sensor window and the remote control. Test the signal output use [IR Signal Check]. ➠ p.30 If okay, then possible infrared sensor trouble.
English Remedy • • • • • • • • • • • • Adjusted [Picture] or [Sound] settings are not effective every time • the unit is turned on. • You see a distorted picture or hear an unusual sound. • • • • Electrical interference from nearby appliances may affect picture quality. Adjust [Contrast] and [Brightness] in the main menu. View other TV channels. The problem might be limited to the broadcasting station or weak signal strength. For the best picture quality, watch "High Definition" wide screen programs.
INFORMATION Glossary Maintenance ATSC Acronym that stands for Advanced Television Systems Committee and the name of the digital broadcasting standards. Aspect Ratio The width of a TV screen relative to its height. Conventional TVs are 4:3 (in other words, the TV screen is almost square); widescreen models are 16:9 (the TV screen is almost twice as wide as its height).
English Terminals Antenna Input VHF / UHF / CATV 75 Ω unbalanced (F-type) Audio Input RCA jack (L/R) x 2 500mV rms Component / Composite Video Input jacks for VIDEO RCA jack x 3 Y/VIDEO 1V p-p (75 Ω) Pb/Cb 700 mV p-p (75Ω) Pr/Cr 700 mV p-p (75Ω) <32MF301B> HDMI Input HDMI 19 pin x 2 <19MF301B> HDMI Input HDMI 19 pin x 1 USB Input USB x 1 PC Input D-Sub 15 pin x 1(RGB) Digital Audio Output (coaxial) 500 mV p-p (75 Ω) RCA jack x 1 <19MF301B only> Headphone Audio Output 1/8 inches x 1(3.
English WARRANTY COVERAGE: This warranty obligation is limited to the terms as set forth below. to any hardware product or any software, even if packaged or sold with the product, as manufacturers, suppliers, or publishers may provide a separate warranty for their own products packaged with the bundled product.