
User's Manual


–
15
–
EN
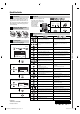
DVD FUNCTIONS
ENTERENTERENTER
TV ASPECT: (Default: 4:3 LETTER BOX)
See note on the left.
TV ASPECT
STILL MODE
PROGRESSIVE
4:3 LETTER BOX
4:3 PAN & SCAN
16:9 WIDE
DISPLAY_TV ASPECT
4:3 LETTER BOX
4:3 PAN & SCAN
16:9 WIDE
ENTER
ENTER
ENTER
ENTER
ENTER
ENTER
STILL MODE: (Default: AUTO)
See note on the left.
TV ASPECT
STILL MODE
PROGRESSIVE
AUTO
FIELD
FRAME
DISPLAY_STILL MODE
AUTO
FIELD
FRAME
ENTER
ENTER
ENTER
Select the
desired
setting.
ENTER
ENTER
ENTER
ENTER
DRC (Dynamic Range Control): (Default: ON)
Set to “ON” to compress the range between soft and loud sounds.
DOLBY DIGITAL: (Default: BITSTREAM)
Set to “BITSTREAM” when the unit is connected to a Dolby Digital decoder.
• BITSTREAM: outputs a Dolby Digital signals.
• PCM: convert the Dolby Digital into PCM (2 channel).
DRC
DOWN SAMPLING
DOLBY DIGITAL
ON
OFF
AUDIO_DRC
ON
OFF
DOWN SAMPLING: (Default: ON)
Set to “ON” when outputting in 48kHz.
Set to “OFF” when outputting the original sound.
DRC
DOWN SAMPLING
DOLBY DIGITAL
BITSTREAM
PCM
AUDIO_DOLBY DIGITAL
BITSTREAM
PCM
DRC
DOWN SAMPLING
DOLBY DIGITAL
ON
OFF
AUDIO_DOWN SAMPLING
ON
OFF
ENTER
ENTER
ENTER
ENTER
ENTER
ENTER
ENTER
ENTER
ENTER
Select the
desired
setting.
ENTER
Select the
desired
setting.
ENTER
Select the
desired
setting.
ENTER
Select the
desired
setting.
ENTER
ENTER
ENTER
ENTER
ENTER
ENTER
ENTER
ENTER
ENTER
ENTER
ENTER
ENTER
ENTER
TV ASPECT
STILL MODE
PROGRESSIVE
OFF
ON
DISPLAY_PROGRESSIVE
OFF
ON
5 To exit
“TV ASPECT” or
“STILL MODE”
menu
To complete
“PROGRESSIVE”
setting
3 Select the desired item.
DISPLAY_TV ASPECT
TV ASPECT
STILL MODE
PROGRESSIVE
4:3 LETTER BOX
4:3 PAN & SCAN
16:9 WIDE
3 Select the desired item.
AUDIO_DRC
DRC
DOWN SAMPLING
DOLBY DIGITAL
ON
OFF
You can change the display functions. Follow steps 1 to 2 on page 14.
DISPLAY menu
Choose the appropriate audio settings for your device. It only affects during the playback of DVD. Follow steps 1 to 2 on page 14.
AUDIO menu
SETUP
Note:
DRC:
• This function is
available only on
the discs which are
recorded in the Dolby
Digital format.
DOWN SAMPLING:
• When playing back
disc with copyright
protection, the sound
will be down sampled
at 48kHz, even if you
set to “OFF”.
hhdlf ll
DISPLAY Setting
B
AUDIO Setting
C
5 To exit the menu
SETUP
ENTER
ENTER
Note:
TV ASPECT:
•
Select “4:3 LETTER BOX”, so that
black bars may appear on the top
and bottom of the screen.
•
Select “4:3 PAN & SCAN” for a full
height picture with both sides
adjusted.
•
Select “16:9 WIDE” if a wide-screen
TV is connected to this unit.
STILL MODE:
•
Select “AUTO” usually.
•
If you select “AUTO”, it automatically
selects the best resolution setting
(“FRAME” or “FIELD”) based on the data
characteristics of the pictures. (default)
•
If you select “FIELD”, the picture in
the still mode will be stabilized.
•
If you select “FRAME”, the picture in
the still mode will be highly defined.
•
An individual picture on TV screen
is called a “frame”, which consists of
two separate images called as “field”.
•
Some pictures may be blurred if
you select “AUTO” in the still mode
due to their date characteristics.
PROGRESSIVE: (Default: OFF)
See note on the right.
Before proceeding…
1. Make sure your TV has progressive scan.
2. Connect with component video cable
NOTE: If there is no picture or picture is
distorted after selecting ‘YES’,
wait about 15 seconds for auto recovery.
Activate Progressive?
SELECT: K / L SET:ENTER
NO
YES
NO
YES
NO
YES
Confirm again to use progressive scan.
If Picture is good, select ‘YES’.
SELECT: K / L
SET:ENTER
If there is no picture or
you do not press any
buttons for 15 seconds,
“PROGRESSIVE” will
switch to “OFF” and it
will exit the “SETUP”
menu.
Note:
PROGRESSIVE:
•
You can set
“PROGRESSIVE” to
“OFF” in “DISPLAY”
menu or press and
hold [PLAY B] on the
front of the unit for
more than 5 seconds
during playback, so
that the P- SCAN
indicator on the front
panel turns off.
•
When “PROGRESSIVE”
is “ON”, video signals
from the unit’s VIDEO
OUT and S-VIDEO OUT
jacks will be distorted
or not be output at all.
Select “Yes”.
ENTER
Select “Yes”.
ENTER
SETUP
Select
“ON”.
ENTER
ENTER
ENTER
ENTER
E6K0AUD_DP100MW8B B_EN_v1.indd 15E6K0AUD_DP100MW8B B_EN_v1.indd 15 2009/08/24 13:17:072009/08/24 13:17:07