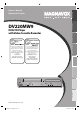
PRECAUTIONS Owner’s Manual Manual del Usuario PREPARATION DV220MW9 BASIC OPERATIONS DVD/CD Player with Video Cassette Recorder ADVANCED PLAYBACK RECORDING Lea primero el Manual del usuario, en donde encontrará consejos que le ayudarán a disfrutar plenamente de su producto Magnavox. Si después de leerlo aún necesita ayuda, consulte nuestro servicio de asistencia en línea en http://www.funai-corp.
PRECAUTIONS PRECAUTIONS The model and serial numbers of this unit may be found on the cabinet. You should record and retain those numbers for future reference. Model No.: Serial No.: WARNING: TO REDUCE THE RISK OF FIRE OR ELECTRIC SHOCK, DO NOT EXPOSE THIS APPARATUS TO RAIN OR MOISTURE.
PRECAUTIONS PRECAUTIONS CAUTION: To prevent electric shock, match wide blade of plug to wide slot, fully insert. ATTENTION: Pour éviter les chocs électriques, introduire la lame la plus large de la fiche dans la borne correspondante de la prise et pousser jusqu’au fond. PREPARATION FCC WARNING This apparatus may generate or use radio frequency energy. Changes or modifications to this apparatus may cause harmful interference unless the modifications are expressly approved in the manual.
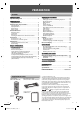
PREPARATION PREPARATION Contents 6 6 6 6 6 6 6 6 7 7 7 7 7 8 8 8 8 8 9 9 PRECAUTIONS PRECAUTION S ADVANCED PLAYBACK PLAYBACK Important Safeguards · · · · · · · · · · · · · · · · · · · · · · · · · · · · 2 Disc Menu · · · · · · · · · · · · · · · · · · · · · · · · · · · · · · · · · · · · · · · · · Calling Up a Menu Screen During Playback · · · · · · · · · Resume Playback · · · · · · · · · · · · · · · · · · · · · · · · · · · · · · · · · · MP3 Playback · · · · · · · · · · · · · · · · · · · · · · · · · · · ·
PREPARATION PRECAUTIONS About Cassette Tapes and Discs Playable Media Media Type DVDVIDEO DVD-RW DVD-R DVD+RW DVD+R CD-DA CD-RW CD-R Cassette Tape PREPARATION Logo Symbols used in this manual Audio CD DVD-Video digital video (MPEG2) digital audio or MP3 VHS BASIC OPERATIONS Recorded Signal MP3 MP3 analog video Unplayable Disc • • • • • DVD-RAM DVD-audio CD-i photo CD video CD • • • • • ADVANCED PLAYBACK Caution: Never play the following discs.
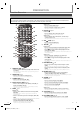
PREPARATION Function Overview Remote Control Button names described in the Owner’s Manual The instructions in this manual rest primarily on the premise that you will operate on the remote control (Please be informed that some operations can only be made on the front panel of the unit). 1 2 3 VCR mode: • Press to exit the VCR menu. STANDBY-ON SPEED TIMER SET Pulse para salir del menú de VCR. OPEN/CLOSE 18 • Press to reset the cassette tape counter. Pulse para restaurar el contador del casete.
PREPARATION Pulse para visualizar el menú de DVD. VCR mode: • Press to call up the VCR menu. Pulse para visualizar el menú de VCR. Pulse para amplificar parte de una imagen. (2x, 3x, 4x ó 1/2x) (DVD) 16. SUBTITLE (DVD) ¬p.19 • Press to select subtitles on a disc. (DVD) Pulse para seleccionar subtítulos en un disco. (DVD) Pulse para seleccionar ángulos de la cámara en un disco. (DVD) 18. OPEN/CLOSE A ¬p.14 DVD mode: • Press to open or close the disc tray. Pulse para abrir o cerrar la bandeja del disco.
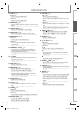
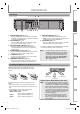
PREPARATION Front Panel 1 2 3 4 5 6 STANDBY-ON 7 8 9 10 11 OPEN/CLOSE POWER ON REC VIDEO DVD DISC IN PLAY IR REW 12 VCR TIMER REC AUDIO F.FWD STOP/EJECT PLAY RECORD 13 14 1516 17 18 19 TRACKING 20 SOURCE PREV STOP 21 22 23 PLAY NEXT 24 25 L2 input jacks 1. STANDBY-ONy ¬p.14 • Press to turn on / off the unit. 2. POWER ON indicator • Lights up when the unit is turned on. 3. cassette compartment (VCR) ¬p.14 • Insert a cassette tape here. 4.
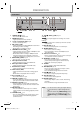
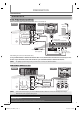
PREPARATION PRECAUTIONS Rear Panel 1 DIGITAL AUDIO OUT DVD AUDIO OUT DVD/VCR S-VIDEO OUT AUDIO OUT Y L CB R AUDIO IN L COAXIAL VCR PREPARATION COMPONENT VIDEO OUT 2 VIDEO OUT R L1 VIDEO IN CR 3 4 5 6 7 8 BASIC OPERATIONS 7. DVD/VCR VIDEO OUT jack ¬p.10 • Connect an RCA video cable from here to the VIDEO input jack of your television or audio device. Standard connection for DVD/VCR use. 8. VCR VIDEO IN jack ¬p.
To audio L To audio R To video input jack input jack input jack (White) PREPARATION (White) (Red) (Yellow) (Red) Connections (Yellow) Connection to a TV If Your TV Has Antenna in Jack Only Before connecting, make sure the powers of the devices are turned off.
PREPARATION PRECAUTIONS After connecting to your TV: You will need to switch to video input on your TV. This is usually marked TV/VIDEO, INPUT or AUX. Please refer to your TV’s owner’s manual for details. Input modes for common TV brands: Listed below are inputs for common brand name TV’s.
PREPARATION Connection to an Audio System Playing Analog Audio this unit analog audio input jacks stereo system DIGITAL AUDIO OUT DVD AUDIO OUT DVD/VCR S-VIDEO OUT COMPONENT VIDEO OUT Y L AUDIO IN L CB AUDIO IN L R COAXIAL (White) R VIDEO OUT R VIDEO IN To audio L output jack CR TAL O OUT To audio R input jack To audio L input jack VCR AUDIO OUT DVD AUDIO OUT DVD/VCR S-VIDEO OUT AUDIO OUT Y L CB R (White) (Red) or (Red) (White) COAXIAL VIDEO OUT R (Red) VCR AUDIO IN
PREPARATION PRECAUTIONS Initial Setups Turning on Unit for the First Time Clock Setting VCR Press VCR first. Press first. 1 SETUP 1 2 Be sure your TV’s input is set to VIDEO. (Name may vary with TV manufacturer. See your TV manual for details.) Press and use / to select “CLOCK SET”. to go to next step.
BASIC OPERATIONS OPERATIONS BASIC BASIC PLAYBACK For VCR Playback Before: Turn on the TV. For Disc Playback 1 (¬page 16 for MP3 playback) 1 Insert a cassette tape so that the unit will be turned on automatically. STANDBY-ON Press to turn on the unit. OPEN/CLOSE . Then press Inserte un casete para que la unidad se encienda automáticamente. STANDBY-ON Para encender la unidad, pulse . OPEN/CLOSE Luego pulse .
BASIC OPERATIONS The contents of DVD are generally divided into “titles”. Titles may be further subdivided into “chapters”. The audio CD contains “track” and CD-RW/-R with MP3 contains “file”, which may be in a “folder”. t. PRECAUTIONS Note: • For DVD, set “STILL MODE” to “FIELD” in Hint for Disc Playback “DISPLAY” menu if pictures in the pause mode are blurred. (¬ page 23.) • For VCR, to prevent damage to the cassette tape, still mode will automatically stop after 5 minutes.
ADVANCED PLAYBACK ADVANCED PLAYBACK Disc Menu DVD-Video Press Zoom DVD DVD-Video Press first. Some discs contain menus which allow you to customize DVD playback. Use [K / L / s / B] to select an item, then press [OK] (or [PLAY B]). Calling Up a Menu Screen During Playback DVD-Video Press DVD • Press [DISC MENU] to call up the disc menu. • Press [TITLE] to call up the title menu. Note: • Menu operations may vary depending on the disc. Refer to the manual accompanying the disc for details.
ADVANCED PLAYBACK Note: Repeat Playback Repeat function is available only during playback. DVD-Video Audio CD OFF DVD-Video Press [SEARCH] once. Use [K] or [L] to select a desired index number. Press [s] to fast rewinding or [B] to fast forwarding. When the cassette tape has reached an index mark, playback will start automatically.
ADVANCED PLAYBACK Note: • Up to 20 chapters, tracks or files can be ordered. Programmed Playback You can change the playback order of chapters / tracks / files. DVD-Video Audio CD MP3 MP3 Press DVD first. 1) During playback, press [MODE] twice when operating audio CD or MP3. During playback, press [MODE] three times when operating DVD. 2) Use [s] or [ B] to select “PROGRAM”. Then press [OK]. For DVD and MP3: 3) Use [K / L / s / B] to select desired title (DVD) or folder (MP3) input field. e.g.
ADVANCED PLAYBACK On-Screen Display You can refer to the various information on the screen when you press [DISPLAY]. Press DVD first. DVD-Video 1st if the sound mode is set to something other than “STEREO”. Refer to “Stereo Sound Mode”. • When you connect the unit to a Dolby Digital decoder with DIGITAL AUDIO OUT JACK, please select “PCM” in “AUDIO” menu (Refer to p.12 for details).
RECORDING RECORDING Before: Turn on the TV. This unit has no tuner system so it cannot receive TV broadcasts without external tuner or such devices. Note: • You can also set the external tuner for timer recording. Refer to “Satellite Link” on page 22. • You CANNOT dub a DVD to a video cassette tape. • Do not change the external tuner’s channel while you are recording. You CANNOT watch one channel and record another at the same time.
RECORDING VHS Press 1 VCR first. SETUP -MENU- TIMER PROGRAMMING B TIMER PROGRAMMING SATELLITE LINK AUTO REPEAT [OFF] CLOCK SET LANGUAGE SELECT PROG 12345678 DATE START TIME END TIME L1/L2 REC SPEED To Cancel a Timer Recording in Progress –– –– Note for Timer Recording & OTR Use / to select “ONCE“, “DAILY“ (Mon-Fri), or “WEEKLY“. Then, press to go to next step. PROGRAM NUMBER 1 B ONCE DAILY WEEKLY Use / to select the desired month. Then, press to go to the next step.
RECORDING Note: • Recording picture will be distorted if the copy Satellite Link protection signal is being detected during satellite link. • When the timer recording and the satellite link are overlapped, those recordings are recorded as illustrated below. You can set the unit to start recording whenever it detects a video signal from the external tuner.
OPTIONAL SETTINGS OPTIONAL SETTINGS PRECAUTIONS Changing the DVD Settings (in the setup menu) Setup menu (highlight is the default) AUDIO Contents Notes Set the language for audio. • Language options are not available with some discs. • Only the languages supported by the disc can be selected. • “LANGUAGE” setting for “AUDIO” and “SUBTITLE” are not available with some discs. Then use [AUDIO ] and [SUBTITLE]. Refer to page 19.
OPTIONAL SETTINGS DVD Press first. Press [STOP C] if you are playing back a disc. PARENTAL Setting Parental setting will prevent your children from viewing inappropriate materials (password protected). Playback will stop if the ratings exceed the levels you set. To Set the Parental Level 1 2 3 SETUP Press to call up the setup menu. Use / to select . OK Press , and then use / to select “YES”.
OPTIONAL SETTINGS PRECAUTIONS INITIALIZE Reset the settings to factory default. SETUP Press to call up the setup menu. OK Use / to select , then press . PREPARATION 1 2 3 OK Press to select “YES”, then press . INITIALIZE_INITIALIZE INITIALIZE BASIC OPERATIONS 4 YES Press 1 , 2 or 3 to select the desired language. SELECT MENU LANGUAGE ENGLISH FRANÇAIS ESPAÑOL ADVANCED PLAYBACK 1 2 3 The next time you operate, the player menu language will be the one you have selected.
TROUBLESHOOTING TROUBLESHOOTING Troubleshooting Guide If this unit does not perform properly when operated as instructed in this manual. Refer to the following: Symptom DVD • VCR No power. This unit does not respond to the remote control. Poor picture or noise. • • • • • • Remedy Make sure the power plug is connected to an AC outlet. Make sure the power is turned on. Check if the power plug is connected to an AC outlet. You have to be within 23 feet (7m) of this unit.
INFORMATION INFORMATION PRECAUTIONS Maintenance • Please refer to relevant topics on the “Troubleshooting Guide” on page 26 before returning the product. • If this unit becomes inoperative, do not try to correct the problem by yourself. There are no user-serviceable parts inside. Turn off, unplug the power plug, and please call our toll free customer support line found on the cover of this manual to locate an authorized service center.
LIMITED WARRANTY FUNAI CORP. will repair this product, free of charge in the USA in the event of defect in materials or workmanship as follows: DURATION: PARTS: LABOR: FUNAI CORP. will provide parts to replace defective parts without charge for one (1) year from the date of original retail purchase. Certain parts are excluded from this warranty. FUNAI CORP. will provide the labor without charge for a period of ninety (90) days from the date of original retail purchase.