Pronto Universal Intelligent Remote Control User Guide
Introduction.........................................................................................................1 Intelligent Remote Control....................................................................................... 1 Charging the Remote Control .................................................................................. 3 Getting Started ...................................................................................................6 Activating the Remote Control .................
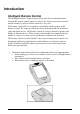
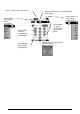
Introduction Intelligent Remote Control The Intelligent Remote Control can be used for most devices that understand infrared (IR) remote control signals. Its easy-to-use touch screen and its intuitive interface makes it a perfect remote control for every user. The Remote Control (RC) is completely customizable. In the memory of the Remote Control, RC codes are stored to activate different brands for all kinds of video and audio devices.
Home .
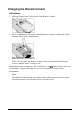
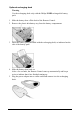
Charging the Remote Control AA batteries 1 Slide the battery door off the back of the Remote Control. 2 Insert 4 AA batteries (included with the Remote Control) as indicated on the bottom of the battery compartment. 3 Slide the battery door back on. After a few seconds, the Remote Control starts up automatically and beeps twice to indicate that it is ready to use. When batteries are running low, the Low Battery icon flashes at the center top of the display.
Optional recharging dock Warning Use the recharging dock only with the Philips NiMH rechargeable battery pack. 1 Slide the battery door off the back of the Remote Control. 2 Remove the plastic AA battery tray from the battery compartment. 3 Insert the battery pack (included with the recharging dock) as indicated on the side of the battery pack. 4 Slide the battery door back on. After a few seconds, the Remote Control starts up automatically and beeps twice to indicate that it has finished starting up.
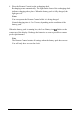
6 Place the Remote Control on the recharging dock. Recharging starts automatically. The light on the front of the recharging dock indicates charging takes place. When the battery pack is fully charged, the light goes off. Notes You can operate the Remote Control while it is being charged. Normal charging time is 2 to 3 hours, depending on the condition of the battery pack. When the battery pack is running low, the Low Battery icon flashes at the center top of the display.
Getting Started Activating the Remote Control Turning on the display · Tap the screen gently with your finger or a blunt, soft object like a pencil eraser. The display is activated and you see the Home panel. Notes If the display stays blank or becomes black, adjust the contrast dial on the left side. If another panel is displayed, tap the Home button The Remote Control shuts down automatically. . Using the backlight · Press the backlight button on the left side.
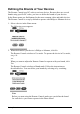
Defining the Brands of Your Devices The Remote Control uses RC codes to activate devices. Because there are several brands using specific RC codes, you have to define the brands of your devices. In the Home menu you find buttons for the most common video and audio devices. The Remote Control is set up by default to operate with Philips or Marantz devices. 1. Select a device in the Home menu. The following screen appears. 2. When the brand of your device is Philips or Marantz, click No.
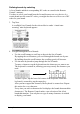
Defining brands by selecting A list of brands and their corresponding RC codes are stored in the Remote ControlÕs memory. You have to select your brand from the list and because not every device of a certain brand uses the same RC codes, you might also have to select a set of RC codes for your brand. 3. Tap Next. A scrollable list of brands for the selected device and a Òvirtual autozoomingÓ mini-keyboard appears. 4. Navigate through the list of brands.
Note When your brand is not displayed in the list of brands, you can use Search mode. See ÒDefining brands by searchingÓ on p. 11. 5. Select your brand in the list. The selected brand becomes black. The Search button switches into Next. 6. Tap Next. When your brand uses only one set of RC codes, the Remote Control switches to Try mode. Continue with step 9. When there are several code sets for your brand, the following screen appears. Notes The code sets are ranked.
7. Select a code set from the list. The selected code set becomes black. The Search button switches to Next. 8. Tap Next. The Remote Control switches to Try mode. The first control panel of the selected device is displayed. 9. Try out the buttons on the different control panels and check if the device is responding to the RC codes the Remote Control is sending. Note Even when your device is responding to the current code set, it is advised to try out other code sets.
Defining brands by searching You can use Search mode to find the matching RC codes for your device when: · your brand is not displayed in the list of brands, · you selected your brand, but you do not know which code set to select. 3. Tap Next. The display shows a scrollable list of brands for the selected device and a Òvirtual auto-zoomingÓ mini-keyboard. 4. Tap Search. The Remote Control automatically searches through all available brands and code sets to find the matching RC codes for your device. 5.
Notes Even when the device is responding to the current code set, it is advised to try out other code sets. When your device responds to more then one code set, install the most suitable one. The name of the responding code set is displayed when you tap the OK button, so you know which code set to select from the list after you have tried out other code sets. 8. When you are not satisfied with the way the device is responding, tap Back to to continue the automatic search.
Selecting a Device Via the Home menu In the Home menu you find buttons to select your devices. Note You can customize the Home menu by adding (see p. 26) or deleting devices (see p. 28). Macro tab icon Device tab icon · Tap the device you want to operate. The first control panel of the selected device appears. Via the Device menu The Device menu allows you to easily switch to another device without having to return to the Home menu. 1 From within any device control panel, tap the device tab.
Operating a Device You operate devices using three kinds of buttons: · Touch screen buttons · Left and Right button (below the touch screen) · Direct-access buttons (to the right of the touch screen) Using touch screen buttons Sending commands By tapping the touch screen buttons you send commands to the device you have selected. When you send a command, the Remote Control icon shows transmitting signals tab. .
Switching to another device without affecting the active device If you switch to another device and you have defined a device action for that device (see p. 22), RC codes are sent out the moment you select the device. However, if you want to switch to another device without sending those RC codes, you have to follow this procedure. Example You have defined a device action for the VCR: when you select the VCR, the TV switches to channel number 10.
Adjusting the Settings Most of the Remote ControlÕs features can be set to your own wishes. 1 Touch and hold the Remote Control icon for a few seconds. The first setup panel appears. You can display the second and third setup panel by using the scroll buttons. 2 Tap the button of the setting you want to adjust. The button becomes black. 3 Use the Left and Right button to adjust the setting. First setup panel Setting Battery Function Shows the battery level.
Second setup panel Setting Level Function Turns the backlight always on or off when activating the touch screen. Note: When you choose always off, you can only activate the backlight using the backlight button. Adjusting Always on: Tap the Level button and position the indicator in the left half of the indication bar using the Left button. Always off: Tap the Level button and position the indicator in the right half of the indication bar using the Right button. Mode Menu Hides or shows the Mode button.
Getting the Maximum out of it Introduction The Remote Control is set up by default to operate with Philips or Marantz devices. When you have other brands, you can define the brands for your devices and install the RC codes to activate those devices. What makes the Remote Control so powerful is the ability to extend its functionality in multiple ways like programming additional functions, adding supplementary devices, recording macros and customizing the interface as it suits you best.
Switching to another mode 1 Tap the Mode button at the bottom of the touch screen. The Mode menu pops up. 2 Tap the mode you want to use. The label of the active mode appears on the Remote Control icon You can now work in the selected mode. . Note When a label is displayed, you can also display the Mode menu by tapping the label. Hiding the Mode menu To prevent accidental changes to the Remote Control interface and commands, you can hide the Mode menu: 1 Make sure the Remote Control is in Use mode.
Redefining Brands If you purchase a new device from a brand that you have not yet defined in the Remote Control, you need to redefine the brand to activate your new device. You can redefine brands by selecting or by searching. Redefining brands by selecting 1. Switch to Brand mode via the Mode button The Device menu pops up. . 2. Select the device for which you want to redefine the brand. 3. Complete instructions 3 to 10 in ÒDefining brands by selectingÓ on page 8. 4. Redefine all other device you want.
Learning Commands You can program the Remote Control commands by transmitting infrared signals from your existing remote controls to the Remote ControlÕs learning eye. To do this, place the Remote Control and the deviceÕs remote control on a flat surface, 10 to 20 cm (4 to 8 inches) apart. The following buttons can be programmed: · control panel buttons, · device actions, · direct-access buttons and Left/Right buttons. You cannot program Home menu buttons directly.
Learning control panel buttons 1 Navigate to the control panel buttons you want to program. 2 Switch to Learn mode via the Mode button . Additional empty buttons appear: they can be programmed and labeled as existing buttons. 3 Point the deviceÕs original remote control to the Remote ControlÕs learning eye as shown on page 20. 4 Tap the Remote Control button you want to program. The button starts flashing. 5 Press and hold the corresponding button on your deviceÕs original remote control.
6 Press and hold the button the Remote Control has to learn as device action on your deviceÕs original remote control. The command for the device action is assigned to the Device button in the Home menu and in the Device menu. If the Remote Control has learned the command successfully, OK flashes on the display. You can let go of the button youÕre holding. If the Remote Control has not learned the command successfully, you hear a short buzz and FAIL appears on the Remote Control icon.
Labeling Elements The following elements can be labeled: · · · · control panel buttons, devices, macro groups and timer groups, macros and timers, the Left/Right buttons labels. To label control panel buttons, macros, timers and the Left/Right buttons labels, go to ÒLabeling a buttonÓ (see p. 24). To label devices, macro groups and timer groups, go to ÒLabeling a deviceÓ (seeÊp.Ê25). You cannot label Home menu buttons directly. You have to label them via the Device menu (see p. 25).
4 Edit the label. · To delete a character, press the Right button (labeled Del). · To enter a character, tap the keyboard near the character you want to use. The keyboard is zoomed in, allowing you to tap exactly the character you need. To enter a space, tap the lower left corner of the keyboard. When the keyboard is zoomed in, tap the empty key. After you have tapped the character, the keyboard is zoomed out. Repeat this action for every character.
Adding and Moving Adding a device If you have a device that is not provided in the Device menu, you can add it to the Remote Control. You cannot add devices to the Home menu directly. You have to add them via the Device menu (see p. 22). 1 Make sure the device tab is active. The device tab is active when the name of a device is displayed. 2 Switch to Add mode via the Mode button . The Remote Control displays the following choices: · Create New Device: Choose this option to add a completely new device.
Moving a device, macro group or timer group You can change the order in the Device menu and the Macro menu. Changes you make in the Device menu are automatically updated in the Home menu. 1 Make sure the device tab or macro tab is active. The device or macro tab is active when the name of a device, macro or timer is displayed. 2 Switch to Move mode via the Mode button . The Remote Control displays the menu. 3 Tap the device or group you want to move. The menu item is highlighted.
Deleting a button or button action Note Borderless buttons cannot be deleted. You can only hide them by removing their label (see ÒLabeling a buttonÓ on page 24). 1 Switch to Delete mode via the Mode button . 2 Tap the button you want to delete. 3 Tap Delete Button Action. The result depends on the element you are deleting: · Control panel button: The button disappears from the display. · Left or Right button command: The corresponding label disappears from the display.
4 Tap the device or group you want to delete. 5 Tap Delete Device, Delete Macro Group or Delete Timer Group. The Device (and its associated Home menu button), the Macro Group (including its macros) or the Timer Group (including its settings) is deleted. 6 Delete all the devices, macro groups and timer groups you want and return to Use mode via the Mode button. Restoring When you have deleted elements, they are no longer visible in Use mode but remain in the Remote ControlÕs memory.
Restoring devices, macro groups or timer groups 1 Make sure the device tab or macro tab is active. The device or macro tab is active when the name of a device, macro or timer is displayed. 2 Switch to Add mode via the Mode button . 3 Tap Restore Deleted Device or Restore Deleted Group. The deleted devices, macro groups or timer groups become visible. 4 Tap the item you want to restore. The item is restored and you return to Use mode.
5 Enter the sequence of commands you want to record. You can navigate to whatever control panel you want, just as you do in Use mode. 6 Tap the Macro menu button. The contents of the macro appear. You can now play, edit or close the macro. 7 Press the Left button to close the macro. A confirmation screen appears where you can save or cancel the macro. 8 Tap Save and assign a label to the macro. The macro is ready to be used.
4. Edit the macro. You can move or delete listed commands or you can record new commands. You can also add delays to the macro (for example, to insert a short pause between turning on a device and sending commands to it allowing the device to warm up): 1 Tap Delay. 2 Tap or to decrease or increase the length of the delay. 3 Use the arrow buttons and to move the delay to the right place. 5 Press the Left button to close the macro. A confirmation screen appears where you can save or cancel the macro.
8 Scroll down to display the second timer control panel in which you can set the stop time. 9 Enter the command the timer has to execute. 10 Tap the clock button and set the stop time using the Left/Right buttons. 11 Press the Left button to close the timer. A confirmation screen appears where you can save or cancel the timer. 12 Tap Save. The timer is activated.
ProntoEdit If you want to personalize your Remote Control even more, beyond its standard programming features, ProntoEdit is the tool for you to use. ProntoEdit is the Remote ControlÕs companion software that you can download from http://www.pronto.philips.com. With ProntoEdit you can: · upload and download new configurations to and from your Remote Control.
· import new graphics to create new buttons and designs; · personalize configuration files to optimize the use of your Remote Control. When you become familiar with ProntoEdit, you can achieve results like: System requirements · PC · Windows 95/98/2000/ME or NT 4.
Troubleshooting General Problems The display is blank · Tap the screen to make sure the Remote Control is turned on. · Adjust the contrast dial on the left side. · Make sure the batteries are properly installed. · Install new batteries or recharge the battery pack using the recharging dock. The display is too light or too dark · Adjust the contrast dial on the left side. The Remote Control shuts itself off · This is a feature of the Remote Control to save power.
Programming Problems Buttons are not sending the correct commands · Check whether the button is learned globally or per device (see p. 23). · Check if you have defined the correct brands for your devices. Macros do not work · Make sure the Remote ControlÕs sending eye is pointed towards the device the entire time the macro is being executed. · Insert delays to allow devices to start up properly (see p. 31). · Check if you donÕt have included inactive buttons in your macro.
The configuration file is corrupted · When this very unlikely event occurs, you have to revert to the original configuration. All your customized commands devices and macros will be lost and you will have to reprogram your Remote Control.
FAQ Can I program a button to execute more than one command? No, you canÕt. However, you can create a macro to execute a sequence of commands (see p. 30). How do I program source switching? See ÒLearning device actionsÓ on page 22. How can I program, label or delete buttons on home panels? You can do this via the Device menu. All changes you make to the devices in the Device menu are automatically updated in the Home menu.
How do I calibrate the touch screen? The Remote Control is calibrated when it leaves the factory, so normally you do not have to calibrate it yourself. It is possible that the Remote Control displays a message to calibrate the touch screen. If this message appears, do the following: You will first see the instruction ÒTouch TOP LEFT cornerÓ and then ÒTouch BUTTOM RIGHT cornerÓ. 1 Tap as close as possible the upper left corner using a blunt tip of a pencil.
Overview of Symbols Pause Stop Normal run; normal speed Normal run; normal speed Fast run; fast speed Fast run; fast speed Slow run; slow speed Slow run; slow speed Eject Recording, general Key Navigate Still mode Tape running direction Next track Previous track Fast forward to index Rewind to index Frame by frame, general Frame by frame, general Subtitle Cancel picture Picture-in-picture mode Menu Picture-in-picture shift Picture-in-picture swap Overview of Symbols 41
Multi-picture display Picture-in-picture select Teletext mode Page number up Page number down Page enlargement TV and text mixed 1st or 2nd language Last view; previous program Stand-by Zone focus: long distance Zone focus: very short distance Single or multi-digit selection Brightness; brilliance Contrast Brightness/contrast Color saturation Lamp; lighting; illumination Split screen freeze / double screen freeze Split screen swap / double screen swap Split screen / double screen Movie expand Personal prefe
Programmable timer; general Tracking Application assistance Actual time on screen EPG / Electronic Program Guide Video output Read data from store Write data into store Page hold Sound muting Additional information on screen Viewing angle Spatial sound effect Television; video Sound; audio Surround sound Picture size adjustment Active control Overview of Symbols 43
Specifications The specifications and design of this product are subject to change without notice.
Accessoires Remote Control recharge package DS1000 (not included) NiMH 4,8V rechargeable battery pack Recharging dock 110/220V-to-12V power adapter RS232 cable for PC connection Database information: Designed by UEI Technology Licensed under U.S.
Index redefining, 20 A AA batteries, 3 searching, 11 selecting, 9 AA battery tray, 4 button light setting, 16 activating the Remote Control, 6 adapter, 4 buttons backlight, 1 Add mode, 18, 26, 33 adding borderless, 28 direct-access, 1, 15 delays, 32 home, 6 devices, 26 devices to the Home menu, 26 labeling, 24 Left and Right, 1, 15 adjusting the settings, 16 B backlight activating, 6 setting level, 17 backlight button, 1, 6 batteries AA, 3 battery pack, 4 charging, 3 installing, 3 low, 3, 5 NiMH
labeling, 24 learning, 22 learning globally, 23 learning per device, 23 restoring, 29 restoring, 29 Copy Existing Device, 26 Create New Device, 26 downloading new configurations, 34 customizing. See learning.
LCD light setting, 16 LCD setting, 16 Home, 13 Macro, 30 Learn mode, 18, 21 Mode, 19 learning control panel buttons, 22 mode, 6 Add mode, 18, 26, 33 device actions, 22 direct-access buttons globally, 23 Brand mode, 7, 18, 20 Delete mode, 18, 27 direct-access buttons per device, 23 Edit mode, 18, 30, 32 empty buttons, 21 Home menu buttons, 21 Label mode, 18, 24 Learn mode, 18, 21 Left/Right buttons globally, 23 Move mode, 18, 27 Left/Right buttons per device, 23 Search mode, 11 Setup mode, 16
ProntoEdit, 34 ProntoEmulator, 34 timer groups, 30 reverting, 17 R RC codes, 18, 26 S scrolling, 13, 14 installing, 10, 12 responding, 10, 11 searching, 11 selecting, 10 sending, 11 recharging contacts, 1 time, 5 recharging dock, 4, 5 recharging light, 5 recording in a loop, 14 Search mode, 11 searching brands, 20 code sets, 20 searching brands, 11 code sets, 11 selecting brands, 8, 20 code sets, 8, 20 ending macro with device control panel, 31 macros, 30 devices, 13 sending source switching, 31 RC
T technical information, 17 stopping, 33 touchscreen, 1 time display, 16 timer groups touchscreen beep, 17 deleting, 28 touchscreen buttons, 14 Try mode, 10 labeling, 25 moving, 27 turning on the display, 6 restoring, 30 timers editing, 33 labeling, 24 organizing, 33 setting, 32 U uploading new configurations, 34 Use mode, 18 Z Zoom in and out (virtual keyboard), 8, 25 starting, 32 Documentation concept and elaboration: The Human Interface Group, De Regenboog 11, 2800 Mechelen, http://www.