
HDD & DVD Player / Recorder With Digital Tuner Owner's Manual

i
n
f
o
Manual
Quick Guide
HDD & DVD Player / Recorder with Digital Tuner H2160MW9 A
E2S00UD
1VMN26795 ★★★★★
Select
2.
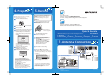
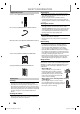
Antenna
Connection
1.
Connect
3.
Prepare
4.
Record
5.
After all the connections are complete,
connect the AC power cord.
1
1
2
4
5
3
Insert two Size AA (R6) batteries.
2
Press [STANDBY-ON ] to turn on the unit.
3
Turn on your TV.
4
Press the button on the TV’s remote control
that accesses the external input channel
repeatedly until you see "Initial Setup"
menu. (Please refer to your TV’s owner's
manual.)
If the TV is connected by an HDMI cable,
it may take a while for the "Initial Setup"
menu to come up.
5
Prepare
4.
“Auto Presetting Now”
If a PBS (public broadcasting station) is
available in your area, clock setting will
automatically be performed and the correct
clock will be displayed following the channel
preset procedure.
Initial setting is then complete.
Press [RETURN] to exit.
If a PBS (public broadcasting station) is not
available in your area, press [OK]. Then
proceed to step 5 in "Manual Clock Setting"
on page 33 in the Owner's Manual.
6
Use [K/L] to select your desired
language, then press [OK].
7
Use [K/L] to select the type of
broadcasting signal, then press [OK].
Press [REC] to start recording.
Writing to Disc
Please finalize the disc when the writing is
completed before playing back on other DVD
players.
90%
Insert a recordable disc (refer to page
27 in the Owner's Manual on how to
insert a disc).
Press [REC MODE] repeatedly to
select a recording mode.
Select the appropriate external input
channel by pressing [SOURCE] or
[CHANNEL / ].
Press [DTV/TV] to select analog TV or
digital TV, then use [CHANNEL / ]
or [the Number buttons] and [ • ] (for
digital TV channels) to select a
desired channel to record.
Press [STOP C] to stop recording.
As for DVD recording, the title list will appear
automatically after writing to a disc completes.
You will need to nalize DVD+R, DVD-RW
or DVD-R to play them back on other DVD
players. Refer to page 62 in the Owner's
Manual for more details.
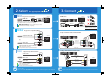
Channel Preset
Make sure the antenna is
connected to “ANTENNA IN” jack.
Antenna
Cable (Analog / Digital)
If you are recording to the HDD, press
[HDD] rst, then proceed to step 2.
If you are recording to a disc, press
[DVD] rst.
• Press [STOP C] to exit the title list.
Align the disc to
the disc tray guide.
Antenna Connection
1.
For more info,
please contact 1-800-605-8610
or visit : http://www.magnavox.com/support
Please read the supplied Owner's
Manual for the detailed instructions.
This connection is for
TV loop through only
Record
5.
e.g.) DVD+R
Printed in China
Initial Setup
Select the language for Setup display
OSD Language
English
Français
Español
Cable (Analog)
rear of this unit
rear of this unit
IN
OUT
ANTENNA
RF coaxial
cable
ANT. IN
VHF / UHF
antenna
RF coaxial
cable
cable TV
company
or
RCA audio
cable
RCA video cable
Your TV
When you use the cable/satellite box,
please connect according to below
IN
OUT
AUDIO IN
(
L1
)
S
ANTENNA
R
L
VIDEO
IN
VIDEO
IN
ANT.OUTANT. IN
cable/satellite box
RF coaxial cable
IN
IN
OUT
VIDEO
IN
AUDIO IN
(
L1
)
S-VIDEO
S-VIDEO
AUDIO OUT
OUT
L
R
VIDEO
OUT
Y
ANTENNA
R
L