Owner’s Manual MBP5320 Blu-ray Disc™ / DVD Player with Built-in WiFi © 2013 Funai Electric Co., Ltd.
CONTENTS INTRODUCTION ............................................. 3 NETWORK FEATURES................................. 34 Safety Instructions.................................................................3 Supplied Accessories............................................................3 Before Using Network Features.....................................34 Information on Network Services..................................34 FEATURES.........................................................
1. INTRODUCTION EN 1.1. Safety Instructions To Avoid the Hazards of Electrical Shock and Fire • Do not handle the AC power cord with wet hands. • Do not pull on the AC power cord when disconnecting it from an AC outlet. Grasp it by the plug. • Do not put your fingers or objects into the unit. Location and Handling • Do not install the unit in direct sunlight, near strong magnetic fields, or in a place subject to dust or strong vibration. • Avoid a place with drastic temperature changes.
2. FEATURES 2.1. Features Blu-ray Disc™ You can enjoy Blu-ray Disc™ which is capable of storing five times more data than a conventional DVD. BD-Java With some Blu-ray discs which contain Java applications, you can enjoy interactive functions such as games or interactive menus. DVD upscaling for enhanced picture quality Your current DVD will look even better than before thanks to video upscaling.
YouTube™ This unit enables you to access YouTube™. On your TV screen, you can enjoy a large number of video clips streamed from YouTube™. Digital Rights Management This product contains technology subject to certain intellectual property rights of Microsoft. Use or distribution of this technology outside of this product is prohibited without the appropriate license(s) from Microsoft. 2.2. Product Info “Product Info” screen provides information about this unit’s software version.
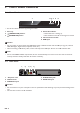
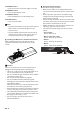
3. FUNCTIONAL OVERVIEW 3.1. Front Panel 1 2* 3 4 5 6 * The unit can also be turned on by pressing this button. 1. Disc tray 4. Power-On indicator 2. (OPEN/CLOSE) button* • Flashes while unit is starting up. 3. (POWER-ON) button • Dims and flickers when IR remote signal is received. 5. Infrared sensor window 6. USB Input C Caution • • Do not connect any device other than USB Memory Stick or USB card reader into the USB Input. (e.g.
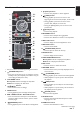
3.3. Remote Control 1 13* 14 2 15 16 (PLAY) button* • Press to start playback or resume playback. 8. (SKIP) button • During playback, press once to return to the beginning of the current Title, Chapter, Track or File. • During playback, press twice to return to the previous Title, Chapter, Track or File. 3 • During the JPEG playback, press to return to the previous File. 9. 4 17 (STOP) button • Press to Stop playback. 10. NUMBER buttons 5 • Press to select a Chapter during playback.
23. ANGLE button • Press to access various camera Angles on the disc. 24. REPEAT button • Press to select Repeat mode. 25. DISPLAY button • Press to Display the on-screen display menu. 26. VUDU button • Press to launch VUDU. D Note • The Power-On indicator on the front panel dims and flickers when it receives the IR signal from the remote control. • Use the supplied remote control. Remote-control operation on any other remote control, such as a universal remote control, is not guaranteed.
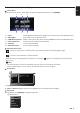
3.4. Guide to On-Screen Display EN Home Menu When you Turn On the unit, Home Menu will appear automatically. Otherwise, press [HOME]. 1 2 3 5 6 Disc 4 1. 2. 3. 4. 5. 6.
4. CONNECTIONS 4.1. Connection to a TV HDMI Connection (Supports up to 1080i(*1), 1080p(*2), 1080p/24(*3) resolution.) Your TV L R LAN VIDEO OUT AUDIO OUT HDMI OUT HDMI cable (not supplied) HDMI IN HDMI OUT No analog audio connection required. (*1) 1080i: Outputs video data with a frame rate of 30 frames per second. (*2) 1080p: Outputs video data with a frame rate of 60 frames per second. (*3) 1080p/24: Outputs video data with a frame rate of 24 frames per second.
4.2. Connection to an Audio System When you change the connections, all devices should be Turned Off. When connecting the unit to an external audio system, refer to the User Manual for Setup / Configuration help.
4.3. HDMI Audio¬Output “Audio¬Output” setting A “BD Audio Mode” setting A Media ª BD-video DVD-video Audio CD DTS-CD AVCHD MP3 DLNA Video DLNA Music Netflix VUDU YouTube™ Audio Source ª “Bitstream” “HD Audio Output” “Mix Audio Output” “LPCM” “HD Audio Output” “Mix Audio Output” Which audio format can be output depends on the compatibility of the connected device.
4.4. Connection to the Network - Software Update: For more information, refer to “Network Update” on page 46. - DLNA home media server: For more information, refer to “Playing Back Video / Music / Photo from DLNA Certified Home Media Servers” on page 24. - BD-Live™: For more information, refer to “Enjoying BD-Live™ Discs Using Internet” on page 28. - Netflix / VUDU / YouTube™ : For more information, refer to “Information on Network Services” on page 34.
Wireless Connection Networking equipment (modem, etc.) LAN WAN Internet Wireless router LAN cable (not supplied) D Note • • • • • If using the wireless connection, refer to page 40 for “Wireless Connection” to configure the network setting. For a wireless router, use a router that supports the following IEEE 802.11 b/g/n specifications. (“n” is preferred type for a faster stable operation of the wireless network.) Our player supports infrastructure mode when using a wireless router.
5. BEFORE YOU START EN 5.1. Finding a Viewing Video Source Input on Your TV After you have completed all of the connections to your TV, review the steps below. 1. Press [ (POWER-ON)] to Turn On the unit. 2. Turn On your TV. 3. Please locate the Source / Input / AUX / Video button on TV’s remote control. The button may vary on the TV brand and model. Once you have located the button, press until you see “Please Wait...” or the Initial Setup Menu on the Screen. Please Wait...
How to Reset the OSD Language You can reset the OSD language if you selected the wrong language. 1. Press [HOME] to display the Home Menu. 2. Use [ ] to select “ ”, then press [OK]. • This item is “Settings” (English) / “Configuaraciones” (Spanish) / “Paramètres” (French). • From here on, please select one of the following items you can find on screen: 3. Use [ ] to select “Playback” (English) / “Reproducción” (Spanish) / “Lecture” (French), then press [OK]. 4.
6. INFORMATION ON PLAYBACK EN 6.1. Information on Playback Playable Discs and Files Playable discs Logos Blu-ray Disc™ - BD-video - BD-RE* (ver. 2.1) (Recorded in BDMV format) - BD-R* (ver. 1.1 / 1.2 / 1.3) (Recorded in BDMV format) (Unfinalized disc may not be played back.
Recommended Specifications AVCHD This unit cannot play back stand-alone AVCHD files (*.m2ts, *.mts or *.m2t) written to a DVD or copied to an SD Memory Card. The DVD or SD Memory Card containing AVCHD files must have a proper file and folder structure meeting AVCHD format specifications. Please use AVCHD compliant device / software to burn or copy AVCHD files to DVD or SD Memory Card. (Please refer to user manuals of your device / software for more information.
Unplayable Media and Files The following discs will not be played back on this unit. CD-ROM DVD-RAM DVD-audio HD DVD SDXC Memory Card unfinalized disc BD-RE (ver. 2.1) (Recorded in BDAV format) BDXL™ • • • • • • • CD-I (compact disc-interactive) VSD (video single disc) video CD SVCD microSDXC Memory Card BD-RE (ver. 1.0) BD-R (ver. 1.1 / 1.2 / 1.
Description for Icons [ ] : group (folder) icon [ ] : music file icon [ ] : movie file icon [ ] : photo file icon - “Folders” refers to the group of files. - “Track” refers to the contents recorded on the audio CD. - “Files” refers to the contents on a disc which are recorded in AVCHD, MP3, JPEG (including KODAK Picture CD) file format. D Note • Unrecognizable characters will be replaced with asterisks. 6.2. Guide to File List Music File List e.g.
EN How to Navigate through the Track / File List • For music file list, use [ ] to move the highlight up and down. Press [ ] or [RETURN] to go back to the previous hierarchy. • For picture file list, use [ ] to move the highlight up, down, left and right. Press [RETURN] to go back to the previous hierarchy. • To access the files in a Group (folder), select the desired Group (folder), then press [OK]. • Press [RED] or [GREEN] to change the page list up or down.
7. BASIC PLAYBACK 7.1. Playing Back a Disc 1. Insert a disc (refer to “How to Insert a Disc” on page 21). • For Blu-ray Disc™ / DVD / audio CD or a disc containing only one type of file, playback will start automatically. If not, press [ (PLAY)]. • Some discs may show a Title or a Disc Menu. In this case, refer to “Using the Title / Disc / Pop Menu” on page 25. 2. Select the type of the file you want to play back, then press [OK]. Music a b c a. For “Music”, Track / File list will be displayed.
D Note for JPEG / KODAK Picture CD Playback • • • Every press of [ ] will turn the image by 90 degrees when an image is displayed. During playback, press [TOP MENU] to display thumbnail screen. This unit conforms to ver. 7.0 of KODAK Picture CD. For details of KODAK Picture CD, contact a shop that provides developing service for Kodak Inc. Some unplayable folders or files may be listed due to the recording status. High-resolution JPEG files take longer to be displayed.
7.3. Playing Back Video / Music / Photo from DLNA Certified Home Media Servers On this unit, you can play video, music and photo files stored on DLNA certified media servers connected to your home network. In order to use this feature, you must connect this unit to your local network. (not guaranteed to work with a wireless environment) • For details, refer to the user manual of the DLNA certified device. 1. Follow steps 1 and 2 in “Before Using Network Features” on page 34. 2.
D Note • • • • • • • • • For the Media Server list, maximum of 10 servers can be displayed. The system can recognize up to 2,000 files (including folders). The 10th and deeper hierarchies cannot be displayed. This unit supports the following formats. (Formats other than listed below cannot be recognized.) EN • • • • - Video : MPEG 1, MPEG 2 PS, MPEG 2 TS / TTS - Music : LPCM, MP3 - Photo : JPEG (Images over 1024 x 768 pixel are not included in the warranty specification.
8. SPECIAL PLAYBACK 8.1. Fast Forward / Fast Reverse 1. During playback, press [ During playback, press [ 2. Press [ (FORWARD)] repeatedly for Fast Forward. (REVERSE)] repeatedly for Fast Reverse. (PLAY)] to return to Normal playback. D Note • • • • For Blu-ray Disc™, DVD and AVCHD, speed changes at 5 different levels. For audio CD, MP3 and Video / Audio files on DLNA Media Server, speed changes at 3 different levels.
8.4. Repeat Playback EN Available repeat functions vary depending on the disc. 1. During playback, press [REPEAT]. 2. Use [ ] to select the desired repeat mode. • You can also change the repeat mode by pressing [REPEAT] repeatedly. REPEAT MODE AVAILABLE MEDIA Chapter Repeat The current Chapter will be played back repeatedly. Title Repeat The current Title will be played back repeatedly. Track Repeat The current Track or File will be played back repeatedly.
8.6. PiP (BONUSVIEW™) Setting Some BD-videos have the PiP function which enables you to display the Secondary Video in the Primary Video. Primary Video PiP 1/8 Secondary Video 1. During playback, press [MODE] to display the Play Menu. 2. Use [ ] to select “PiP” then press [OK]. • PiP information will appear. 3. Use [ ] to select the Secondary Video you want to show. • The Secondary Video will be displayed with the Secondary Audio. • Use [ ] to switch between current setting and “Off”. 4.
8.8. Title / Chapter Search EN Using [ (SKIP)] / [ 1. During playback, press [ (SKIP)] (SKIP)] to Skip the current Title or Chapter and move to the next. The Title or Chapter will move forward one at a time. • If there is no Chapter in one Title, the current Title may be Skipped. To go back to the beginning of the current Title or Chapter, press [ (SKIP)]. Press [ (SKIP)] repeatedly to go to the previous Title or Chapter. The Title or Chapter may move backward one at a time. Using [MODE] 1.
8.10. Time Search 1. During playback, press [MODE] to display the Play Menu. 2. Use [ ] to select “Search”, then press [OK]. • For video files on DLNA server, skip to step 4. 3. Use [ ] to select “ ”, then press [OK]. e.g.) Blu-ray Disc™ Search 4. Use [ 00:12:44 / 11:13:14 ] or [the NUMBER buttons] to enter the time count you want to jump to, then press [OK]. e.g.) Entering 1 hour 45 minutes and 15 seconds. Press Playback will start from the desired time entered.
D Note • • • Some discs will only allow you to change the subtitles from the Disc Menu or Pop Menu. Press [TOP MENU] or [POP MENU/MENU] to display the Disc Menu or Pop Menu. If the disc has no Subtitle language or Subtitle Style, “Not Available” will be displayed on the TV screen. During playback of the Secondary Video, the Primary Subtitle setting is not available except when there is no Subtitle for the Secondary Video. You can also change the Subtitle setting from the Play Menu.
8.13. Switching Camera Angles Some BD-videos and DVD-videos contain scenes which have been shot simultaneously from various angles. You can change the Camera Angle when appears on the TV screen. 1. During playback, press [ANGLE]. 2. Use [ ] to select your desired angle. • You can also change the setting by pressing [ANGLE] repeatedly. • The selected Angle will be displayed on the display bar at the top of the TV screen. 3. Press [RETURN] to Exit.
8.15. Noise Reduction EN Reduces the noise of the playback picture. 1. During playback, press [MODE] to display the Play Menu. 2. Use [ ] to select “Noise Reduction”, then press [OK]. 3. Use [ ] to select your desired setting. e.g.) Blu-ray Disc™ Noise Reduction Off “On”: Activates noise reduction. “Off”: Deactivates noise reduction. 4. Press [RETURN] to Exit. D Note • • This function can also be set during Netflix / VUDU / YouTube™ playback.
9. NETWORK FEATURES 9.1. Before Using Network Features Please follow the instructions below before using network features. 1. Connect this unit to the Internet. • Refer to “Connection to the Network” on page 13. 2. Set up the necessary network connection settings. • Refer to “Network Connection” on page 38. 3. Press [NET APP] to display the network application menu. 4. Use [ ] to select the desired application, then press [OK]. • For the first time only, “Network Service Disclaimer” screen will appear.
10. LIST OF SETTINGS EN In “Settings”, you can customize various kinds of settings as you prefer. Refer to the following instructions to navigate through the Setup Menu. 1. Press [HOME] to access the Home Menu. 2. Use [ ] to select “Settings”, then press [OK]. 3. Use [ ] to select the desired Category, then press [OK]. 4. Use [ ] to move up and down the list to select Menus / Options. 5. To make a selection or to access options of an item, select the desired item, then press [OK].
Category Playback Menus / Options Language Audio Subtitle Disc Menu BD Rating Level DVD Rating Level Password Change Angle Icon Auto English Español Français Original Bulgarian Chinese Czech Danish Dutch English Finnish French German Greek Hungarian Icelandic Irish Off Bulgarian Chinese Czech Danish Dutch English Finnish French German Greek Hungarian Icelandic Irish Bulgarian Chinese Czech Danish Dutch English Finnish French German Greek Hungarian Icelandic Irish Off Age Setting Off 8 [Adult] 7 [NC-1
Category Menus / Options Software Update Automatically check for latest software Quick Start Mode* Product Info Initialize Disc Network USB Memory Stick On Off On Off EN Others Reset Settings Format USB Memory Stick (Unit) Erase Saved BD-ROM Data (USB Memory Stick) Erase Saved BD-ROM Data Reset Network Settings OSS * When “Quick Start Mode” is set to “On”, power consumption during Standby mode will increase.
11. SETUPS 11.1. Network Connection HOME A “Settings” A “Network” A “Network Connection” Perform the network connection setup in order to use the network features, such as BD-Live™, DLNA home media server, Netflix, VUDU, YouTube™ and the network update function. Connection Test After you enable a network connection or change the network settings, always perform the connection test to check to see if the connection is correctly made. 1. Use [ ] to select “Settings” in the Home Menu, then press [OK].
Manual (Wired) In the following cases, select “Manual” to set each setting as necessary. When connection test failed with the setting of “Auto”. - When instructed by your Internet service provider to make specific settings in accordance with your network environment. EN - 1. Follow steps 1 and 2 in “Auto (Wired)” on page 38. 2. Use [ ] to select “Manual”, then press [OK]. 3. Use [ ] to select “IP Address”, then press [OK]. 4. “IP Address” setting screen will appear.
10. Press [RED] to go to the “Proxy Port” setting screen. 11. Enter the proxy port number using the NUMBER buttons, then select “OK”, then press [OK]. Proxy Port Please input the Proxy Port. 65525 Return Clear OK 12. Connection test confirmation screen will appear. Select “Yes”, then press [OK] to start the connection test. The test result will appear right after the connection test finishes. 13. “Network connection succeeds.” will be displayed. Select “End” then press [OK] to complete the settings.
D Note Auto Scan (Wireless) 1. Follow steps 1 and 2 in “Push Button Method” on page 40. 2. Use [ ] to select “Auto Scan”, then press [OK]. • This unit will automatically start searching for nearby wireless networks. 3. The search result will be displayed. Use [ ] to select an appropriate SSID, then press [OK]. • If you select an SSID with “ ” (no password is required), please go to step 5. Access Point Setting Please select the access point.
D Note • The internal wireless LAN supports following specifications. - Wireless standards: IEEE 802.11 b/g/n - Frequency: 2.4 GHz - Security protocol: WEP* / WPA / WPA2 * “WEP” is not recommended to be used due to its “Major security flaws”. Change the Security protocol on the wireless router to “WPA” or “WPA2 (recommended)” mode. Manual (Wireless) Set up the connection to the wireless router manually by entering the SSID. In the following cases, select “Manual” to set each setting as necessary.
11.2. fun-Link (HDMI CEC) A “Settings” A “HDMI” EN HOME A “fun-Link (HDMI CEC)” fun-Link (HDMI CEC) allows integrated system control over HDMI and is part of the HDMI standard. This function may not work properly depending on the device connected to the unit. When “fun-Link (HDMI CEC)” setting is set to “On” the functions listed below will be available.
Copyright protection system To play back the digital video images of a BD-video or DVD-video via an HDMI connection, it is necessary that both the player and the display device (or an AV receiver / amplifier) support a copyright protection system called HDCP (high-bandwidth digital content protection system). HDCP is copy protection technology that comprises data encryption and authentication of the connected AV device. This unit supports HDCP.
DVD Rating Level A A “Settings” “Playback” A “DVD Rating Level” EN HOME 1. Use [ ] to select “Settings” in the Home Menu, then press [OK]. 2. Use [ ] to select “Playback”, then press [OK]. 3. Use [ ] to select “DVD Rating Level”, then press [OK]. 4. Use [the NUMBER buttons] to enter your 4-digit password. 5. Use [ ] to select your desired level, then press [OK]. 6. Press [HOME] to Exit.
11.5. Software Update HOME A “Settings” A “Others” A “Software Update” This unit lets you update the software yourself using a software update disc, USB Memory Stick or via the Internet. The available discs are below: - BD-RE/-R - DVD-RW/-R - CD-RW/-R Disc / USB Memory Stick Update You can update the software by using a disc or USB Memory Stick. Prepare a blank disc or USB Memory Stick for software update: Access www.magnavox.
C Caution Please do not unplug the AC power cord, LAN cable, wireless modem / router or press [ the unit to Standby mode while using “Network Update”. (POWER-ON)] to turn D Note • • • • In order to update the software via the Internet, you must connect the unit to the Internet and set up necessary settings. For the network connection, refer to “Connection to the Network” on page 13. For the network setup, refer to “Network Connection” on page 38.
12. TROUBLESHOOTING Problem Tip No power. Check the AC power cord, if it is properly connected. Try another power outlet. Unplug the AC power cord, and wait for about 5-10 seconds. Plug it back in and attempt to power On the unit. No sound or picture. Make sure both the TV and Blu-ray Disc™ player are Turned On. Confirm the connections to the TV are made properly as shown in the “CONNECTIONS” on page 10. Check to see whether the connected TV or another device supports HDCP.
Problem Cannot play back a disc. To completely reset the unit, press and hold [ (POWER-ON)] on the front panel for 10 seconds to shut down the unit or unplug the AC power cord from the AC outlet for 5-10 seconds. The operation is not possible. in the upper right hand corner of the TV screen. Buttons do not work or the unit stops To soft reset the unit, press and hold [ (POWER-ON)] on the front responding.
Problem Tip Cannot load a Blu-ray Disc™ (stuck in “Loading…” mode) and cannot Open the disc tray to eject the disc. The software update screen appears after Turning On the unit. Unplug unit from AC outlet for 20 seconds. Plug unit back in and press the [ (OPEN/CLOSE)] on the unit to eject the disc. Please complete the software update. When the software update has failed, the software update screen will keep appearing after turning the unit on.
Problem Cannot use the wireless connection. Folder or files stored on DLNA home media server are not displayed in the file list or files do not play back. Cannot use Netflix feature. If appears in the upper left corner of the Home Menu screen, this unit is connected to an Access Point. Please contact your ISP for further assistance when you cannot access BD-Live™ or network services.
13.
14. SPECIFICATIONS EN General Signal system Power requirements Power consumption Dimensions (width x height x depth) Weight Operating temperature Operating humidity NTSC Color 120 V AC, 60 Hz 12 W (standby: 0.5 W) 11.1 x 1.5 x 7.8 inches (280.0 x 38.0 x 196.0 mm) 2.56 lbs. (1.
15. NETWORK SERVICE DISCLAIMER Content and services made available through this product are transmitted by third parties by means of networks and transmission facilities over which Company has no control and third party services may be terminated or interrupted at any time, and Company makes no representation or warranty that any content or service will remain available for any period of time.
16. MAINTENANCE Cleaning the Cabinet • Wipe the front panel and other exterior surfaces of the unit with a soft cloth. • Never use a solvent, thinner, benzene or alcohol to clean the unit. Do not spray insecticide liquid near the unit. Such chemicals may discolor the surface or damage the unit. Cleaning Discs • When a disc becomes dirty, clean it with a cleaning cloth. Wipe the disc from the center to outside. Do not wipe in a circular motion.
17. TRADEMARK INFORMATION Manufactured under license from Dolby Laboratories. Dolby and the double-D symbol are trademarks of Dolby Laboratories. Manufactured under license under U.S. Patent Nos: 5,956,674; 5,974,380; 6,226,616; 6,487,535; 7,392,195; 7,272,567; 7,333,929; 7,212,872 & other U.S. and worldwide patents issued & pending. DTS-HD, the Symbol, & DTS-HD and the Symbol together are registered trademarks & DTS-HD Master Audio | Essential is a trademark of DTS, Inc. Product includes software.
EN “Blu-ray Disc™”, “Blu-ray” and “Blu-ray Disc™” logo are trademarks of the Blu-ray Disc Association. is a trademark of DVD Format/Logo Licensing Corporation. “BD-Live™” and “BD-Live™” logo are trademarks of the Blu-ray Disc Association. “BONUSVIEW™” and “BONUSVIEW™” logo are trademarks of the Blu-ray Disc Association.
18. GLOSSARY AACS Default Gateway Advanced Access Content System (AACS) is the content protection scheme used with Blu-ray discs. IP address of the electronic devices (such as router) which provide Internet access. Analog Audio Digital Audio An electrical signal that directly represents sound. Compare this to digital audio which can be an electrical signal, but is an indirect representation of sound. See also “Digital Audio”. An indirect representation of sound by numbers.
Switch / Hub JPEG is a method of compressing still picture files. You can copy JPEG files on BD-RE/-R, DVD-RW/-R, CD-RW/-R, or USB Memory Stick from a computer and play back the files on this unit. A device used for connecting multiple devices to the network. Title LAN (Local Area Network) A collection of chapters on BD-video or DVD-video. See also “Chapter”. A group of computer networks covering a small area like a company, school or home.
19. ESPAÑOL 19.1. Mando a Distancia 5. Botones de ROJO / VERDE / AZUL / AMARILLO 1 13* 14 2 15 16 • Púlselo para activar las teclas de atajo en algunas funciones de BD-vídeo. Cuando se despliega la lista de archivos, presione para cambiar las páginas. 6. Botón 7. Botón 3 (REVERSO) • Durante la reproducción, púlselo para invertir rápido la reproducción. (REPRODUCIR)* • Púlselo para iniciar o reanudar la reproducción. 8.
19. Botón (SALTAR) • Durante la reproducción, púlselo para saltar al siguiente capítulo, pista o archivo. • Cuando la reproducción esté en modo de pausa, púlselo para avanzar la reproducción imagen a imagen. 20. Botón (PAUSAR) • Púlselo para pausar la reproducción. 21. Botón AUDIO ES • Púlselo para seleccionar el canal de sonido (como idiomas de sonido) de un disco. 22. Botón SUBTITLE • Púlselo para seleccionar los subtítulos de un disco. 23.
19.3. Instalacion Inicial Por favor, siga las instrucciones que se exponen a continuacion para completar la configuracion inicial. 1. Utilice [ ] mientras se presenta la pantalla de bienvenida para seleccionar “Next” y pulse luego [OK]. 2. Aparece la pantalla de configuracion del idioma. Utilice [ ] para seleccionar su idioma y pulse luego [OK]. Idioma Por favor, seleccione su idioma para el menú en pantalla. English Español Français Retorno 3. Aparece la pantalla de “Modo de Inicio Rápido”.
LIMITED WARRANTY FUNAI CORP. will repair this product, free of charge in the USA in the event of defect in materials or workmanship as follows: DURATION: PARTS: FUNAI CORP. will provide parts to replace defective parts without charge for one (1) year from the date of original retail purchase. Certain parts are excluded from this warranty. LABOR: FUNAI CORP. will provide the labor without charge for a period of ninety (90) days from the date of original retail purchase.