
User manual


14
Auto Setting
(Only on the fi rst time setup off the factory)
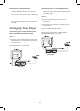
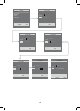
Option 1
Connecting your TV thru Antenna and
RCA cable (Recommended setup)
(please make sure that you connected
your TV and VCR properly)
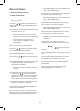
Select your TV to AV mode
Tuning the VCR on
(1) Press Standby/On on the remote control. You
can also press on the front panel.
(2) Set the VCR/DVD to VCR mode by the remote
control or front panel button.
(3) VCR indicator light will be on in the panel.
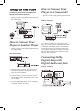
Option 2
Connecting your TV thru Antenna
Turn on the TV
Turn the TV channel whichever channel you
select when connecting thr VCR
(1) Press Standby/On on the remote control.You
can also press on the front panel.
(2) Set the VCR/DVD to VCR mode by the remote
control or front panel button.
(3) VCR indicator light will be on in the panel.
(4) Tune your TV to fi nd the VCR channel,
please refer to the section of “TEST SIGNAL
GENERATION MODE” on page 22.
Option 3
Connecting your player through extra
equipment (satellite system)
Select your TV to AV mode
Tuning the VCR on
(1) Press Standby/On the remote control.You can
also press on the front panel
(2) Set the VCR/DVD to VCR mode by the remote
control or front panel button
(3) VCR indicator light will be on in the panel
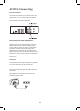
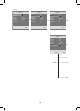
COUNTRY
Austral
ia
Ne
w zealand
ENTE
R: Confirm SETUP: End
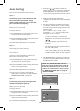
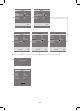
SETUP: End
CLOCK SET
Tim
e --:--
Dat
e -- / -- / - - - -
1. Press the [
/
] buttons to select the
desired country on the setup manu. And press
the [ENTER] button to confi rm the selected
country. Then VCR will auto-search and setup
all your channels automatically.
2. After the channel auto searching is
completed
,
the “Please wait” screen will appear
a while.
3. The auto searching is completed, the screen
is change to “CLOCK SET”. In case of setting
the clock newly, press the [0-9] buttons as the
following order:
hour -> minute -> day -> month -> year.
At that time, “--/--/----”, this clock input guide
will appear on the TV screen.
•
In case of correcting it, current date is
displayed on the TV screen, then press the
[
/
] buttons to move the current to
the wanted position and input the new
numbers.
•
The clock will work, although the VCR is in
the clock setting state.
•
In the “year” display, press “04” will change
to 2004. Likewise, press “99” will change to
2099.
4. The [ENTER] button is pressed to confi rm the
new clock. Press the [SETUP] button to leave
the SETUP menu screen.
NOTE: This AUTO SETTING situation
happens only on the fi rst time setup off
the factory. Should reset of clock or TV
stations is needed, please reter to page
15 “MANUAL CLOCK SET” or page 22
“INSTALLATION”