T9206UG(EN).QX4 06.7.24 6:14 PM Page 1 20 inch COLOR TV/DVD Owner’s Manual MWC20D6 FEATURES • Auto Channel Programming • Screen Saver • Auto Power Off • Parental Lock • Resume Play • Closed Caption Decoder • Virtual Surround SUPPLIED ACCESSORIES This unit comes with the following accessories. Please confirm that all the accessories are included.
T9206UG(EN).QX4 06.7.24 6:14 PM Page 2 PRECAUTIONS WARNING: TO REDUCE THE RISK OF FIRE OR ELECTRIC SHOCK, DO NOT EXPOSE THIS APPLIANCE TO RAIN OR MOISTURE. CAUTION RISK OF ELECTRIC SHOCK DO NOT OPEN THIS SYMBOL INDICATES THAT DANGEROUS VOLTAGE CONSTITUTING A RISK OF ELECTRIC SHOCK IS PRESENT WITHIN THIS UNIT. CAUTION: TO REDUCE THE RISK OF ELECTRIC SHOCK, DO NOT REMOVE COVER (OR BACK). NO USER SERVICEABLE PARTS INSIDE. REFER SERVICING TO QUALIFIED SERVICE PERSONNEL.
06.7.24 6:14 PM Page 3 14. Lightning - For added protection for this unit receiver during a lightning storm, or when it is left unattended and unused for long periods of time, unplug it from the wall outlet and disconnect the antenna or cable system. This will prevent damage to the unit due to lightning and power-line surges. 15.
T9206UG(EN).QX4 06.7.24 6:14 PM Page 4 LASER SAFETY This unit employs a laser. Only a qualified service person should remove the cover or attempt to service this device, due to possible eye injury. CAUTION: USE OF CONTROLS OR ADJUSTMENTS OR PERFORMANCE OF PROCEDURES OTHER THAN THOSE SPECIFIED HEREIN MAY RESULT IN HAZARDOUS RADIATION EXPOSURE. CAUTION: VISIBLE AND INVISIBLE LASER RADIATION WHEN OPEN AND INTERLOCK DEFEATED. DO NOT STARE INTO BEAM. LOCATION: INSIDE, NEAR THE DECK MECHANISM.
T9206UG(EN).QX4 06.7.24 6:14 PM Page 5 TABLE OF CONTENTS ANTENNA/CABLE CONNECTIONS . . . . . . . . . . . CONNECTING TO AN EXTERNAL DEVICE (FRONT) . CONNECTING TO A DIGITAL AUDIO DEVICE (REAR) INSTALLING THE BATTERIES IN REMOTE CONTROL .6 .6 .7 .7 OPERATING CONTROLS AND FUNCTIONS . . .8 TV SECTION TV OPERATION AND SETTINGS . . . . . . . . . . . .9 INITIAL SET UP . . . . . . . . . . . . . . . . . . . . . . . . . . .9 WATCHING A TV PROGRAM . . . . . . . . . . . . . . . . .
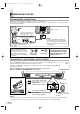
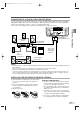
T9206UG(EN).QX4 06.7.24 6:14 PM Page 6 PREPARATION FOR USE ANTENNA/CABLE CONNECTIONS Plug the incoming cable into the ANT. jack on the rear of the unit. If your cable service supplies you with a converter box or if you use a satellite system, connect the box with this unit as shown below. Cable TV signal or Antenna Rear of the unit ANT. COAXIAL Incoming cable from home Antenna / Cable Company (No Cable Box) ANT.
T9206UG(EN).QX4 06.7.24 6:14 PM Page 7 CONNECTING TO A DIGITAL AUDIO DEVICE (REAR) ANT. COAXIAL (OUT) Dolby Digital decoder (IN) COAXIAL To COAXIAL jack (DVD AUDIO OUT only) or To Coaxial digital Audio input jack PREPARATION FOR USE You can connect this unit to a digital audio device to enjoy the digital audio of DVD. Connect to an amplifier equipped with digital input jacks, such as MD deck or DAT deck.
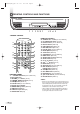
T9206UG(EN).QX4 06.7.24 6:14 PM Page 8 OPERATING CONTROLS AND FUNCTIONS - CONTROL PANEL - OPEN/CLOSE y STANDBY-ON VIDEO VOLUME 1 2 3 CH. SELECT STOP L - AUDIO - R HEADPHONE PLAY 45 6 7 8 9 10 11 - REMOTE CONTROL STANDBY-ON 12 13 14 OPEN/ CLOSE PICTURE/ SLEEP SELECT 1 2 3 4 5 6 7 8 PREV +100 0 +10 NEXT SET-UP 16 17 18 CH. 25 VOL.
T9206UG(EN).QX4 06.7.24 6:14 PM Page 9 TV OPERATION AND SETTINGS WATCHING A TV PROGRAM TV When you turn on the power for the first time, the SELECT LANGUAGE screen is displayed. Select the language for screen display and perform auto programming of the channels. 1 2 3 Confirm the antenna (or cable) connection and press [PLAY B]. • The tuner scans and memorizes all active channels in your area.
T9206UG(EN).QX4 06.7.24 6:14 PM Page 10 TV SECTION TV OPERATION AND SETTINGS SLEEP TIMER / PICTURE CONTROL TV You can set Sleep Timer and picture adjustment with [PICTURE / SLEEP]. • The menu changes as described below every time you press [PICTURE / SLEEP]. BRIGHT Sleep Timer SHARPNESS 1 K / L] to point to Use [K "CAPTION". 2 Press [PICTURE / SLEEP] to display the Sleep Timer menu.
6:14 PM Page 11 CHANNEL SET UP TV Channel presetting is necessary at the start or in case you moved the TV to a different area. Press [SET-UP]. K / L] to point to Use [K "CHANNEL SET UP", then press [ENTER]. 2 K / L] to point to "AUTO Use [K CH PROGRAMMING", then press [ENTER]. - TV SETUP B CHANNEL SET UP V-CHIP SET UP LANGUAGE [ENGLISH] CAPTION [OFF] 5 Press [SET-UP] to exit the menu. NOTE: • To confirm that channel(s) has (have) been deleted or added, select it (them) using [CH. K / L].
T9206UG(EN).QX4 06.7.24 6:14 PM Page 12 TV SECTION TV OPERATION AND SETTINGS A V-CHIP SET UP TV This feature enables parents to prevent their children from watching inappropriate material on TV. When you try to access a blocked program, “PROTECTED PROGRAM by ...” message appears on the TV screen. 4 1 2 Press [SET-UP]. Use [K / L] to select "V-CHIP SET UP", then press [ENTER].
T9206UG(EN).QX4 MPAA RATING SET UP Use [K / L] to point to your desired item, then press [ENTER] to select "BLOCK" or "VIEW". Selection G PG PG-13 R NC-17 X 5 Page 13 G PG PG–13 B R NC–17 X [VIEW] [VIEW] [VIEW] [BLOCK] [BLOCK] [BLOCK] Rating Category Explanations General Audience Parental Guidance suggested. Unsuitable for children under 13 Restricted; under 17 requires accompanying parent or adult guardian No one under 17 admitted Mature audience only Press [SET-UP] to exit the menu.
T9206UG(EN).QX4 06.7.
T9206UG(EN).QX4 06.7.24 6:14 PM Page 15 PLAYING A DISC FAST FORWARD / FAST REVERSE BASIC PLAYBACK 1 Press [STANDBY-ON] to turn on 2 Press [OPEN/CLOSE A]. 3 Place the disc in the tray, with the label facing up. • Every time you press the button, playback speeds up and the level of the speed appears on the screen. D1 NOTES: 4 • For DVDs, fast forward/reverse speed is different depending on the disc. Approximate speed is 1 (×2), 2 (×8), 3 (×20), 4 (×50) and 5 (×100). Press [PLAY B].
T9206UG(EN).QX4 06.7.24 6:14 PM Page 16 DVD SECTION SPECIAL PLAYBACK FUNCTIONS & SETTINGS FUNCTION TABLE The setting menu changes as described below every time you press [MODE] during playback. See the reference page for how to set each menu. Some functions are not available in specific modes, but this is not a malfunction. DVD-V CD Press [MODE] Press [MODE] AUDIO MENU (P.17) SUBTITLE MENU (P.17) STEREO L-ch R-ch OFF SUBTITLE STREAM 1 .... SUBTITLE STREAM 32 V.S.S. MENU (P.
6:14 PM Page 17 AUDIO MENU ANGLE MENU AUDIO LANGUAGE Some DVD discs contain scenes which have been shot from various angles and you can change them as you like. You can select the audio language during DVD playback (if multi languages are available). 1 Press [MODE] during playback. 2 Use [K / L] to select your desired language. 1 During playback, press [MODE] repeatedly until ANGLE menu appears. 2 Use [K / L] to select your desired angle. 3 Press [RETURN] to exit the menu. 1.
T9206UG(EN).QX4 06.7.24 6:14 PM Page 18 DVD SECTION SPECIAL PLAYBACK FUNCTIONS & SETTINGS BLACK LEVEL MENU SEARCH MENU You can adjust the Black Level to make the black parts of the picture brighter. You can begin playback at a specific track, title, chapter or from a specific point on a disc. 1 TRACK SEARCH 2 During playback, press [MODE] repeatedly until BLACK LEVEL menu appears. OFF (BLACK LEVEL) 1 Use [K / L] to select "ON" or "OFF". ON: Makes the dark parts brighter.
6:14 PM Page 19 TIME SEARCH REPEAT PLAYBACK 1 During playback, press [MODE] repeatedly until SEARCH menu appears. REPEAT TRACK 2 Use [K / L] repeatedly to display TIME SEARCH menu. 3 Within 60 seconds, use the Number buttons to enter a desired disc time. Playback will start at the specified time. 0:0 _:_ _ TOTAL 1 During playback, press [MODE] repeatedly until REPEAT menu appears. 2 Use [K / L] to select your desired repeat mode.
T9206UG(EN).QX4 06.7.24 6:14 PM Page 20 DVD SECTION SPECIAL PLAYBACK FUNCTIONS & SETTINGS ON-SCREEN INFORMATION PROGRAMMED PLAYBACK You can check the information about the current disc by pressing [DISPLAY]. You can determine the playing order of tracks. For DVD-Videos 1 In the stop mode, press [MODE]. 1 PROGRAM • The PROGRAM screen appears. CD-DA 1 2 3 4 5 6 7 ENTER PLAY CLEAR TOTAL 0:00:00 3:40 4:30 5:00 3:10 5:10 1:30 2:30 1/4 Press [DISPLAY] during playback to show current chapter.
T9206UG(EN).QX4 06.7.24 6:14 PM Page 21 CHANGING THE DVD SET UP ITEMS You can change the DVD player’s settings by pressing [SET-UP] in DVD mode. The set up items are shown in the diagram below. CUSTOM INITIALIZE LANGUAGE (P.21) AUDIO SUBTITLE DISC MENU DISPLAY (P.22) TV MODE STILL MODE TV MODE DRC DOWN SAMPLING DOLBY DIGITAL AUDIO (P.22) DOLBY DIGITAL PARENTAL (P.22) OTHERS (P.23) CUSTOM MENU 1 In the stop mode, press A SETUP [SET-UP] twice to display the DVD SETUP menu.
T9206UG(EN).QX4 06.7.24 6:14 PM Page 22 DVD SECTION CHANGING THE DVD SET UP ITEMS B 4 C DISPLAY SETTING Use [K / L] to select an item, then press [ENTER]. SETUP DISPLAY TV MODE STILL MODE 4:3 LETTER BOX AUTO • TV MODE: QUICK You can change certain aspects of the DVD display screens and on-screen messages on the TV screen. 4:3 LETTER BOX (default): To show black bars on top and bottom of the screen. 4:3 PAN & SCAN: To show a full height picture with both sides trimmed.
6:14 PM Page 23 E 6 7 K / L] to select the Use [K desired level, then press [ENTER]. SETUP OTHER SETTING PARENTAL 4 PARENTAL LEVEL ALL 8 [ADULT] 7 [NC-17] 6 [R] Press [SET-UP] to exit the menu. • CONTROL LEVELS ALL: All parental locks are cancelled. 8 [ADULT]: DVD software of any grade (adult/general/children) can be played back. 7 to 2: Only DVD software intended for general use and children can be played back.
T9206UG(EN).QX4 06.7.24 6:14 PM Page 24 TROUBLESHOOTING GUIDE If the unit does not perform properly when operated as instructed in this Owner’s Manual, check the following guide for the possible remedy of a problem before contacting Customer Service. Sometimes a performance problem can be easily solved by checking seemingly apparent but often overlooked possibilities. It could save your time and money.
06.7.24 6:14 PM Page 25 SYMPTOM POSSIBLE REMEDY PAGE DVD mode No picture • This unit cannot play DVD-RAM/CD-i/Photo CD/Video CD/DVD with region codes other than "1" and "ALL". 14 Disc cannot be played • Clean the disc. • Place the disc correctly, with the label side up. • Cancel the parental setting or change the control level. 26 15 22 No sound • Correct the audio output settings. • Confirm the power and audio settings of external audio component.
T9206UG(EN).QX4 06.7.24 6:14 PM Page 26 MAINTENANCE DEGAUSSING IR SIGNAL CHECK A degaussing circuit in this unit clears up color errors on the TV screen. Color errors occur when there is any excess magnetism close to the unit. This circuit is designed to operate once when the unit is first plugged in. If you see minor color errors on the screen, unplug the unit for approximately 30 minutes. When you plug in the unit again, the degaussing circuit will operate to clear errors.
T9206UG(EN).QX4 06.7.
T9206UG(EN).QX4 06.7.24 6:14 PM Page 28 SPECIFICATIONS GENERAL SPECIFICATIONS TV CRT: Television system: Closed caption system: Tuner channel TV VHF Low: VHF High: UHF: CATV VHF: MID band: SUPER band: HYPER band: 20 inch in-line gun, 90˚ deflection tube NTSC-M §15.
T9206UG(ES).QX4 06.7.24 3:51 PM Page 29 ÍNDICE DE CONTENIDO PREPARATIVOS PARA EL USO . . . . . . . . . . . .29 SECCIÓN DVD CONEXIONES DE ANTENA/CABLE . . . . . . . . . . .29 CONEXIÓN A UN DISPOSITIVO EXTERNO (FRONTAL) . . . . . . . . . . . . . . . . . . . . . . . . . . . .30 CONEXIÓN A UN DISPOSITIVO DE AUDIO DIGITAL (TRASERA) . . . . . . . . . . . . . . . . . . . . . . . . . . . .30 REPRODUCCIÓN DE UN DISCO . . . . . . . . . . .33 REPRODUCCIÓN BÁSICA . . . . . . . . . . . . . . . . . .
T9206UG(ES).QX4 06.7.24 3:51 PM Page 30 PREPARATIVOS PARA EL USO CONEXIÓN A UN DISPOSITIVO EXTERNO (FRONTAL) Cuando vea un programa grabado en otra fuente (videograbadora o videocámara), utilice las tomas de entrada AUDIO/VIDEO en la parte frontal de la unidad. Conecte las tomas de salida de Audio/Vídeo de otra fuente a las tomas de entrada de AUDIO L/R y VIDEO de esta unidad. A continuación, utilice [SELECT] o [CH. K / L] hasta que aparezca "AUX" en la pantalla.
T9206UG(ES).QX4 06.7.24 3:51 PM Page 31 SECCIÓN TV FUNCIONAMIENTO Y AJUSTES DEL TELEVISOR PARA VER UN PROGRAMA DE TELEVISIÓN 1 Después de finalizar la conexión de la antena o del cable, conecte el cable de alimentación a una toma estándar de CA. 2 Presione [STANDBY-ON y] para encender la unidad. 3 Presione cualquier tecla para seleccionar el idioma del menú de pantalla. • ENGLISH :[VOL. Y] • ESPAÑOL :[VOL. X] • FRANÇAIS :[CH. K] 4 TV - SUGERENCIAS ÚTILES 1.
T9206UG(ES).QX4 06.7.24 3:51 PM Page 32 SECCIÓN TV FUNCIONAMIENTO Y AJUSTES DEL TELEVISOR IDIOMA DE MENÚ DE PANTALLA AJUSTE DE CANAL TV Es necesario preseleccionar el canal al principio o en caso de haber movido el televisor a una zona distinta. 1 AUTOPROGRAMACIÓN DEL CANAL 1 Presione [SET-UP]. K / L] para ir hasta Utilice [K "AJUSTE DE CANAL", y presione [ENTER]. 2 K / L] para ir hasta Utilice [K "AUTOPROGRAMACIÓN DE CA.", y presione [ENTER]. - TV PREP.
T9206UG(ES).QX4 06.7.24 3:51 PM Page 33 SECCIÓN DVD REPRODUCCIÓN DE UN DISCO REPRODUCCIÓN BÁSICA AVANCE RÁPIDO / RETROCESO RÁPIDO 1 Presione [STANDBY-ON] para encender la unidad. 2 Presione [OPEN/CLOSE A]. 3 Coloque el disco en la bandeja, con la etiqueta hacia arriba. • Durante la reproducción, mantenga presionado [FWD D] para avance rápido o [REW E] para retroceso rápido. • Cada vez que mantenga presionado el botón, la reproducción se acelera y el nivel de velocidad aparece en la pantalla.
T9206UG(ES).QX4 06.7.
T9206UG(ES).QX4 06.7.
T9206UG(EN).QX4 06.7.24 6:14 PM Page 29 LIMITED WARRANTY FUNAI CORP. will repair this product, free of charge in the USA in the event of defect in materials or workmanship as follows: DURATION: PARTS: LABOR: FUNAI CORP. will provide parts to replace defective parts without charge for one (1) year from the date of original retail purchase. Two (2) years for Picture Tube. Certain parts are excluded from this warranty. FUNAI CORP.