VCR VR201BMG Video Cassette Recorder Hookup Pages
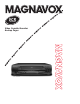
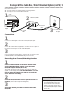
6 Hookups Without a Cable Box / Direct Broadcast System The basic VCR/TV connection – antenna/cable to VCR to TV – is shown below. If you have a Cable Box or a Direct Broadcast System, please see pages eight-nine. If you have a Stereo TV, please see page 10. After you hook up the VCR, go to page 11 to turn on the VCR. 1 Disconnect the antenna or cable from your TV.
Hookups Without a Cable Box / Direct Broadcast System (cont’d) 7 3 Connect the RF coaxial cable (supplied) to the OUT Jack on the back of the VCR and to the ANTENNA IN Jack on the TV. (You may use either a snap-on type (supplied) or screw-on type of coaxial cable, whichever you prefer.
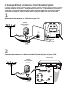
8 Hookups With a Cable Box / Direct Broadcast System There are two ways to connect your Cable Box/DBS to the VCR. With this connection: ● You may view any channel. ● You must select channels at the Cable Box/DBS. Channels cannot be changed at the VCR. ● You may not view a channel other than the one you are recording. ● You may not program channels at the VCR. ● You can only program a timer recording for one channel at a time.
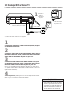
Hookups With a Cable Box / Direct Broadcast System (cont’d) 9 With this connection: ● You may watch one channel while recording another. ● You may not record scrambled channels. 1 VCR ANT IN 2 Cable Box/DBS 75 ANT CAB / LE AUDIO IN OUT IN VIDEO OUT OUT CH3 CH4 RF coaxial cable Cable Signal RF coaxial cable 3 TV’s ANTENNA IN Jack Connections 1 2 Connect a Cable signal to the VCR’s ANT(enna) IN Jack.
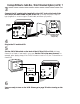
10 Hookups With a Stereo TV 1 ANT antenna or cable to ANT(enna) IN Jack IN AUDIO OUT IN VIDEO VIDEO (yellow) and AUDIO (white) OUT Jacks OUT 2 3 Audio and Video IN Jacks on TV CH3 CH4 Video Cable Audio Cable ● Audio and Video cables are not supplied. 1 Connect the antenna or cable to the ANT(enna) IN Jack on the back of the VCR. 2 Connect a video cable to the yellow VIDEO OUT Jack on the back of the VCR. Then, connect the other end of the video cable to the VIDEO IN Jack on your TV.
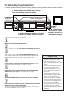
22 Front Panel F.FWD (Fast Forward) Button When playback is stopped, press to fast forward the tape at high speed. During tape playback, press to fast forward the tape while the picture stays on the screen. Details are on page 35. Press to select an item in the VCR menu. Remote Sensor Receives a signal from your remote control so you can operate your VCR from a distance. REW(ind) Button When playback is stopped, press to rewind the tape at high speed.
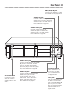
Rear Panel 23 ANT(enna) IN Jack Connect your antenna or cable here. Details are on pages six-10. AUDIO IN Jack Connect a cable coming from the AUDIO OUT Jack of a camcorder, another VCR, or an audio source here. Details are on page 32. AUDIO OUT Jack Connect a cable going to the AUDIO IN Jack of a camcorder, another VCR, or an audio system here. Details are on page 32.
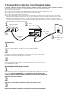
32 Rerecording (Tape Duplication) 1. Audio cable from AUDIO OUT Jack of VCR 1 to AUDIO IN Jack of VCR 2 VCR 1 Playing VCR VCR 2 - Recording VCR ANT ANT IN IN AUDIO OUT AUDIO IN VIDEO OUT OUT IN CH3 CH4 VIDEO 2. Video cable from VIDEO OUT Jack of VCR 1 to VIDEO IN Jack of VCR 2 OUT CH3 CH4 3. RF coaxial cable from the OUT jack of VCR 2 to the TV’s ANTENNA IN Jack ● Audio and Video cables are not supplied. 1 2 3 Make the connections shown above. VCR 1 will play your tape.