
Owner's manual

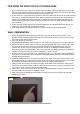


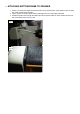

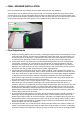
Table Of Contents
- MMC 2 INSTALLATION INSTRUCTION MANUAL
- TABLE OF CONTENTS:
- SELECTION OF SPEAKER LOCATION
- PAINTING SPEAKER FRAMES
- TIPS FROM THE PROS FOR DO-IT-YOURSELFERS
- WALL PREPARATION
- TOP FRAME INSTALLATION
- ATTACHING BOTTOM FRAME TO SPEAKER
- BOTTOM FRAME ATTACHMENT TO WALL
- FINAL SPEAKER INSTALLATION
- Final Adjustments
- HOOKUP
- In case you missed it in the manual-
- SPEAKER ANGLE ADJUSTMENT
- Phasing
- Bass Management and Processor Settings
- Tweeter Level Control

K. SPEAKER ANGLE ADJUSTMENT
Some of the adjustments below are easier if the motor is pulled back using a strip of duct tape as described above
in Final Speaker Installation.
For the best sound, the MMC 2 should be angled so that the panel is on-axis with the listener with a minimum
distance from the wall of 30 degrees. (Use of the MMC 2 as a dual center channel speaker requires slightly
different adjustments. Contact Magnepan for dual center speaker installations).
This adjustment can be challenging on your first attempt. The figure, below, shows the concept of the Cam/Stop. It
is not an actual drawing of the parts, but, the visualization of the design may be helpful to make the adjustment.
CAUTION-- Before you begin the adjustment, take the precaution of securing the top frame. It will be necessary to
lift up on the speaker frame as you make this adjustment. This could result in the top frame coming loose from the
wall and falling. Painter's tape can help to prevent the top frame from being pushed upward during the speaker
angle adjustment.
Pull the MMC 2 out until you feel the slight resistance of the Cam/Stop. (Note- If you do not feel the resistance of the
Cam/Stop, the Cam has been rotated 180 degrees and the Cam must be rotated further until the Cam and Stop
intersect.) Insert the long 5/64 inch allen wrench into the Cam/Stop at the bottom of the speaker as shown in Fig. 1
and 2 below and loosen the allen screw. Rotate the MMC 2 to the desired position as shown in Fig. 3 and 4 while
holding the Cam/Stop stationary. It is necessary to raise the MMC 2 slightly to remove the weight of the speaker off
of the Cam/Stop so that the speaker can be rotated independently of the Cam/Stop.Tighten the allen screw. If the
Cam/Stop moves in the process of moving the MMC 2, the angle will be wrong. In that case, another adjustment
will be necessary.
Lift the speaker panel as high as possible to expose the allen screws. Insert the long 5/64 inch allen wrench into
the allen screws in the Cam/Stop at the bottom of the speaker as shown in Fig. 1 and 2. Loosen all but one of the
allen screws (Your cam may have 2 or 3 allen screws). Next, pull the MMC 2 out until you feel the slight resistance
of the Cam/Stop. (Note- If you do not feel the resistance of the Cam/Stop, the Cam has been rotated 180 degrees
and the Cam must be rotated further until the Cam and Stop intersect.) Maintain the speaker panel at the position
where the Stop has hit the Cam. Lift the speaker panel as high as possible to gain access to the allen screws.
Insert the long 5/64 inch allen wrench into one tightened allen scew in the Cam/Stop. Loosen the allen screw and
use the allen wrench to hold the cam at the same position while you rotate the MMC 2 to the desired position. It is
necessary to keep the weight of the speaker panel off of the Cam/Stop so that the speaker can be rotated
independently of the Cam/Stop. Tighten the allen screw. Invariably, the Cam/Stop will move slightly in the process
of moving the speaker panel and the angle will be wrong. In that case, another adjustment will be necessary. The
last step is to check the panel angle by using the Controller/Power Supply which may not be the exactly the same
as the manual setting.
The angle of the MMC 2 should never be set for less than 30 degrees for optimum sound.
Setting stop in closed position-- A nylon screw is included with the MMC 2 to act as a stop so that the MMC 2 can
be adjusted to be parallel with the wall in the closed position. The screw hole is located at the bottom inside edge of
Fig. ____