
User Manual
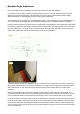


6. Speaker Angle Adjustment
Many of the adjustments and installation are much easier with the aid of an LED headlamp.
For the best sound, the MMC 2 should be angled so that the panel is on-axis with the listener with a minimum
distance from the wall of 30 degrees. (Use of the MMC 2 as a dual center channel speaker requires slightly
different adjustments. Contact Magnepan for dual center speaker installations).
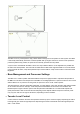
This adjustment can be challenging on your first attempt. Figure 1, below, shows the concept of the Cam/Stop. It is
not an actual drawing of the parts, but, the visualization of the design may be helpful to make the adjustment.
Helpful hint--Ensuring that the panel moves freely or detecting the slight resistance of the Cam/Stop is made easier
if the motor assembly and drive wheel is pulled away from the idler wheel. The motor assembly can be held out of
the way by attaching a 1 inch-wide piece of duct tape to the entire length of the motor frame. Pull the frame back
with the tape under tension and attach the duct tape to the end of the wood frame.
CAUTION-- Before you begin the adjustment, take the precaution of securing the top frame. It will be necessary to
lift up on the speaker frame as you make this adjustment. This could result in the top frame coming loose from the
wall. Painter's tape can help to prevent the top frame from being pushed upward during the speaker angle
adjustment.
Note--The Installation Manual recommends installing 2 small brads in the wall at the top of the top frame as a
precaution to prevent the top frame from be pushed upward and falling. If this precaution has been taken, you will
see two small brad heads in the wall at the top of the top frame which can be removed with a long nose pliers.
If you wish to add this precaution, make a mark on the wall at the top of the frame on both ends of the frame. Drill a
small hole in the wall the same size as a brad (which has a small head). When the installation is complete. Insert
the brad into the hole after completing the installation. The head of the brad will be above the line of sight and will
act as a keeper to prevent the top frame from being pushed upward. Use a long nose priers to remove the brad for
servicing the speakers.
Fig. 1
Fig. 2