
Installation Manual


© 2014 Magnum Energy, Inc.Page 5
Installation
2.4 Mounting the ME-ARC Remote
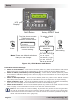
The ME-ARC can either be fl ush mounted (through an opening in the wall), or surface mounted
using the provided bezel. Find a location that is clean, dry and protected. Allow room to access
the remote’s SELECT knob and to view the LEDs/display.
CAUTION: Ensure that no AC power is connected to the inverter, and then according
the your inverter owner’s manual correctly connect the inverter to the batteries.
CAUTION: Always check for hidden electrical wires, pipes and cables BEFORE drilling,
cutting, or screwing into walls or cabinets.
2.4.1 Flush Mount Installation Procedure
To fl ush mount, the wall opening must have at least a 2” (5 cm) depth to allow room for the re-
mote and the cable.
1. Cut an opening in the wall (Figure 2-5). Ensure there are no openings around the display
and enough material for the screws to secure the unit.
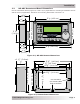
2. Drill four pilot holes for the #8-32 screws that will attach the remote to the wall (refer to
Figure 2-3 for hole locations and dimensions).
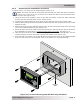
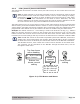
3. Route one end of the cable through the wall cutout to the inverter/charger, and then plug
it into the RJ11 REMOTE port (blue label) on the inverter/charger—inverter has DC power,
but is OFF. See Figure 2-2.
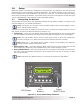
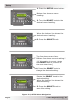
4. Take the other end of the remote cable and while plugging it into the back of the ME-ARC,
view the remote’s display to ensure the Power-up Self Test initiates (see Section 2.5).
5. If the self test is successful, secure the ME-ARC to the wall using four of the supplied Phillips
screws. If the self test is unsuccessful, refer to the Troubleshooting section.
Figure 2-5, Flush Mounting the ME-ARC
3.0"
(7.6 cm)
5.0"
(12.7 cm)