
Installation Manual


© 2014 Magnum Energy, Inc.Page 19
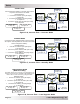
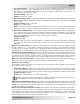
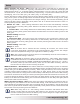
Setup
Press to
select SETUP
menu
Press
SETUP
Rotate to
access
these:
Top line shows
current status
Bottom line shows current
SETUP menu heading
Status...
01 System Setup
02 Invert Setup 05 BMK Setup
03 Charger Setup 06 PT Setup
04 AGS Setup
SETUP: 01 System Setup
The following menus are used to set up the remote’s screen and clock.
• 01A Set Clock – The ME-ARC contains a real time clock that must be set for proper opera-
tion of some features. The features are: the SETUP: 02C AC In-Time, 04B Gen Run Time, 04G
Quiet Time, 04H Gen Exercise menu items, and the TECH: 04 Fault History menu item.
**IMPORTANT**
It is important that you set the clock as it is critical in effectively addressing fault issues, as well
as for the proper start/stop functions of your AGS device and PT charge controller, if installed.
Info: The clock obtains power from the inverter and resets if the ME-ARC is disconnected
from the inverter.
To set the current time:
From the Set Clock menu:
1. Rotate the SELECT knob to the correct Hour setting, and then press SELECT.
2. Rotate the SELECT knob to the correct Minute setting, and then press SELECT.
3. Rotate the SELECT knob to the appropriate AM/PM setting, and then press SELECT.
• 01B Screen Setup – This setting enables you to adjust the contrast and brightness of the
LCD screen, and to turn off the Power Save™ feature—or to select the time that determines
when the display goes into Power Save mode.
Default setting: Brightness = 50%, Contrast = 100%
Range: 0-100% (10% increments)
Default setting: Pwr Save = 15 Min
Range: OFF, 1-60 Min (1-min. increments)
Info: If DC power is lost to the router, the 01B Screen Setup setting defaults back to
the default settings (Brightness = 50%, Contrast = 100%).
What is the Power Save feature? The Power Save feature turns off the remote’s LCD backlight
and LEDs to conserve energy. The remote enters Power Save mode if there hasn’t been a button
press or fault message for a set period of time (per the Pwr Save setting). When in Power Save
mode, the remote’s LCD backlight and LEDs can be reactivated by pressing any button. If you
have a fault during Power Save mode, the LCD backlight and the FAULT LED will come on and
stay on as long as the fault is present.
Info: If you want the LCD backlight and the LED’s to always be on (while communicating),
turn the Power Save feature off by selecting OFF from the Pwr Save menu option.
Info: Pressing the SELECT knob causes the remote to exit Power Save mode. However,
rotating the SELECT knob will not cause the remote to come out of Power Save mode.
Figure 3-9, SETUP Button and Menus