
Installation Manual


© 2014 Magnum Energy, Inc.Page 35
Setup
Info: When Multi is selected and the charger goes to Full charge mode, if another
charge source (such as PV or wind) is charging the batteries above the fully charged
voltage, the charger will remain in the Full Charge stage.
Why should I use Multi? Multi is the most commonly used charge mode. It is suitable for most
applications and assures a full charge to the batteries, without overcharging. If there is another
alternate charge source charging the batteries (PV, wind or hydro), then Multi mode uses the
inverter/charger to complete a full charge. The inverter/charger transitions to Full Charge mode
and the alternate charge source then maintains the battery voltage. If the alternate source is un-
able to maintain the voltage, the charger enters Float mode for another 4-hour period. The Full
Charge feature in the Multi mode also helps reduce water consumption in fl ooded batteries when
they are left in charge mode for extended periods, such as in a backup power application.
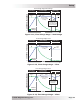
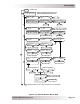
◊ Set Final Charge Stage = Float – The Float stage is a maintenance charge mode that
maintains a constant voltage—while delivering up to the maximum rated current of the char-
ger in order to power any DC loads connected to the batteries. Most 3-stage chargers fi nish
the charge mode in Float, and remain in Float as long as an AC source is available on the input
of the charger. The fl oat voltage is determined by the battery type selected in the 03C Battery
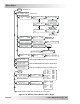
Type menu. Unlike Multi mode, in Float mode there is no Full Charge feature. See Figure 3-13.
Why should I use the Float Charge Stage? Float mode is typically used when the charger is
the only charge source connected to the batteries. This mode will maintain the batteries at the
fl oat voltage. If using fl ooded batteries and the charger is in fl oat for an extended period, the
water level should be checked every two to three weeks for proper levels.
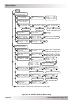
◊ Set Final Charge Stage = Silent – The charger stops charging once it transitions to
‘Silent’. Normally, the charger enters Silent mode after the Absorption charge mode has
fi nished. Once the charger enters the Silent mode, the battery voltage is continuously moni-
tored. If the batteries fall to the Set Rebulk Volts value, the charger restarts the Bulk charge
mode and then transitions to Absorb charge mode. After the Absorb charge mode, the charger
again transitions to Silent mode. This Silent to Rebulk to Absorb and back to Silent cycle will
continue as long as it is required. See Figure 3-14.
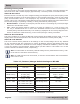
Set ReBulk Volts – When Silent mode is selected, you must also set the DC voltage
set-point where the charger restarts the Bulk charge mode. This setting should be slightly
above the lowest DC volts to which you want the batteries to fall. Typically, the lowest DC
volts to which the batteries are allowed to fall is 12.0 to 12.2 VDC (12-volt systems), 24.0
to 24.4 VDC (24-volt systems), and 48.0 to 48.8 VDC (48-volt systems), respectively.
Default setting: 12.0 VDC (12V), 24.0 VDC (24v), 48.0 VDC (48v)
Ranges: 12.0-16.0 VDC (12v), 24.0-32.0 VDC (24v), 48.0-64.0 VDC (48v)
Why should I use the Silent Stage? Silent mode is typically used when an alternate charge
source is available and able to fully charge or fi nish the charge cycle after the Absorb stage. A
major difference between Multi mode and Silent mode is that the Silent mode returns to Bulk
mode instead of Float mode. In Silent mode, you can also adjust the Rebulk set-point in order to
allow the alternate charge source to provide more of the battery charging.
• 03H EQ Reminder Days: This menu sets the number of days that must pass before the
remote will remind you to equalize your batteries.
Default setting: OFF
Range: OFF, 1-255 Days
Note: If “CC/CV Controlled” displays on this menu’s screen, you will not be able to adjust the
settings as “CC/CV” has been selected as the battery type from the 03C Battery Type menu.
Info: Once equalizing begins, the METER: 03C Since EQ Start timer resets to zero days.
SETUP: 04 AGS Setup/SETUP: 05 BMK Setup/SETUP: 06 PT Setup
Refer to Sections 7.0, 8.0, and 10.0 respectively for detailed information on the AGS/BMK/PT
SETUP menus that are available from the ME-ARC remote’s SETUP button.