
Installation Manual


© 2014 Magnum Energy, Inc.
Page 99
Using a PT Controller: Setup
10.0 Using a PT Charge Controller
Pressing the SETUP button provides access to the menu items and settings that enable you to
confi gure your PT charge controller. This section discusses how to set up and monitor the PT
charge controller using the ME-ARC remote. It also covers other PT controller menu options that
are available using this remote. Refer to your PT controllers owner’s manual for more information
on setup and operation procedures (PN: 64-0067).
IMPORTANT: The PT controller must be connected and communicating with the ME-ARC in or-
der to set up and/or control its operation. If the PT controller is not communicating or there is
no PT connected, “No PT Present” appears when accessing the METER: 07 PT Meters, SETUP: 06
PT Setup or the CTRL: 04 PT Control menus (unless the TECH: 07 Show all Menus menu is set to
“Yes”). Refer to Section 3.2.5 for more information on the TECH: 07 menu.
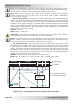
10.1 Setting Up the PT Controller using the ME-ARC
Use the ARC remote’s SETUP button to identify a battery type and the Absorb Done, Max Charge
Rate/Time, Bulk Start, PT Aux Relay and PT Alarm settings for your PT controller. Review each
menu item to determine if you need to adjust any settings to meet your system requirements.
Info: If Linked displays on the ME-ARC for the 06A Battery Type and 06B Absorb Done
settings, then that indicates that “Yes” has been selected from the SETUP: 01E Link PT
CHG Settings menu. For additional information on linking the inverter’s charge settings
with the PT controller’s charge settings, refer to page 20.
• 06A Battery Type: This setting selects the battery type, which determines the battery charge
profi le and ensures the batteries are receiving the proper charge voltage. The charge voltage
settings are fi xed when using the GEL, Flooded, AGM1, or AGM2 selections, but can be adjusted
if using the CC/CV or Custom selections.
Default setting: Flooded
Range: AGM1, AGM2, Flooded, GEL, CC/CV, Custom
◊ Set Battery Type (GEL, Flooded, AGM1, or AGM2) – When the battery type selection
is GEL (for Gel batteries), Flooded (for liquid lead acid batteries), AGM1 (for Lifeline AGM
batteries), or AGM2 (for East Penn/Deka/Discover/Trojan AGM batteries), the charge voltage
level for the Absorption, Float, and EQ charge modes are fi xed as shown in Table 3-1—de-
pending on the battery type selected and the nominal inverter battery voltage.
Info: The voltage settings shown in Table 3-1 are based on the Battery Temperature
Sensor (BTS) at a temperature of 77°F (25°C), or not connected. If the BTS is connected,
the actual charge voltage will increase if the temperature around the BTS is below 77°F
(25°C), and decrease if higher than 77°F (25°C). This ensures the batteries receive the
correct charge voltage regardless of temperature.
◊ Set Battery Type (CC/CV) – The CC/CV selection provides a 2-stage (i.e., Constant
Current/Constant Voltage) charging method with an adjustable charge voltage and a setting
that limits output current—if needed. It consolidates all the battery charge settings that are
required for Constant Current and Constant Voltage charging cycles.
Note: CC/CV settings only display if CC/CV is selected from the 06A Battery Type menu.
Info: If CC/CV has been selected from the 06A Battery Type menu, the Absorb Done
and the Volts and SOC settings (under the 06E Bulk Start menu) are no longer accessible
and display “CC/CV Controlled” when selected. This is to prevent charging confl icts that
could occur while in the CC/CV profi le.
CAUTION: Whenever the CC/CV battery type is selected, some settings—within the
menus that are no longer accessible—are internally linked to the CC/CV settings and
can be automatically changed. Because settings can be automatically changed once CC/
CV has been selected, if a different battery type is selected, then all charge settings
must be reviewed to ensure they are correct for the new battery type selection.