Pathfinder 500 PLEASE READ ME FIRST www.magnumbikes.
Contents 1. General Introduction 1.1 Welcome .................................................................................................................................................... 01 1.2 Use of Manual ............................................................................................................................................ 01 1.3 Service and Technical Support .................................................................................................................
General 1.General Introduction 1.1 Welcome Thank you for purchasing a Magnum electric bike, and welcome to the Magnum Bikes family of e-bike enthusiasts. We encourage you to join our Facebook group “Magnum Bikes Community”. Our Facebook group is a place for Magnum riders to ask questions, have discussions, share recommendations and experiences and connect with other Magnum Bike enthusiasts. You can find the group linked here: https:// www.facebook.com/groups/389290978573773 1.
General 1.General Introduction 1.4 E-Bike 20 10 8 7 11 12 21 13 1 22 9 2 18 3 4 5 23 24 19 25 17 16 15 6 26 14 1. Rear Light 8. Rear Disk Brake 15. Chain 22. Front Fender 2. Rear Fender 9. Water Bottle Mount 16. Pedal 23. Wheel Reflector 3. Motor 10. Saddle 17. Crankset 24. Front Fork 4. Freewheel 11. Seatpost 18. Controller 25. Dropout + Skewer 5. Rear Derailleur 12. Saddle Quick Release 19. Front Disc Brake 26. Tire 6. Chain Guard 13. Battery 20.
General 1.General Introduction 1.
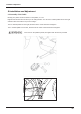
Installation & Adjustment 2.Installation and Adjustment 2.1 Handlebar and Stem Assembly 1. Loosen the screws on the faceplate of the stem. Remove the faceplate and set aside. 2. Center the handlebar and put the faceplate back in place. Tighten the 4 faceplate screws in a star pattern. Handlebar & Stem Adjustment To adjust the angle of your stem loosen the stem bolt (1).
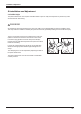
Installation & Adjustment 2.Installation and Adjustment 2.2 Assembly of the Pedals Identify your pedals: check the letters on the pedals, “L” or “R”. Right and left are the same as when you are riding the bike. The “R” and “L” marked pedals are for the right and lefts sides of the bike as if you were riding it. The “R” marked pedal is for the right, thread it into the crank clockwise and tighten. The “L” marked pedal is for the left., thread it into the crank counterclockwise and tighten.
Installation & Adjustment 2.Installation and Adjustment 2.3 Seat Position To enable comfortable, fatigue-free and safe riding, the saddle and handlebar height should be adjusted to the body size of the rider. The saddle height is correct if the leg is near full extension while the foot is resting flat on the pedal in the bottom position of the crank cycle. The toes must still be able to touch the ground comfortably.
Installation & Adjustment 2.Installation and Adjustment 2.4 Saddle Height The quick-release lever must require noticeable effort to put into fully closed position to prevent any undesired movement while riding. WARNING An improperly closed quick release lever can open again or have limited ability to keep the saddle in place. This may cause the saddle to suddenly drop into the seat tube, potentially leading to serious falls and injury.
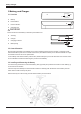
Battery & Charger 3.Battery and Charger 3.1 Overview A Battery B Power Button C Power Indicator D Charging Port A B C D WARNING Please ensure that the battery is locked in place before use A AC Plug¹ B Charger C Charging Indicator D Battery Plug D B C A 3.
Battery & Charger 3.4 Charging Charging at temperatures below 32°F (0°C) or above 140°F (60°C) can cause the battery to charge insufficiently and can be harmful to the life of the battery. During charging, the charger’s LED light will be continuously red. Charging is completed when the charger’s LED turns green. Do not leave your battery charging overnight. Please use the original charger or a certified replacement charger from Magnum Bikes.
Display 4. Display Appearance Powering ON/OFF Press and hold the power button (located above the top of the display screen) to turn on the display.
Display 4.
Display 4.Display Power On/Off Turn the battery ON, then press and hold the power button to turn the display ON. Press and hold the power button to turn the display OFF. Pedal Assist Level Press the increase arrow button to increase the level of pedal assist. Press the decrease arrow button to decrease the level of pedal assist. The level of pedal assist will show on the display as it is increased or decreased by the rider. The assist levels do not cycle.
Display 4.Display Display Settings Enter/Exit The Display Settings Menu Press the power button and increase arrow button at the time to enter the display settings menu. Press the power button and decrease arrow button at the same time to exit the display settings menu. Display Settings Menu Navigation Use the increase and decrease arrow buttons to move through the display settings menu. After the menu item is highlighted, press the power button to open the options.
Display Tire Size If tire size is not pre-set - select your wheel/tire size and press the power button to set your option. Speed Units Select km/h or mph and press the power button to set your option. Top Speed Setting Top speed is pre-set and can only be adjusted by entering the password. Consult a certified Magnum Bikes dealer or Magnum Bikes customer support if you need further assistance with your speed settings.
Display System Version This option cannot be changed but will display the hardware and software version of the display. Mode Setting This setting refers to the pedal assist sensor. If you have a cadence sensor this setting should be set to “speed”. If you have a torque sensor this setting should be set to “torque”. Magnum “Pathfinder” will come with a cadence sensor. The Magnum “Pathfinder T” will come with a torque sensor. The T stands for torque.
Recommendations & Maintenance 5. Recommendations and Maintenance 5.1 General Requirements E-bikes use metal shells to cover the electric components, we strongly advise against the use of excessive water to wash the shells and parts around them. Use a soft cloth with a neutral solution to wipe the dirt off the shells. Afterward, wipe everything dry with a clean soft cloth.
Recommendations & Maintenance Maintenance Schedule Each Ride Tire Pressure X Tire Condition X Visual Inspection X Brake Lever Pressure X Quick Releases X Handlebar Alignment X Saddle Alignment X Battery Pack Locked X Wheel Check X Weekly Inspect Frame Condition¹ X Clean & Lubricate Chain X Check Brake Pads X Monthly Lubricate Forks X Lubricate Brakes & Cables X Lubricate Folding Mechanism X Check all Bolts & Torque Settings X Clean Bicycle X Charge Battery X Check He
Recommendations & Maintenance 5.
Warranty 6. Warranty Your Magnum E-bike comes with a limited warranty. Please visit www.magnumbikes.com or your local Magnum dealer for details. Bike must be registered at www.magnumbikes.com/warranty in order to be covered by the one year warranty. Stay Connected @magnumbikes @magnumelectricbikes @magnumbikes @magnumbikes www.magnumbikes.com @magnumbikes info@magnumbikes.com 323.375.
ELECTRIC BIKES