
User`s manual


27
Magtrol Model DSP6001 Dynamometer Controller
Chapter 3 – Installation/Configuration
SETUP
3.2.7 eDDy-CUrrent or powDer Brake DynaMoMeter witH torqUe tranSDUCer SetUp
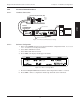
3.2.7.1 Hardware Connection
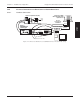
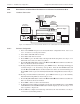
DYNAMOMETER / TSC1
AUX / TSC2
SUPPLY 2
SUPPLY 1
RS-232C
GPIB/IEEE–488
BRAKE
ACCESSORY
TORQUE–SPEED
OUTPUT
CTRL OUT
BRAKE FUSE
CAUTION: DOUBLE POLE FUSING
75VA 50/60Hz
EARTH
GROUND
FUSE (5×20mm):
120V UL/CSA 800mA 250V SB
240V IEC 315mA 250V T
(5×20mm):
UL/CSA 1.25A 250V SB
IEC 1A 250V T
MAGTROL, INC. BUFFALO, NY
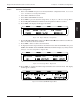
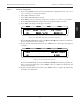
TM Torque
Transducer
GPIB
or
RS-232
PC
M-TEST
DSP6001 Dynamometer Controller
Excitation
Torque
TSC 401
Torque-Speed
Conditioner
DES Power Supply
Speed
Eddy-Current (WB)
OR Powder Brake (PB)
Dynamometer
Figure 3–22 Eddy-Current or Powder Brake Dynamometer with Torque Transducer Setup
3.2.7.2 Software Configuration
1. Turn on the DSP6001 and proceed to the dynamometer configuration menu. See Section
3.2.1 – Dynamometer Configuration Menu.
2. Select TSC1 until WB or PB is reached.
3. Select TSC2 until TM2XX is reached.
4. Press SHIFT to get to the TSC1 eddy-current/powder brake setup menu. See Figure 3–21
TSC1 Eddy-Current/Powder Brake Setup Menu.
5. Press TORQUE UNITS button and use UP and DOWN buttons and Decrease/Increase
dial to set desired scale factor for TSC1.
6.a. If using an Eddy Current Dynamometer, press SHIFT 2 times. The display should appear
as shown in Figure 3–19 Nominal Speed Setup Menu. Press the AUX SETUP button and
use UP and DOWN buttons and Decrease/Increase dial to set desired nominal speed.
Press SHIFT 2 times to get to the Torque Transducer Setup Menu as shown in Figure 3-
11.
6.b. If using a Powder Brake Dynamometer, press SHIFT 2 times to get to the Torque Transducer
Setup Menu as shown in Figure 3–11.
7. Press TORQUE UNITS button and use UP and DOWN buttons and Decrease/Increase
dial to set desired scale factor for TSC2.
8. Press SHIFT 3 times to return to the main menu.
9. To display the TSC2 torque transducer information in the main menu STATUS area, press
SHIFT, AUX SETUP and the POWER UNITS button until the display says ON. See Figure
3–12 Aux Setup Menu - Display On.
10. Press SHIFT to complete the initial setup and return to the new main menu. See Figure
3–13 TSCI with TM2XX Output Menu.